1. 引言
在上一篇文章中,我们构建了一个仪表盘,使用DataStax Astra(基于Apache Cassandra的无服务器数据库)存储和展示复仇者联盟的独立事件。该数据库通过Stargate提供额外API支持。
本文将采用不同方式处理相同数据:允许用户选择要显示的复仇者、时间范围,并在交互式地图上展示这些事件。与上篇文章不同,用户将能直观看到数据在地理和时间维度的关联性。
阅读本文需满足以下前提:
2. 服务配置
我们将通过CQL API(Cassandra查询语言)获取数据,这需要额外配置才能连接服务器。
2.1 下载安全连接包
**要通过CQL连接DataStax Astra托管的Cassandra数据库,需下载"安全连接包"**。这个zip文件包含SSL证书和数据库连接详情,确保安全连接。
获取步骤:
- 登录Astra控制台
- 选择目标数据库的"Connect"标签页
- 在"Connect using a driver"下选择"Java"选项

为方便演示,我们将文件放入src/main/resources目录。实际部署时需注意:
- 不同环境(开发/生产)应使用不同连接包
- 需建立配置管理机制动态切换文件
2.2 创建客户端凭据
连接数据库还需要客户端凭据。不同于前文使用的访问令牌,CQL API需要"用户名"和"密码"(实际是Client ID和Client Secret)。
创建步骤:
- 进入"Organizations"下的"Manage Tokens"
- 生成新的Client ID和Client Secret
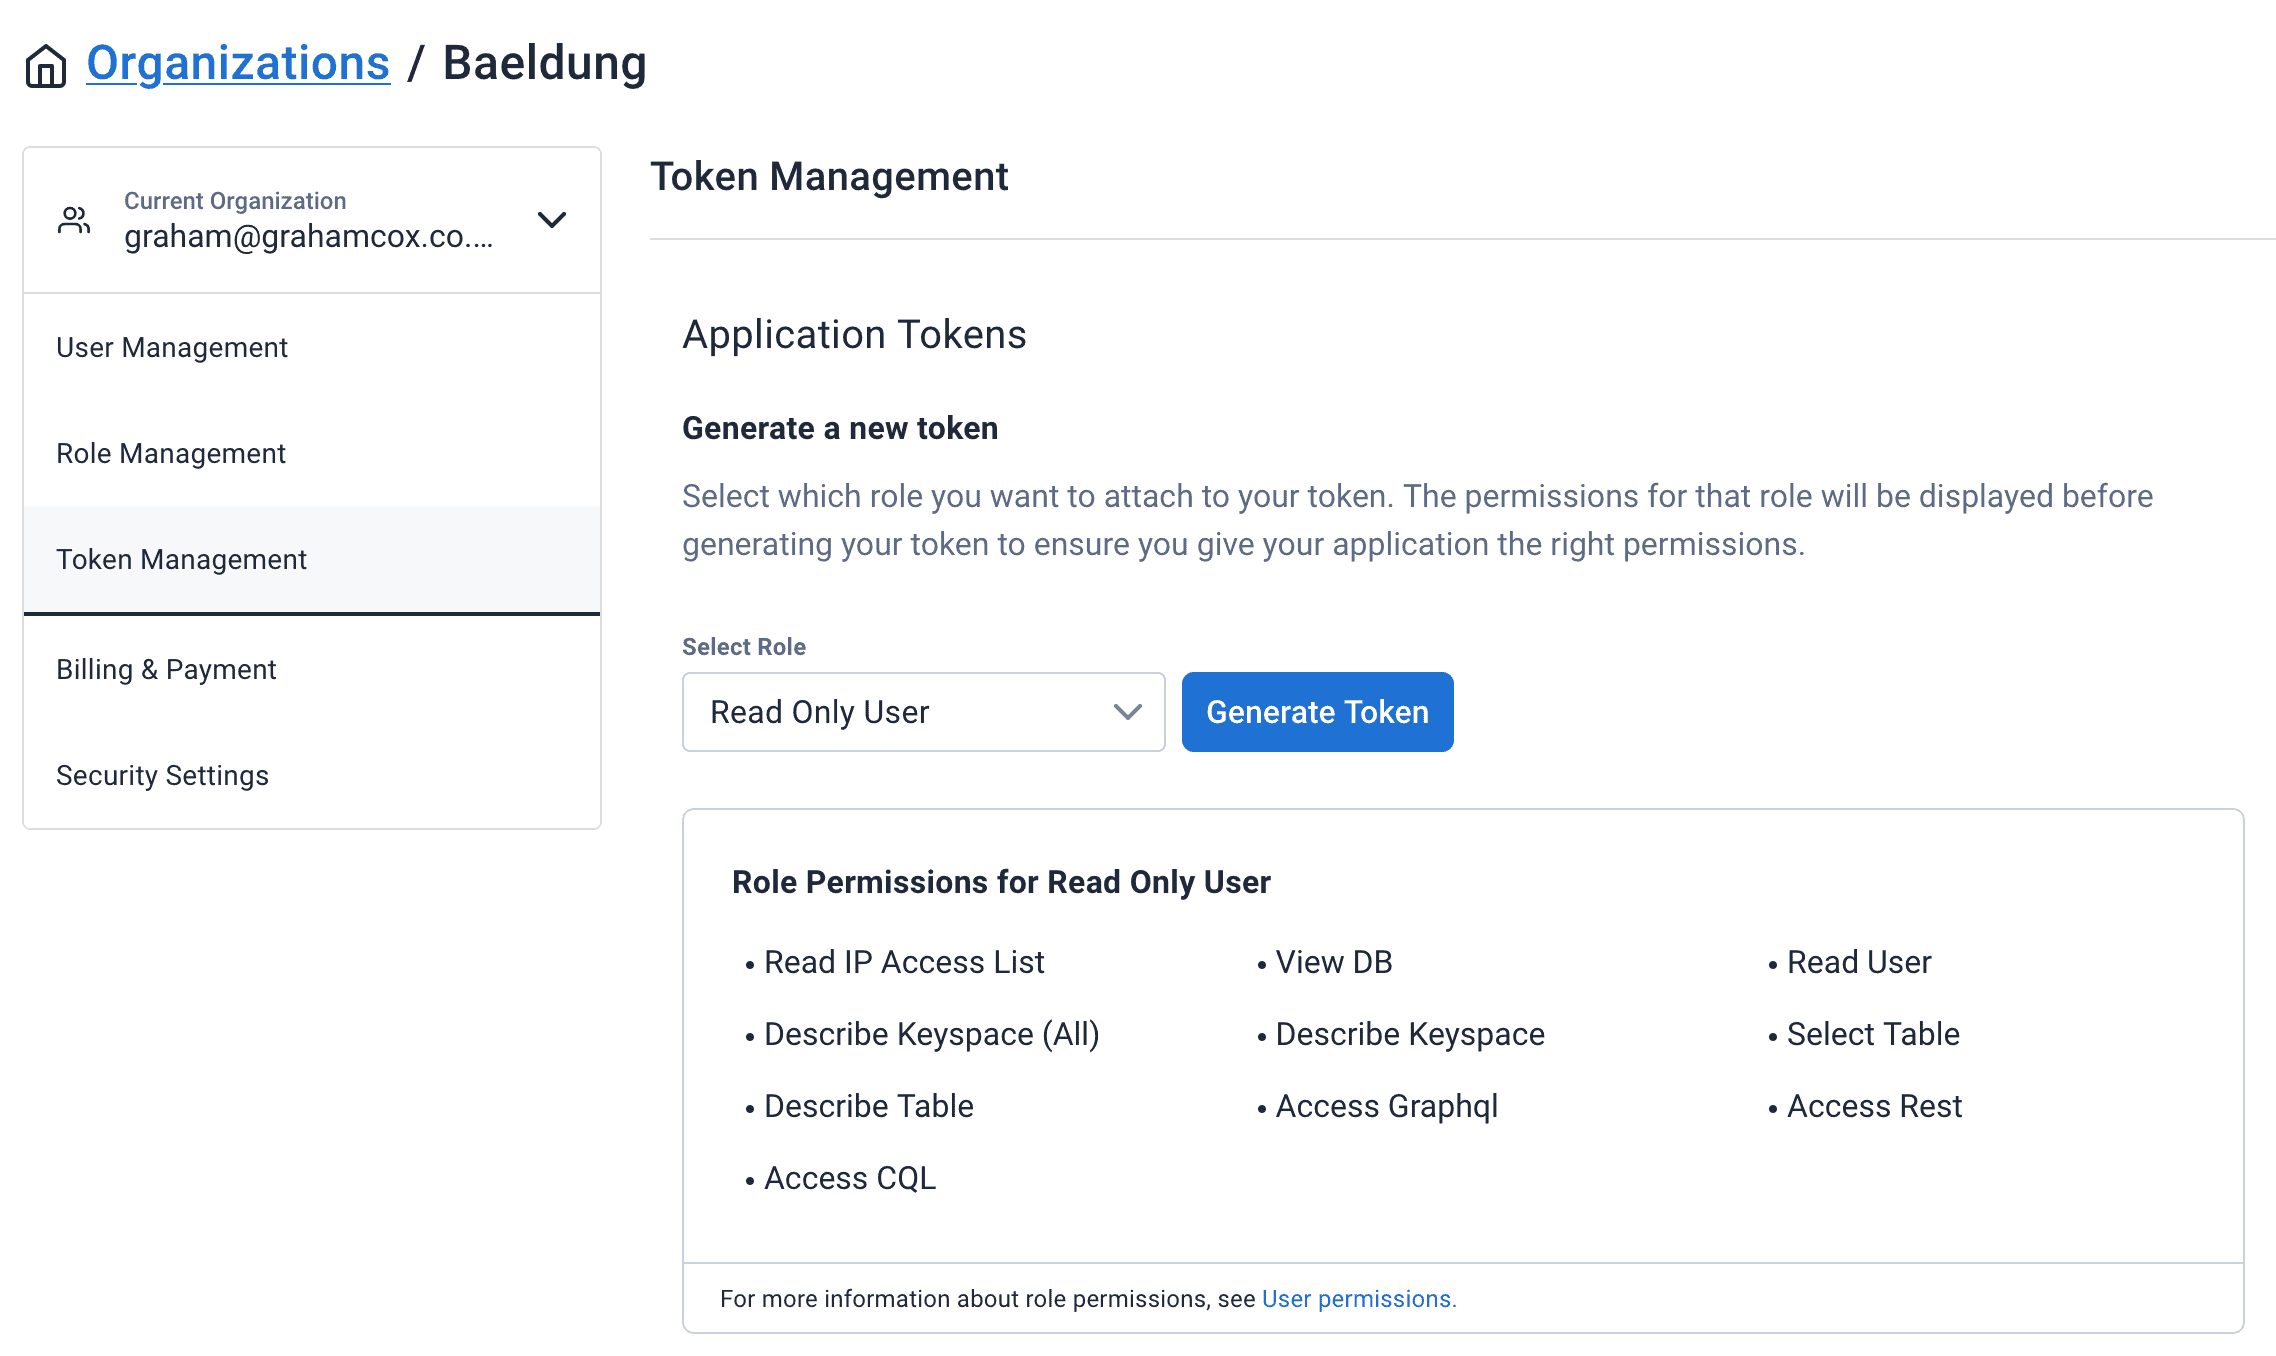
将生成的凭据添加到application.properties:
ASTRA_DB_CLIENT_ID=clientIdHere
ASTRA_DB_CLIENT_SECRET=clientSecretHere
2.3 Google Maps API密钥
渲染地图需要Google Maps支持,需申请Google API密钥。
操作流程:
- 登录Google Cloud Platform控制台
- 创建新项目
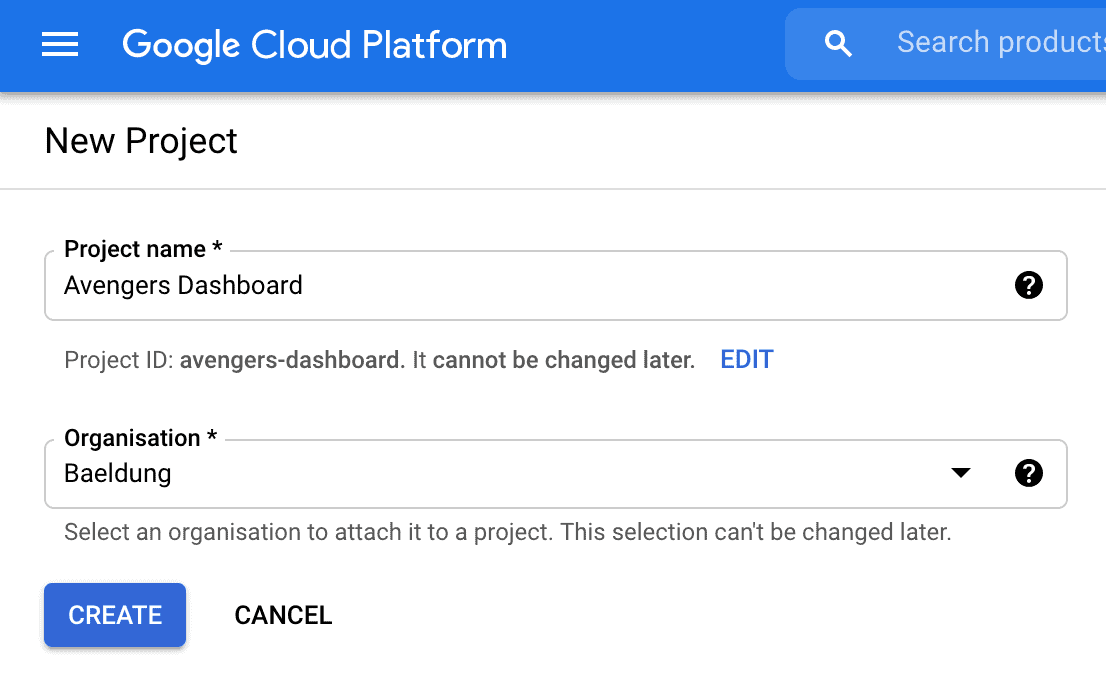
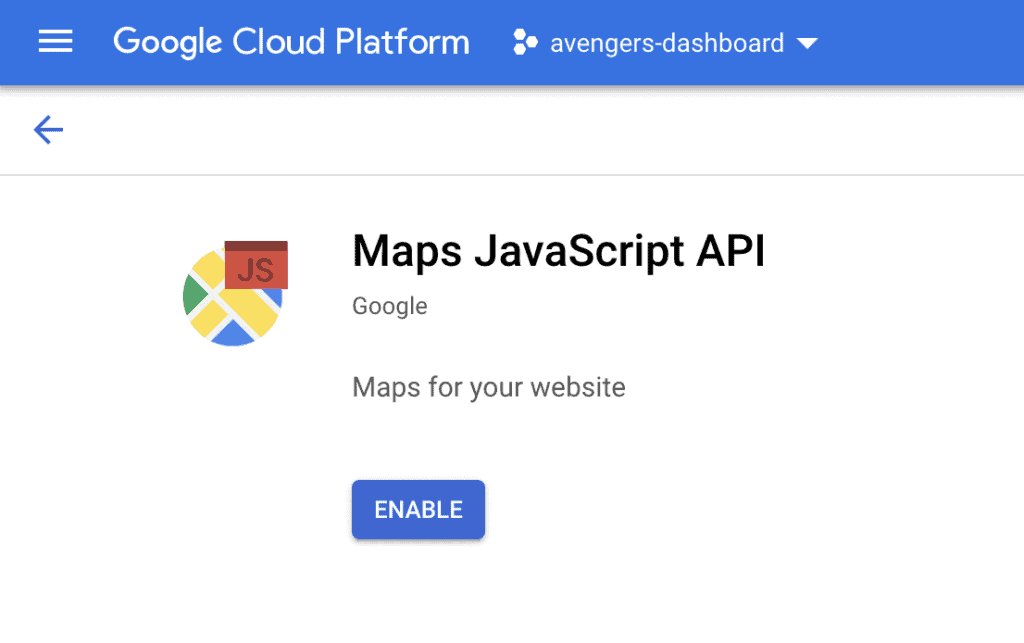
- 启用Google Maps JavaScript API:
- 搜索并选择"Maps JavaScript API"
- 点击"启用"
- 创建API密钥:
- 侧边栏进入"凭据"
- 点击"创建凭据" > "API密钥"
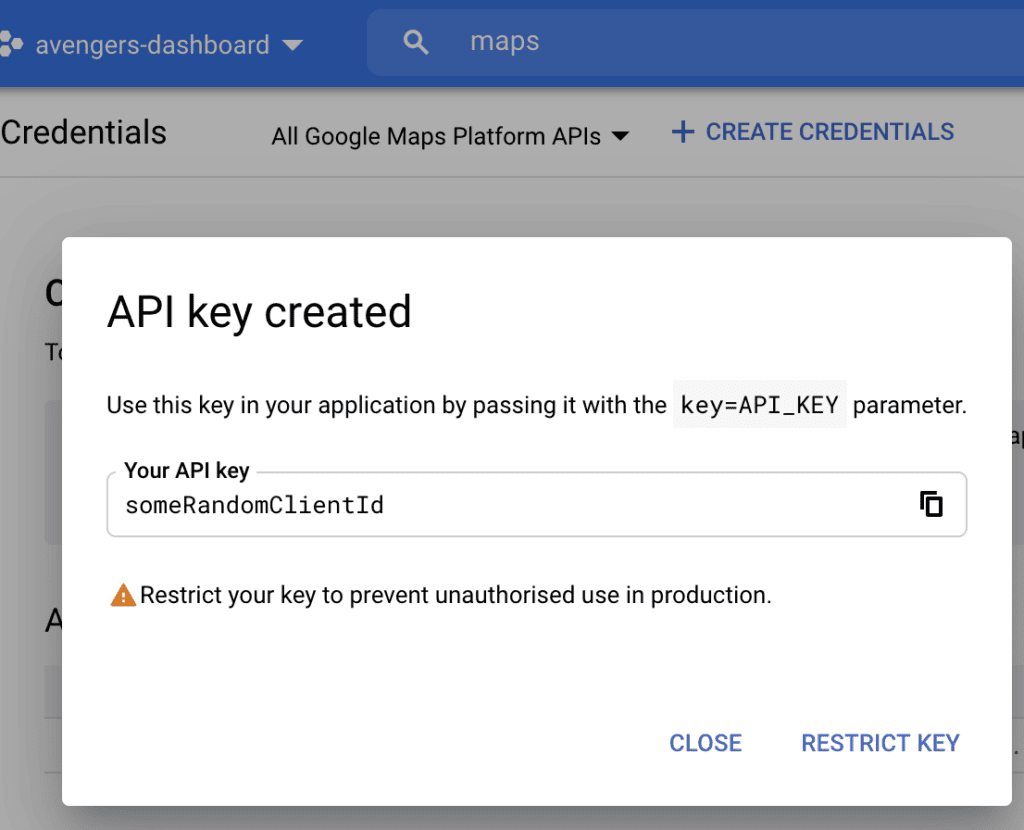
将密钥添加到application.properties:
GOOGLE_CLIENT_ID=someRandomClientId
3. 基于Astra和CQL构建客户端层
要通过CQL与数据库交互,需编写客户端层。创建CqlClient类封装DataStax CQL API,隐藏连接细节:
@Repository
public class CqlClient {
  @Value("${ASTRA_DB_CLIENT_ID}")
  private String clientId;

  @Value("${ASTRA_DB_CLIENT_SECRET}")
  private String clientSecret;

  public List<Row> query(String cql, Object... binds) {
    try (CqlSession session = connect()) {
      var statement = session.prepare(cql);
      var bound = statement.bind(binds);
      var rs = session.execute(bound);

      return rs.all();
    }
  }

  private CqlSession connect() {
    return CqlSession.builder()
      .withCloudSecureConnectBundle(CqlClient.class.getResourceAsStream("/secure-connect-baeldung-avengers.zip"))
      .withAuthCredentials(clientId, clientSecret)
      .build();
  }
}
核心功能:
- 提供单一公共方法连接数据库并执行CQL查询
- 支持绑定参数(bind values)
- 使用前文生成的安全连接包和客户端凭据
关键配置点:
- 安全连接包路径:
src/main/resources/secure-connect-baeldung-avengers.zip - 凭据属性名:
ASTRA_DB_CLIENT_ID和ASTRA_DB_CLIENT_SECRET
⚠️ 性能提示:当前实现将所有查询结果加载到内存返回。生产环境建议:
- 逐行处理结果集
- 或封装为
java.util.stream.Stream流式处理
4. 获取所需数据
有了CQL客户端后,需编写服务层获取展示数据。
首先定义数据库行映射的Java Record:
public record Location(String avenger,
  Instant timestamp,
  BigDecimal latitude,
  BigDecimal longitude,
  BigDecimal status) {}
然后创建服务层:
@Service
public class MapService {
  @Autowired
  private CqlClient cqlClient;

  // 待实现方法
}
4.1 生成复仇者列表
获取所有可展示的复仇者名单:
public List<String> listAvengers() {
  var rows = cqlClient.query("select distinct avenger from avengers.events");

  return rows.stream()
    .map(row -> row.getString("avenger"))
    .sorted()
    .collect(Collectors.toList());
}
实现要点:
- 查询
events表中avenger列的唯一值 - 因
avenger是分区键,查询效率极高 - CQL要求过滤分区键才能排序,故在Java代码中完成排序
- 考虑到返回数据量小,排序开销可接受
4.2 生成位置详情
获取地图展示的位置数据:
public Map<String, List<Location>> getPaths(List<String> avengers, Instant start, Instant end) {
  var rows = cqlClient.query("select avenger, timestamp, latitude, longitude, status from avengers.events where avenger in ? and timestamp >= ? and timestamp <= ?",
    avengers, start, end);

  var result = rows.stream()
    .map(row -> new Location(
      row.getString("avenger"),
      row.getInstant("timestamp"),
      row.getBigDecimal("latitude"),
      row.getBigDecimal("longitude"),
      row.getBigDecimal("status")))
    .collect(Collectors.groupingBy(Location::avenger));

  for (var locations : result.values()) {
    Collections.sort(locations, Comparator.comparing(Location::timestamp));
  }

  return result;
}
关键设计:
- CQL自动展开IN子句处理多个复仇者
- 同时过滤分区键和聚集键确保高效查询
- 将结果映射为
Location对象 - 按
avenger分组后按时间戳排序 - 返回结构:
Map<复仇者名称, 位置列表>
5. 展示地图
数据获取能力就绪后,需实现用户界面。首先编写控制器:
5.1 地图控制器
@Controller
public class MapController {
  @Autowired
  private MapService mapService;

  @Value("${GOOGLE_CLIENT_ID}")
  private String googleClientId;

  @ModelAttribute("googleClientId")
  String getGoogleClientId() {
    return googleClientId;
  }

  @GetMapping("/map")
  public ModelAndView showMap(@RequestParam(name = "avenger", required = false) List<String> avenger,
  @RequestParam(required = false) String start, @RequestParam(required = false) String end) throws Exception {
    var result = new ModelAndView("map");
    result.addObject("inputStart", start);
    result.addObject("inputEnd", end);
    result.addObject("inputAvengers", avenger);

    result.addObject("avengers", mapService.listAvengers());

    if (avenger != null && !avenger.isEmpty() && start != null && end != null) {
      var paths = mapService.getPaths(avenger,
        LocalDateTime.parse(start).toInstant(ZoneOffset.UTC),
        LocalDateTime.parse(end).toInstant(ZoneOffset.UTC));

      result.addObject("paths", paths);
    }

    return result;
  }
}
核心逻辑:
- 通过服务层获取复仇者列表
- 当用户提交查询参数时,获取位置数据
- 使用
@ModelAttribute向视图注入Google Client ID - 处理时间参数转换(LocalDateTime → Instant)
5.2 地图模板
使用Thymeleaf编写HTML模板:
<!doctype html>
<html lang="en">

<head>
  <meta charset="utf-8" />
  <meta name="viewport" content="width=device-width, initial-scale=1" />

  <link href="https://cdn.jsdelivr.net/npm/[email protected]/dist/css/bootstrap.min.css" rel="stylesheet"
    integrity="sha384-eOJMYsd53ii+scO/bJGFsiCZc+5NDVN2yr8+0RDqr0Ql0h+rP48ckxlpbzKgwra6" crossorigin="anonymous" />

  <title>复仇者联盟状态地图</title>
</head>

<body>
  <nav class="navbar navbar-expand-lg navbar-dark bg-dark">
    <div class="container-fluid">
      <a class="navbar-brand" href="#">复仇者联盟状态地图</a>
    </div>
  </nav>

  <div class="container-fluid mt-4">
    <div class="row">
      <div class="col-3">
        <form action="/map" method="get">
          <div class="mb-3">
            <label for="avenger" class="form-label">复仇者</label>
            <select class="form-select" multiple name="avenger" id="avenger" required>
              <option th:each="avenger: ${avengers}" th:text="${avenger}" th:value="${avenger}"
                th:selected="${inputAvengers != null && inputAvengers.contains(avenger)}"></option>
            </select>
          </div>
          <div class="mb-3">
            <label for="start" class="form-label">开始时间</label>
            <input type="datetime-local" class="form-control" name="start" id="start" th:value="${inputStart}"
              required />
          </div>
          <div class="mb-3">
            <label for="end" class="form-label">结束时间</label>
            <input type="datetime-local" class="form-control" name="end" id="end" th:value="${inputEnd}" required />
          </div>
          <button type="submit" class="btn btn-primary">查询</button>
        </form>
      </div>
      <div class="col-9">
        <div id="map" style="width: 100%; height: 40em;"></div>
      </div>
    </div>
  </div>

  <script src="https://cdn.jsdelivr.net/npm/[email protected]/dist/js/bootstrap.bundle.min.js"
    integrity="sha384-JEW9xMcG8R+pH31jmWH6WWP0WintQrMb4s7ZOdauHnUtxwoG2vI5DkLtS3qm9Ekf" crossorigin="anonymous">
    </script>
  <script type="text/javascript" th:inline="javascript">
    /*<![CDATA[*/
    let paths = /*[[${paths}]]*/ {};

    let map;
    let openInfoWindow;

    function initMap() {
      let averageLatitude = 0;
      let averageLongitude = 0;

      if (paths) {
        let numPaths = 0;

        for (const path of Object.values(paths)) {
          let last = path[path.length - 1];
          averageLatitude += last.latitude;
          averageLongitude += last.longitude;
          numPaths++;
        }

        averageLatitude /= numPaths;
        averageLongitude /= numPaths;
      } else {
        // 无数据时使用默认坐标
        paths = {};
        averageLatitude = 40.730610;
        averageLongitude = -73.935242;
      }


      map = new google.maps.Map(document.getElementById("map"), {
        center: { lat: averageLatitude, lng: averageLongitude },
        zoom: 16,
      });

      for (const avenger of Object.keys(paths)) {
        const path = paths[avenger];
        const color = getColor(avenger);

        // 绘制路径
        new google.maps.Polyline({
          path: path.map(point => ({ lat: point.latitude, lng: point.longitude })),
          geodesic: true,
          strokeColor: color,
          strokeOpacity: 1.0,
          strokeWeight: 2,
          map: map,
        });

        // 添加标记点
        path.forEach((point, index) => {
          const infowindow = new google.maps.InfoWindow({
            content: "<dl><dt>复仇者</dt><dd>" + avenger + "</dd><dt>时间戳</dt><dd>" + point.timestamp + "</dd><dt>状态</dt><dd>" + Math.round(point.status * 10000) / 100 + "%</dd></dl>"
          });

          const marker = new google.maps.Marker({
            position: { lat: point.latitude, lng: point.longitude },
            icon: {
              path: google.maps.SymbolPath.FORWARD_CLOSED_ARROW,
              strokeColor: color,
              scale: index == path.length - 1 ? 5 : 3
            },
            map: map,
          });

          marker.addListener("click", () => {
            if (openInfoWindow) {
              openInfoWindow.close();
              openInfoWindow = undefined;
            }

            openInfoWindow = infowindow;
            infowindow.open({
              anchor: marker,
              map: map,
              shouldFocus: false,
            });
          });

        });
      }
    }

    // 复仇者颜色映射
    function getColor(avenger) {
      return {
        wanda: '#ff2400',
        hulk: '#008000',
        hawkeye: '#9370db',
        falcon: '#000000'
      }[avenger];
    }

    /*]]>*/
  </script>

  <script
    th:src="${'https://maps.googleapis.com/maps/api/js?key=' + googleClientId + '&callback=initMap&libraries=&v=weekly'}"
    async></script>
</body>

</html>
模板核心功能:
- 左侧表单:选择复仇者、时间范围
- 右侧地图:展示路径和标记点
- Thymeleaf自动将Java对象转为JSON注入JavaScript
- 地图交互:
- 不同复仇者使用不同颜色路径
- 标记点显示详细信息(时间戳、状态值)
- 点击标记显示信息窗口
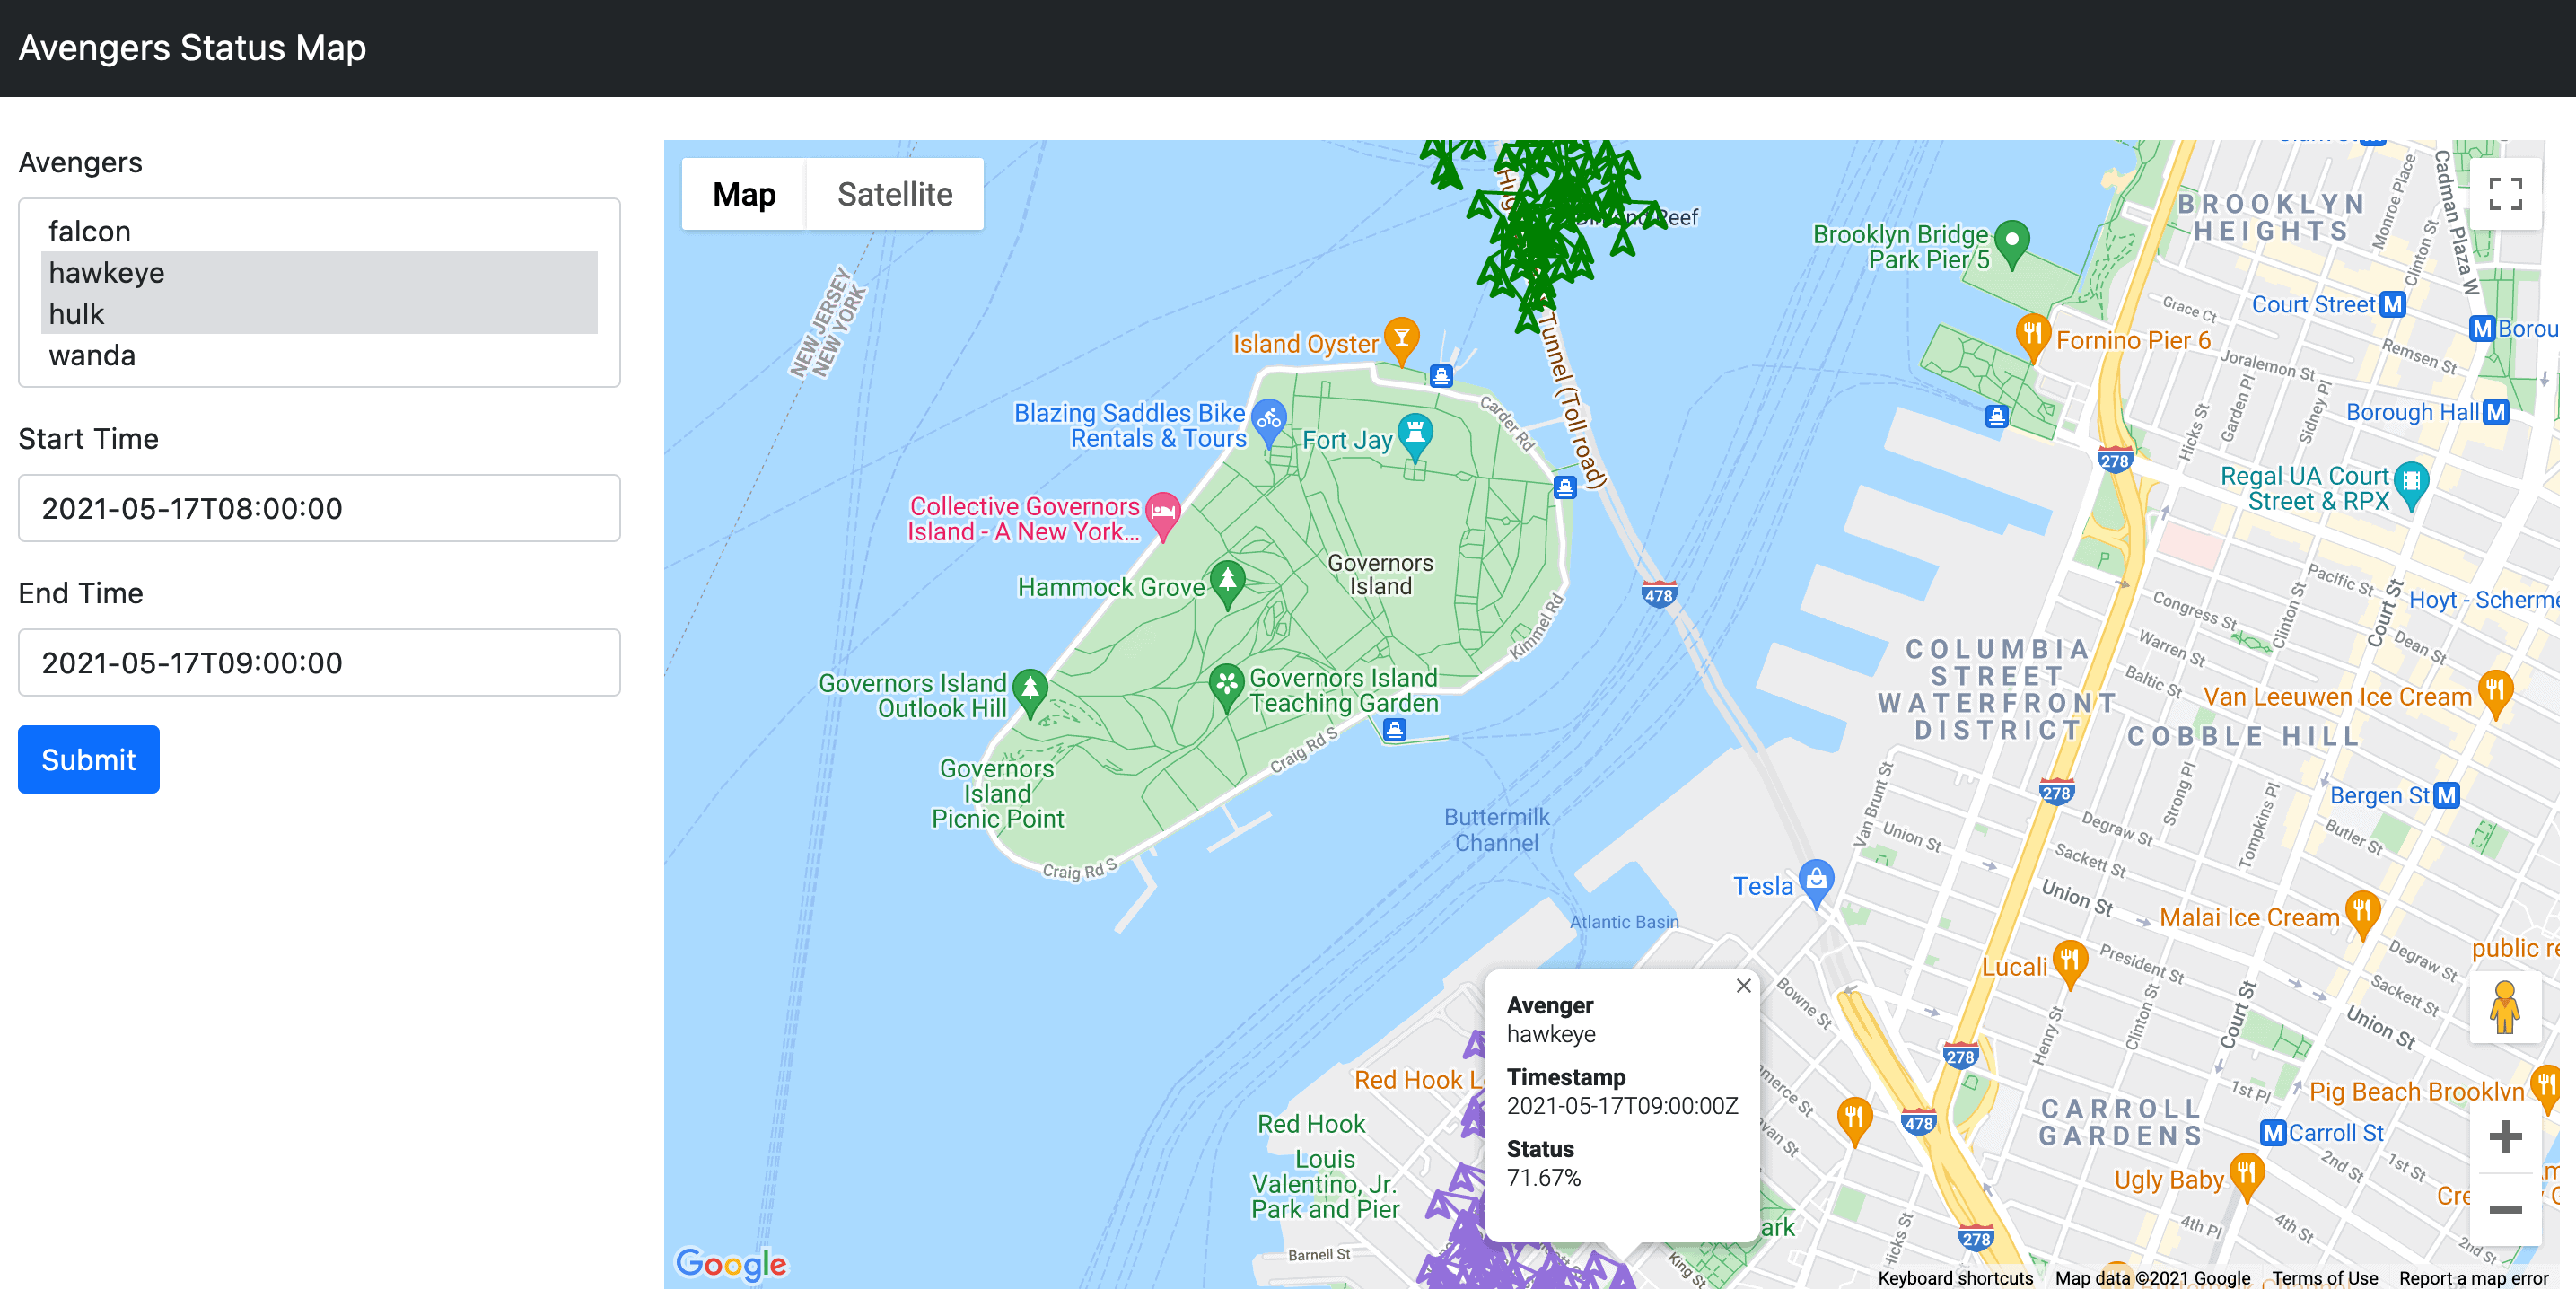
最终效果:用户可选择复仇者和时间范围,直观查看数据在地图上的分布:
6. 总结
本文展示了Cassandra数据的另一种可视化方式,演示了如何使用Astra CQL API获取数据并在Google Maps上呈现。关键点包括:
- 安全连接:通过安全连接包和客户端凭据建立CQL连接
- 高效查询:利用Cassandra分区键和聚集键优化查询性能
- 交互式可视化:结合前端技术实现动态地图展示
- 扩展性:架构支持添加更多数据维度和可视化形式
完整代码请参考GitHub仓库。