1. 概述
本文将探讨如何使用 Gatling 对任意 REST 接口进行性能测试,重点聚焦在负载测试上。首先快速介绍不同类型的性能测试及其关键性能指标(KPI),接着概述 Gatling 的核心术语,然后通过 Maven 插件搭建示例项目,使用 Gatling Java DSL 模拟场景执行负载测试,最后运行测试并分析生成的报告。
2. 性能测试类型
性能测试通过测量多种指标来理解系统在不同流量和吞吐量下的表现。主要类型包括:
✅ 负载测试:在一段时间内对系统施加大量并发虚拟用户负载
✅ 压力测试:逐步增加负载直至系统崩溃点
✅ 浸泡测试:长时间保持稳定流量以发现瓶颈
✅ 峰值测试:快速将请求量提升至压力水平后立即下降
✅ 扩展性测试:测试用户请求量伸缩时的系统表现
关键性能指标(KPI)包括:
- 事务响应时间
- 吞吐量(单位时间处理的事务数)
- 错误率(如超时)
压力测试还能帮助发现内存泄漏、性能下降、安全漏洞和数据损坏问题。本文将重点使用 Gatling 进行负载测试。
3. 核心术语
Gatling 框架的基础术语:
- Scenario(场景):虚拟用户执行的一系列步骤,模拟常见用户操作(如登录、购买)
- Feeders(数据源):从外部源(CSV/JSON)向虚拟用户操作注入数据的机制
- Simulation(模拟):定义在特定时间范围内运行场景的虚拟用户数量
- Session(会话):跟踪虚拟用户在场景中交互消息的上下文
- Recorder(录制器):Gatling UI 工具,用于生成场景和模拟脚本
4. 示例搭建
以员工管理微服务为例,包含需要负载测试的 POST 和 GET 接口。先添加 Gatling 依赖:
<dependency>
    <groupId>io.gatling</groupId>
    <artifactId>gatling-app</artifactId>
    <version>3.7.2</version>
</dependency>
<dependency>
    <groupId>io.gatling.highcharts</groupId>
    <artifactId>gatling-charts-highcharts</artifactId>
    <version>3.7.2</version>
</dependency>
再添加 Maven 插件:
<plugin>
    <groupId>io.gatling</groupId>
    <artifactId>gatling-maven-plugin</artifactId>
    <version>4.2.9</version>
    <configuration>
        <simulationClass>com.example.EmployeeRegistrationSimulation</simulationClass>
    </configuration>
</plugin>
⚠️ 注意:插件配置中显式指定了模拟类 EmployeeRegistrationSimulation,插件将基于该类运行测试。
定义待测试的 RestController:
@PostMapping(consumes = { MediaType.APPLICATION_JSON_VALUE })
public ResponseEntity<Void> addEmployee(@RequestBody EmployeeCreationRequest request, UriComponentsBuilder uriComponentsBuilder) {
    URI location = uriComponentsBuilder.path("/api/employees/{id}")
      .buildAndExpand("99")
      .toUri();
    return ResponseEntity.created(location)
      .build();
}
@GetMapping("/{id}")
public Employee getEmployeeWithId(@PathVariable("id") Long id) {
    List<Employee> allEmployees = createEmployees();
    return allEmployees.get(ThreadLocalRandom.current()
      .nextInt(0, allEmployees.size()));
}
接下来扩展 Simulation 类实现负载测试。
5. 模拟步骤
模拟类是启动负载测试的核心组件。我们扩展 Simulation 创建自定义模拟:
public class EmployeeRegistrationSimulation extends Simulation {

    private static final HttpProtocolBuilder HTTP_PROTOCOL_BUILDER = setupProtocolForSimulation();

    private static final Iterator<Map<String, Object>> FEED_DATA = setupTestFeedData();

    private static final ScenarioBuilder POST_SCENARIO_BUILDER = buildPostScenario();

    // ...
}
需定义的关键元素:
- HTTP 协议配置
- 请求头
- 数据源(Feeders)
- HTTP 请求
- 场景(Scenario)
- 负载注入模式
5.1. HTTP 协议配置
Gatling 支持多种协议(HTTP/HTTPS/WebSockets),这里配置 HTTP 协议:
private static HttpProtocolBuilder setupProtocolForSimulation() {
    return HttpDsl.http.baseUrl("http://localhost:8080")
      .acceptHeader("application/json")
      .maxConnectionsPerHost(10)
      .userAgentHeader("Gatling/Performance Test");
}
关键配置项:
baseUrl:基础 URLacceptHeader:接受的内容类型maxConnectionsPerHost:每主机最大连接数userAgentHeader:用户代理标识
5.2. 数据源定义
数据源(Feeders) 是从外部源向虚拟用户会话注入数据的 API。支持 CSV、JSON、文件、数组等多种类型。创建测试数据方法:
private static Iterator<Map<String, Object>> feedData() {
    Faker faker = new Faker();
    Iterator<Map<String, Object>> iterator;
    iterator = Stream.generate(() -> {
          Map<String, Object> stringObjectMap = new HashMap<>();
          stringObjectMap.put("empName", faker.name()
            .fullName());
          return stringObjectMap;
      })
      .iterator();
    return iterator;
}
数据源本质是 Iterator<Map<String, Object>>,通过 feed 方法轮询记录并注入场景。Gatling 内置策略:
queue():队列模式random():随机模式shuffle():洗牌模式circular():循环模式
数据加载机制可配置为 eager()(预加载)或 batch()(分批加载)。
5.3. 场景定义
场景(Scenario) 表示虚拟用户遵循的典型行为流程。创建员工创建场景:
private static ScenarioBuilder buildPostScenario() {
    return CoreDsl.scenario("Load Test Creating Employee")
      .feed(FEED_DATA)
      .exec(http("create-employee-request").post("/api/employees")
        .header("Content-Type", "application/json")
        .body(StringBody("{ \"empName\": \"${empName}\" }"))
        .check(status().is(201))
        .check(header("Location").saveAs("location")))
      .exec(http("get-employee-request").get(session -> session.getString("location"))
        .check(status().is(200)));
}
场景包含两个步骤:
- POST 请求:创建员工,检查状态码 201,保存
Location头到会话 - GET 请求:使用保存的
Location获取员工,检查状态码 200
5.4. 负载注入模型
Gatling 提供两种负载注入模型:
- 开放模型(Open):控制虚拟用户到达率,更接近真实系统
- 封闭模型(Closed):控制并发用户数
使用开放模型的 RampRateOpenInjection 逐步增加负载:
private RampRateOpenInjectionStep postEndpointInjectionProfile() {
    int totalDesiredUserCount = 200;
    double userRampUpPerInterval = 50;
    double rampUpIntervalSeconds = 30;
    int totalRampUptimeSeconds = 120;
    int steadyStateDurationSeconds = 300;

    return rampUsersPerSec(userRampUpPerInterval / (rampUpIntervalSeconds / 60)).to(totalDesiredUserCount)
      .during(Duration.ofSeconds(totalRampUptimeSeconds + steadyStateDurationSeconds));
}
配置说明:
- 初始 50 用户
- 每 30 秒增加 50 用户
- 最高 200 用户后持续 5 分钟
5.5. 模拟器设置
在构造函数中组合协议、场景和负载注入模型:
public EmployeeRegistrationSimulation() {
    setUp(BUILD_POST_SCENARIO.injectOpen(postEndpointInjectionProfile())
      .protocols(HTTP_PROTOCOL_BUILDER));
}
5.6. 断言
使用 Gatling DSL 验证测试结果:
setUp(BUILD_POST_SCENARIO.injectOpen(postEndpointInjectionProfile())
  .protocols(HTTP_PROTOCOL_BUILDER))
  .assertions(
    global().responseTime().max().lte(10000),
    global().successfulRequests().percent().gt(90d)
  );
断言要求:
- 最大响应时间 ≤ 10 秒
- 成功请求率 > 90%
6. 运行模拟与报告分析
通过 Maven 命令运行测试:
mvn gatling:test
控制台输出关键指标:
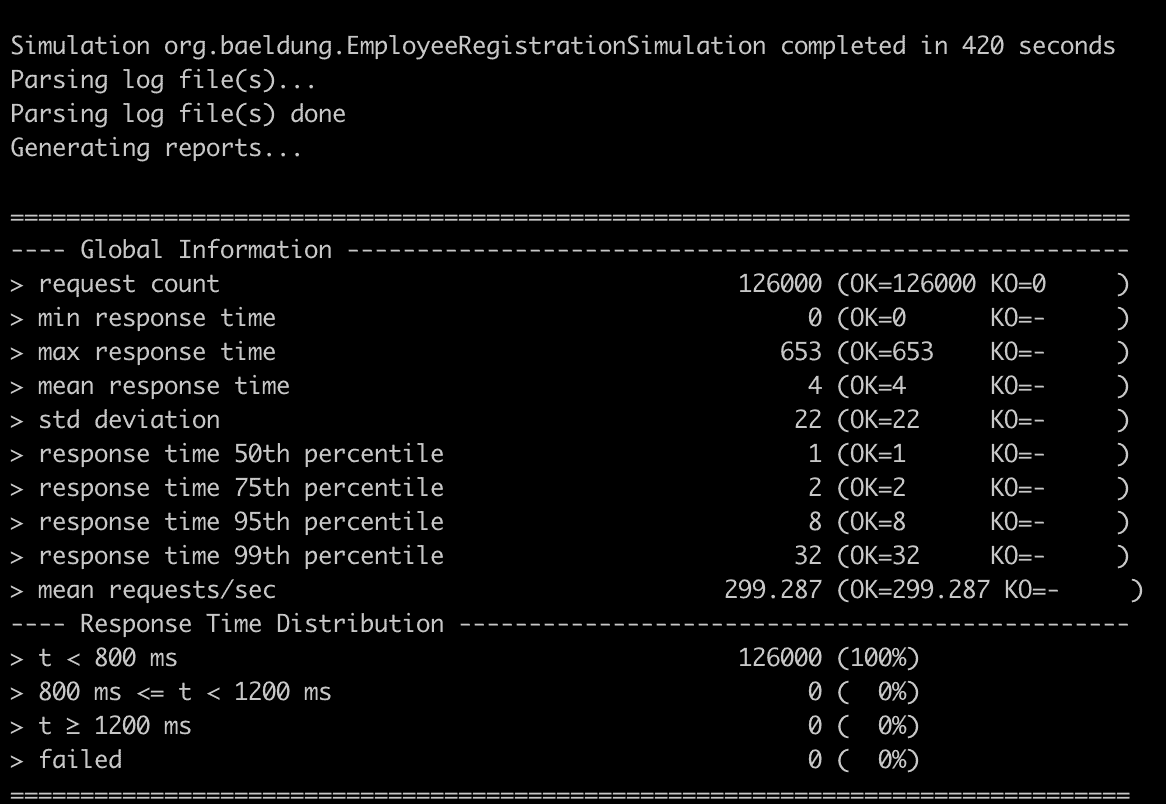
测试完成后,Gatling 在 target/gatling 目录生成 HTML 报告(index.html)。核心图表分析:
每秒请求数:
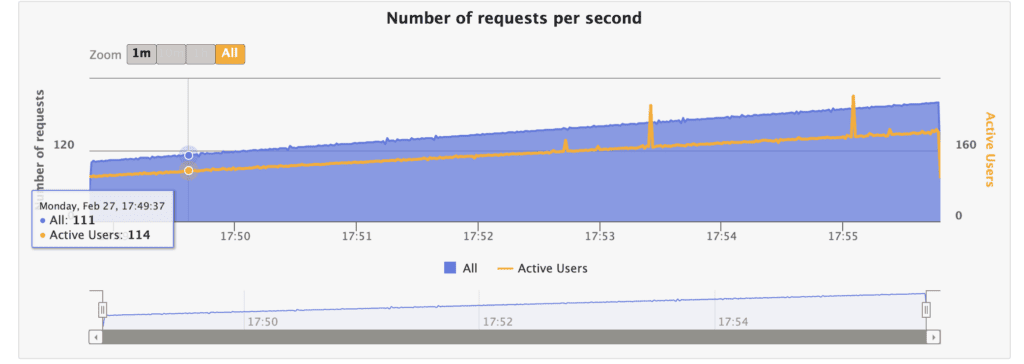 ✅ 帮助理解系统处理流量增长的能力,识别无性能降级的最大请求数
响应时间分布:
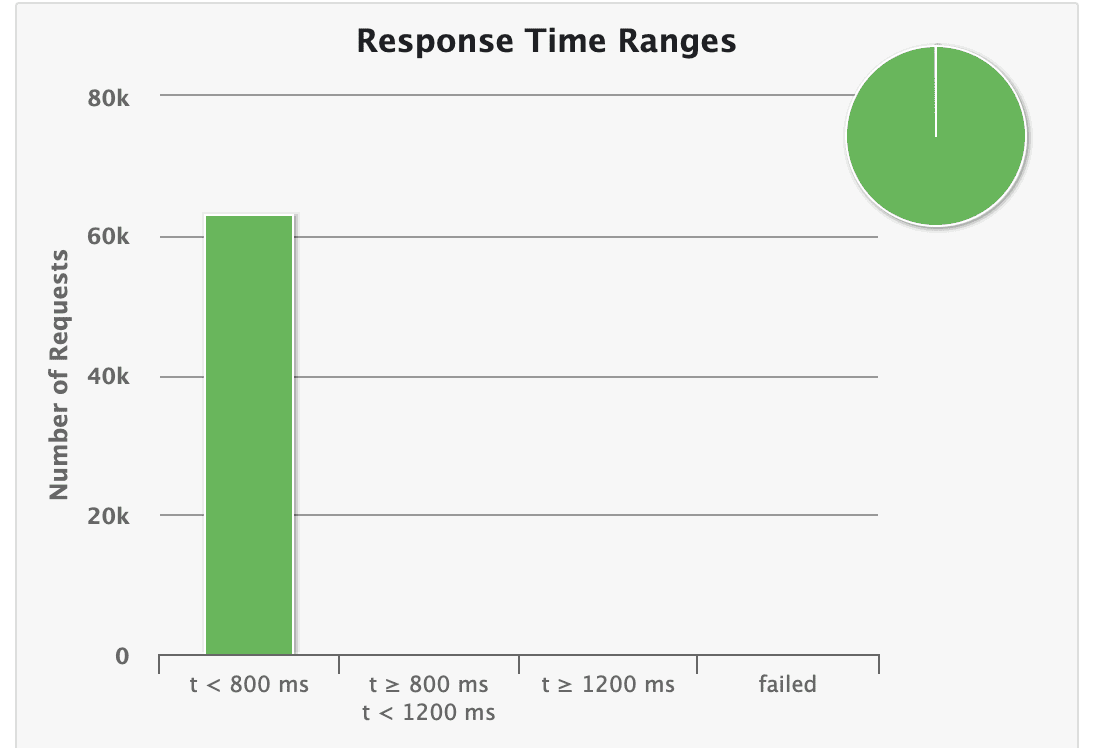 ✅ 显示不同时间区间的请求占比(本例全部 <800ms)
响应时间百分位:
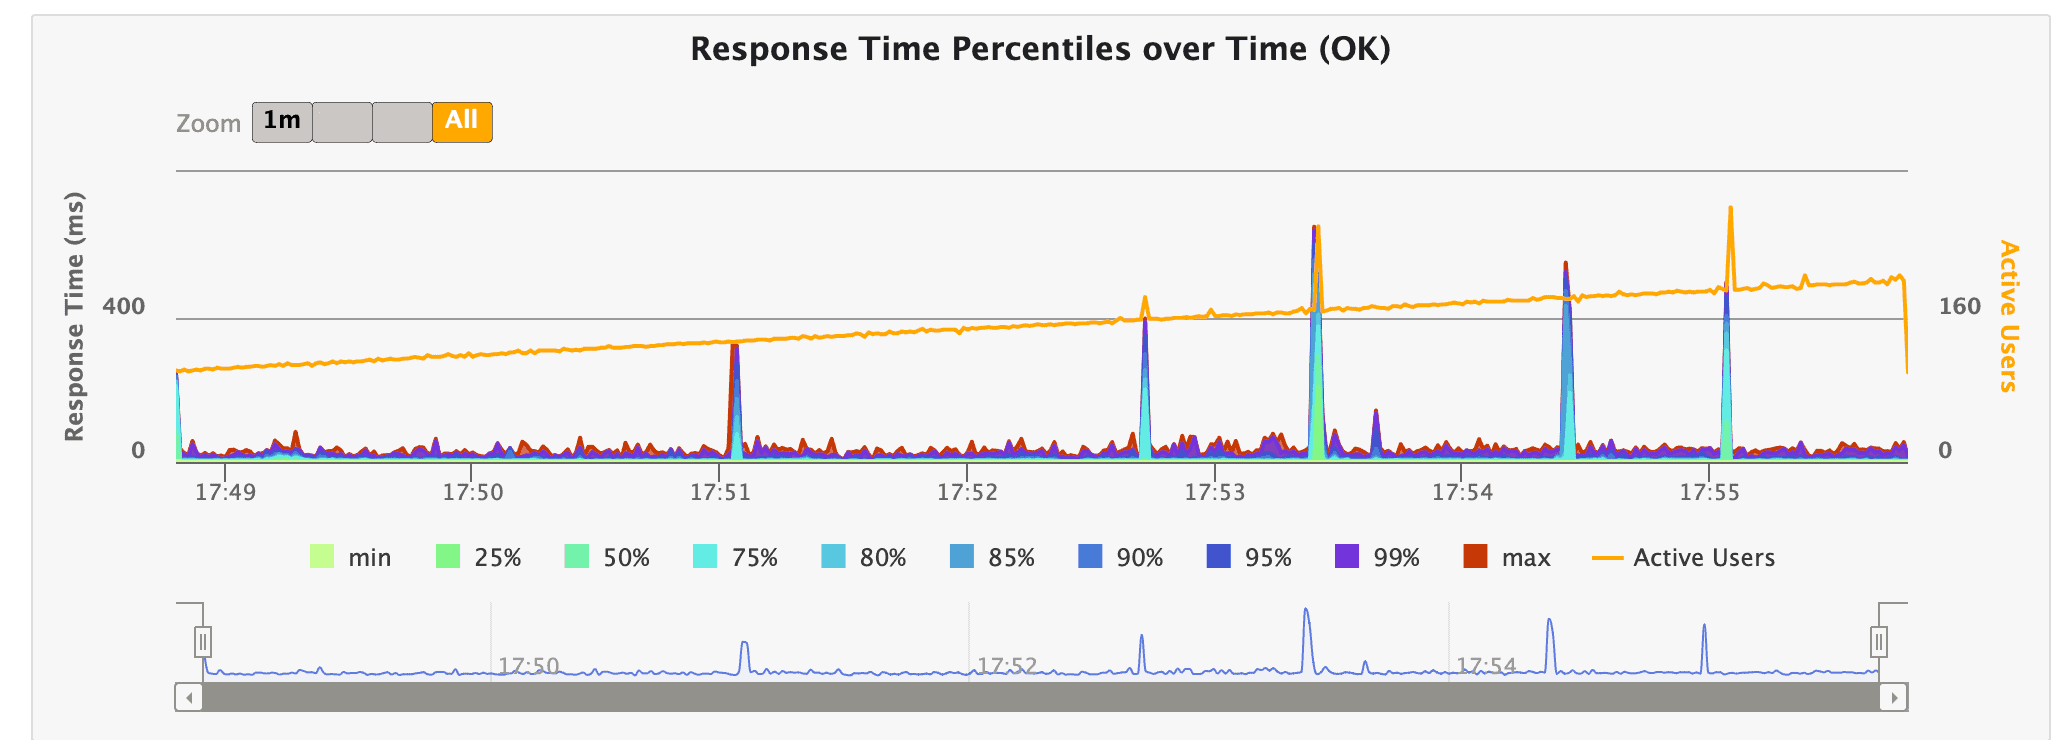 ✅ 提供详细统计信息(50/75/95/99 百分位响应时间)
7. 总结
本文展示了使用 Gatling Java DSL 对 REST 接口进行负载测试的完整流程:
- 概述性能测试类型与核心术语
- 搭建 Maven 项目并配置依赖
- 实现模拟关键步骤(协议/数据源/场景/负载模型)
- 运行测试并分析报告指标
通过合理配置负载注入模型和断言,可精准识别系统性能瓶颈。完整源码见 GitHub。