1. 概述
AWS 提供了大量服务,我们可以通过其官方 SDK 在 Java 中调用。但在早期版本中,该 SDK 并不支持响应式操作,异步能力也非常有限。
随着 AWS SDK for Java 2.0 的发布,这一切发生了改变。该版本基于 Reactive Streams 规范,✅ 现在我们可以使用完全非阻塞的 I/O 模式来操作 AWS 服务。
本文将通过一个 Spring Boot 实现的简单 blob 存储 REST 接口,后端使用 AWS S3,带你掌握这套响应式编程实践。
2. AWS S3 操作概览
我们的目标是构建一个典型的 blob 存储服务,支持前端应用上传、列出、下载和删除文件(如图片、音频、文档等),即标准的 CRUD 操作。
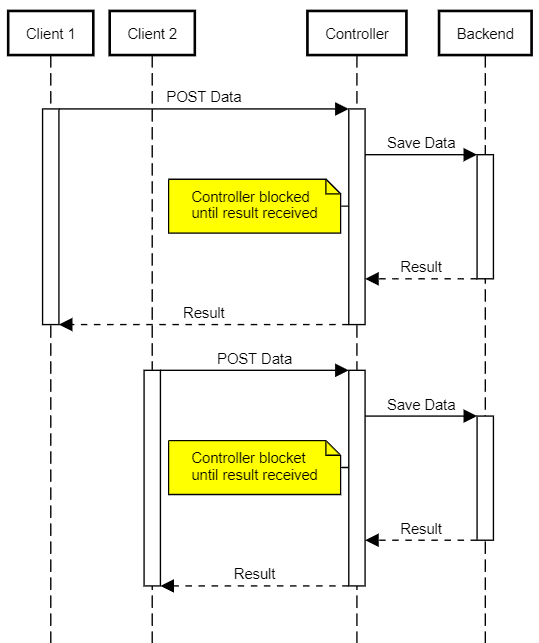
⚠️ 传统实现的一大痛点是:如何高效处理大文件或慢速网络连接。
在 Servlet 3.0 之前,JavaEE 只提供阻塞式 API,每个客户端连接都需要一个独立线程。这种模型资源消耗大,容易导致:
- 需要更多服务器资源(成本更高)
- 更容易受到 DoS 类攻击
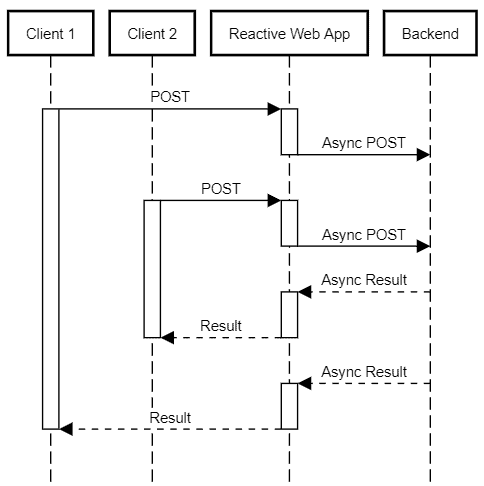
而使用响应式栈后,情况大为改观:
- 使用少量线程,通过 I/O 事件驱动(如数据可读、写完成)
- 同一线程可处理多个客户端的事件
- 极大减少上下文切换开销
- 资源利用率更高,同等并发下更轻量
3. 项目搭建
示例项目是一个标准的 Spring Boot WebFlux 应用,包含 Lombok、JUnit 等常用依赖。
核心是引入 AWS SDK for Java 2.x 的相关依赖:
<dependencyManagement>
    <dependencies>
        <dependency>
            <groupId>software.amazon.awssdk</groupId>
            <artifactId>bom</artifactId>
            <version>2.24.9</version>
            <type>pom</type>
            <scope>import</scope>
        </dependency>
    </dependencies>
</dependencyManagement>

<dependencies>
    <dependency>
        <groupId>software.amazon.awssdk</groupId>
        <artifactId>s3</artifactId>
        <scope>compile</scope>
    </dependency>

    <dependency>
        <artifactId>netty-nio-client</artifactId>
        <groupId>software.amazon.awssdk</groupId>
        <scope>compile</scope>
    </dependency>
</dependencies>
关键点:
- 使用 AWS 提供的 BOM(Bill of Materials)统一管理版本,✅ 避免手动指定每个组件版本
s3依赖包含 S3 客户端核心功能netty-nio-client是异步非阻塞通信的基础,必须引入
更多传输层配置详见 AWS 官方文档。
4. S3 客户端创建
S3 操作的入口是 S3AsyncClient 类,所有异步调用都从它发起。
我们通过 Spring 的 @Configuration 创建一个单例 Bean,便于注入使用:
@Configuration
@EnableConfigurationProperties(S3ClientConfigurarionProperties.class)
public class S3ClientConfiguration {
    @Bean
    public S3AsyncClient s3client(S3ClientConfigurarionProperties s3props,
      AwsCredentialsProvider credentialsProvider) {
        SdkAsyncHttpClient httpClient = NettyNioAsyncHttpClient.builder()
          .writeTimeout(Duration.ZERO)
          .maxConcurrency(64)
          .build();
        S3Configuration serviceConfiguration = S3Configuration.builder()
          .checksumValidationEnabled(false)
          .chunkedEncodingEnabled(true)
          .build();
        S3AsyncClientBuilder b = S3AsyncClient.builder().httpClient(httpClient)
          .region(s3props.getRegion())
          .credentialsProvider(credentialsProvider)
          .serviceConfiguration(serviceConfiguration);

        if (s3props.getEndpoint() != null) {
            b = b.endpointOverride(s3props.getEndpoint());
        }
        return b.build();
    }
}
配置说明
S3ClientConfigurarionProperties 包含以下关键配置项:
region:AWS 区域,如us-east-1accessKeyId/secretAccessKey:API 凭据endpoint:可选,用于覆盖默认 S3 接口地址(对接 MinIO、LocalStack 等兼容服务)bucket:文件存储的桶名称
客户端配置要点
- ❌ 禁用写超时(
writeTimeout(Duration.ZERO)):避免低带宽下上传中断 - ✅ 提高最大并发(
maxConcurrency(64)):提升吞吐 - ❌ 禁用校验和(
checksumValidationEnabled(false)):减少 CPU 开销 - ✅ 启用分块编码(
chunkedEncodingEnabled(true)):支持流式上传
凭据管理
使用自定义 AwsCredentialsProvider,支持从 Spring 环境中读取配置,✅ 便于对接 Vault、Config Server 等外部配置中心:
@Bean
public AwsCredentialsProvider awsCredentialsProvider(S3ClientConfigurarionProperties s3props) {
    if (StringUtils.isBlank(s3props.getAccessKeyId())) {
        return DefaultCredentialsProvider.create();
    } else {
        return () -> {
            return AwsBasicCredentials.create(
              s3props.getAccessKeyId(),
              s3props.getSecretAccessKey());
        };
    }
}
5. 上传服务设计
上传接口路径为 /inbox,支持两种方式:
- 普通上传:
POST,请求体为文件原始数据 - 多部分上传:
POST或PUT,multipart/form-data格式
我们创建 @RestController 处理两种请求:
@RestController
@RequestMapping("/inbox")
@Slf4j
public class UploadResource {
    private final S3AsyncClient s3client;
    private final S3ClientConfigurarionProperties s3config;

    public UploadResource(S3AsyncClient s3client, S3ClientConfigurarionProperties s3config) {
        this.s3client = s3client;
        this.s3config = s3config;
    }

    @PostMapping
    public Mono<ResponseEntity<UploadResult>> uploadHandler(
      @RequestHeader HttpHeaders headers,
      @RequestBody Flux<ByteBuffer> body) {
      // ... 单文件上传逻辑
    }

    @RequestMapping(
      consumes = MediaType.MULTIPART_FORM_DATA_VALUE,
      method = {RequestMethod.POST, RequestMethod.PUT})
    public Mono<ResponseEntity<UploadResult>> multipartUploadHandler(
      @RequestHeader HttpHeaders headers,
      @RequestBody Flux<Part> parts ) {
      // ... 多文件上传逻辑
    }
}
返回 UploadResult 对象,包含操作结果和生成的文件 key,供后续下载使用。
6. 单文件上传
客户端发送原始数据,我们通过 @RequestBody Flux<ByteBuffer> 接收流式数据。
核心逻辑简单粗暴:
- 生成唯一文件 key
- 构建
PutObjectRequest - 将
Flux<ByteBuffer>转为AsyncRequestBody传给 SDK
@PostMapping
public Mono<ResponseEntity<UploadResult>> uploadHandler(@RequestHeader HttpHeaders headers,
  @RequestBody Flux<ByteBuffer> body) {
    String fileKey = UUID.randomUUID().toString();
    MediaType mediaType = headers.getContentType();
    if (mediaType == null) {
        mediaType = MediaType.APPLICATION_OCTET_STREAM;
    }
    CompletableFuture future = s3client
      .putObject(PutObjectRequest.builder()
        .bucket(s3config.getBucket())
        .contentLength(headers.getContentLength()) // 必须!
        .key(fileKey)
        .contentType(mediaType.toString())
        .metadata(Collections.singletonMap("filename", "original.jpg"))
        .build(),
      AsyncRequestBody.fromPublisher(body));

    return Mono.fromFuture(future)
      .map((response) -> {
        return ResponseEntity
          .status(HttpStatus.CREATED)
          .body(new UploadResult(HttpStatus.CREATED, new String[] {fileKey}));
        });
}
踩坑提醒
- ⚠️
contentLength必须指定,否则 SDK 会抛异常 - ✅ 使用
AsyncRequestBody.fromPublisher(body)直接桥接 Reactor 与 AWS SDK - 异步结果通过
Mono.fromFuture()转为响应式流
7. 多文件上传
处理 multipart/form-data 上传,不能简单复用单文件逻辑,否则会:
- ❌ 需要缓存整个文件才能获取大小
- ❌ 消耗额外磁盘 I/O 和内存
✅ 正确做法:使用 AWS 多部分上传(Multipart Upload) 功能,支持:
- 分块上传(最小 5MB/块,最后一块除外)
- 并行上传
- 断点续传
7.1 外层处理流程
return parts
  .ofType(FilePart.class)           // 只处理文件部分
  .flatMap((part)-> saveFile(part)) // 并发上传每个文件
  .collect(Collectors.toList())     // 收集所有生成的 key
  .map((keys)-> new UploadResult(HttpStatus.CREATED, keys)));
7.2 单文件上传实现
由于 S3 要求每块 ≥5MB,需本地缓冲。我们用 UploadState 记录上传状态:
class UploadState {
    String bucket;
    String filekey;
    String uploadId;
    int partCounter;
    Map<Integer, CompletedPart> completedParts = new HashMap<>();
    int buffered = 0;
    UploadState(String bucket, String filekey) {
        this.bucket = bucket;
        this.filekey = filekey;
    }
}
完整上传流程:
Mono<String> saveFile(HttpHeaders headers, String bucket, FilePart part) {
    String filekey = UUID.randomUUID().toString();
    Map<String, String> metadata = Collections.singletonMap("filename", part.filename());
    MediaType mt = part.headers().getContentType();
    if (mt == null) mt = MediaType.APPLICATION_OCTET_STREAM;

    UploadState uploadState = new UploadState(bucket, filekey);

    CompletableFuture<CreateMultipartUploadResponse> uploadRequest = s3client
      .createMultipartUpload(CreateMultipartUploadRequest.builder()
        .contentType(mt.toString())
        .key(filekey)
        .metadata(metadata)
        .bucket(bucket)
        .build());

    return Mono
      .fromFuture(uploadRequest)
      .flatMapMany((response) -> {
          uploadState.uploadId = response.uploadId();
          return part.content(); // 转为 Flux<DataBuffer>
      })
      .bufferUntil((buffer) -> { // 缓冲至 5MB
          uploadState.buffered += buffer.readableByteCount();
          if (uploadState.buffered >= s3config.getMultipartMinPartSize()) {
              uploadState.buffered = 0;
              return true;
          }
          return false;
      })
      .map((buffers) -> concatBuffers(buffers)) // 合并为 ByteBuffer
      .flatMap((buffer) -> uploadPart(uploadState, buffer))
      .reduce(uploadState, (state, completedPart) -> {
          state.completedParts.put(completedPart.partNumber(), completedPart);
          return state;
      })
      .flatMap((state) -> completeUpload(state))
      .map((response) -> uploadState.filekey);
}
7.3 上传分块
private Mono<CompletedPart> uploadPart(UploadState uploadState, ByteBuffer buffer) {
    final int partNumber = ++uploadState.partCounter;
    CompletableFuture<UploadPartResponse> request = s3client.uploadPart(
        UploadPartRequest.builder()
            .bucket(uploadState.bucket)
            .key(uploadState.filekey)
            .partNumber(partNumber)
            .uploadId(uploadState.uploadId)
            .contentLength((long) buffer.capacity())
            .build(),
        AsyncRequestBody.fromPublisher(Mono.just(buffer)));

    return Mono.fromFuture(request)
      .map((result) -> CompletedPart.builder()
        .eTag(result.eTag())
        .partNumber(partNumber)
        .build());
}
7.4 完成上传
private Mono<CompleteMultipartUploadResponse> completeUpload(UploadState state) {
    CompletedMultipartUpload multipartUpload = CompletedMultipartUpload.builder()
        .parts(state.completedParts.values())
        .build();
    return Mono.fromFuture(s3client.completeMultipartUpload(
        CompleteMultipartUploadRequest.builder()
            .bucket(state.bucket)
            .uploadId(state.uploadId)
            .multipartUpload(multipartUpload)
            .key(state.filekey)
            .build()));
}
8. 文件下载
相比上传,下载简单得多。核心是 getObject() 方法,接收:
GetObjectRequest:指定桶和 keyAsyncResponseTransformer:将响应流转换为目标类型
⚠️ 注意:SDK 自带的 toPublisher() 实现会在内存中缓冲整个文件,不适合大文件。
但我们无需担心,自定义转换器非常简单。
8.1 下载接口
@GetMapping(path="/{filekey}")
Mono<ResponseEntity<Flux<ByteBuffer>>> downloadFile(@PathVariable("filekey") String filekey) {
    GetObjectRequest request = GetObjectRequest.builder()
      .bucket(s3config.getBucket())
      .key(filekey)
      .build();

    return Mono.fromFuture(s3client.getObject(request, AsyncResponseTransformer.toPublisher()))
      .map(response -> {
        String filename = getMetadataItem(response.response(), "filename", filekey);
        return ResponseEntity.ok()
          .header(HttpHeaders.CONTENT_TYPE, response.response().contentType())
          .header(HttpHeaders.CONTENT_LENGTH, Long.toString(response.response().contentLength()))
          .header(HttpHeaders.CONTENT_DISPOSITION, "attachment; filename=\"" + filename + "\"")
          .body(Flux.from(response));
      });
}
踩坑提醒
- ✅
AsyncResponseTransformer.toPublisher()返回Publisher<ByteBuffer>,可直接转为Flux - ⚠️ S3 元数据头 不区分大小写(RFC 7230),MinIO 等兼容服务可能返回不同大小写,需做归一化处理
9. 总结
本文展示了如何在 Spring WebFlux 中使用 AWS SDK for Java 2.x 的响应式特性,实现高效、低资源消耗的 S3 文件服务。
核心优势:
- ✅ 非阻塞 I/O,高并发下资源占用低
- ✅ 流式处理,支持大文件上传下载
- ✅ 无缝集成 Reactor 与 AWS SDK
该模式同样适用于 DynamoDB 等其他支持响应式的 AWS 服务。
完整代码见 GitHub 仓库。