1. 概述
Amazon S3 凭借其可扩展性、耐用性和丰富的功能集,已成为最广泛使用的云存储后端。许多其他存储后端都力求兼容 S3 API(与 Amazon S3 交互的编程接口),这充分证明了其行业地位。
然而,当迁移到不完全兼容的替代存储后端时,依赖 S3 API 的应用可能面临挑战。这会导致开发成本激增和供应商锁定问题。
这时 S3Proxy 就派上用场了。S3Proxy 是一个开源库,通过在 S3 API 和各种存储后端之间提供兼容层来解决上述挑战。它让我们能使用熟悉的 S3 API 无缝对接不同存储后端,无需大量修改代码。
本教程将探讨如何在 Spring Boot 应用中集成 S3Proxy,并配置其与 Azure Blob Storage 和 Google Cloud Storage 协同工作。我们还会介绍如何将文件系统设置为本地开发和测试的存储后端。
2. S3Proxy 工作原理
在深入实现前,我们先了解 S3Proxy 的工作机制。
S3Proxy 位于应用和存储后端之间,充当代理服务器。当应用使用 S3 API 发送请求时,它会拦截请求并将其转换为配置的存储后端对应的 API 调用。同样,存储后端的响应会被转换回 S3 格式再返回给应用。
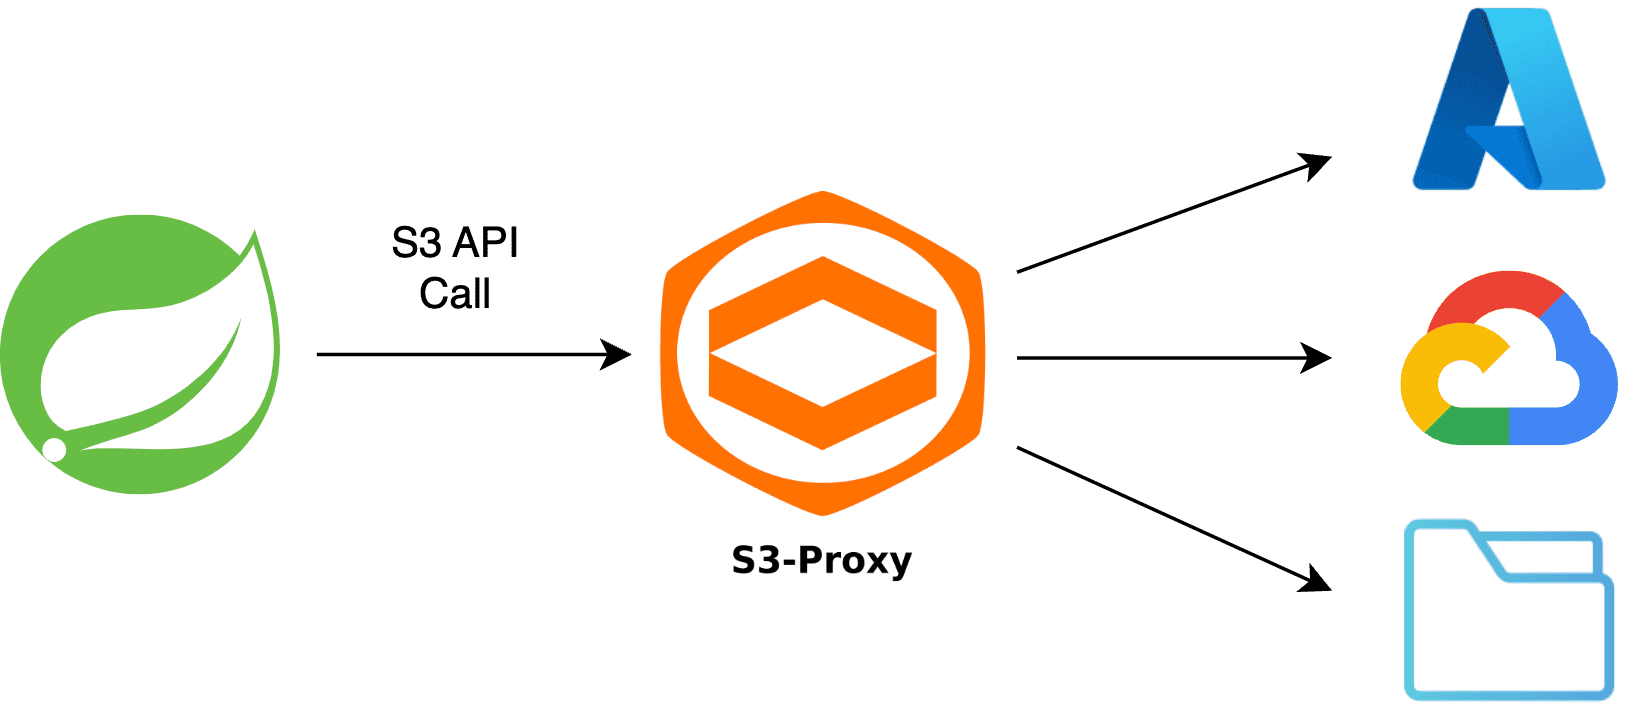
S3Proxy 通过嵌入式 Jetty 服务器运行,并使用Apache jclouds(多云工具包)处理转换过程来对接各种存储后端。
3. 项目搭建
使用 S3Proxy 访问多种存储后端前,需要添加必要的 SDK 依赖并正确配置应用。
3.1. 依赖管理
首先在项目的 pom.xml 中添加必要依赖:
<dependency>
    <groupId>org.gaul</groupId>
    <artifactId>s3proxy</artifactId>
    <version>2.3.0</version>
</dependency>
<dependency>
    <groupId>software.amazon.awssdk</groupId>
    <artifactId>s3</artifactId>
    <version>2.28.23</version>
</dependency>
S3Proxy 依赖 提供代理服务器及后续将配置的 Apache jclouds 组件。
Amazon S3 依赖 提供 S3Client 类,这是 S3 API 的 Java 封装器。
3.2. 定义云无关存储属性
现在定义一组可跨不同存储后端使用的云无关存储属性。
将这些属性存储在项目的 application.yaml 文件中,并使用@ConfigurationProperties 将值映射到 POJO,后续定义 jclouds 组件和 S3Client bean 时会引用该类:
@ConfigurationProperties(prefix = "com.baeldung.storage")
class StorageProperties {

    private String identity;

    private String credential;

    private String region;

    private String bucketName;

    private String proxyEndpoint;

    // 标准的 setter 和 getter

}
上述属性代表大多数存储后端所需的通用配置参数,如安全凭证、区域和存储桶名称。此外还声明了 proxyEndpoint 属性,用于指定嵌入式 S3Proxy 服务器的运行 URL。
以下 application.yaml 片段展示了自动映射到 StorageProperties 类的属性配置:
com:
  baeldung:
    storage:
      identity: ${STORAGE_BACKEND_IDENTITY}
      credential: ${STORAGE_BACKEND_CREDENTIAL}
      region: ${STORAGE_BACKEND_REGION}
      bucket-name: ${STORAGE_BACKEND_BUCKET_NAME}
      proxy-endpoint: ${S3PROXY_ENDPOINT}
使用 ${} 属性占位符从环境变量 加载属性值。
这种设置允许我们将后端存储属性外部化,并在应用中轻松访问它们。
3.3. 应用启动时初始化 S3Proxy
为确保嵌入式 S3Proxy 服务器在应用启动时运行,创建实现ApplicationRunner 接口的 S3ProxyInitializer 类:
@Component
class S3ProxyInitializer implements ApplicationRunner {

    private final S3Proxy s3Proxy;

    // 标准构造器

    @Override
    public void run(ApplicationArguments args) {
        s3Proxy.start();
    }

}
通过构造器注入 S3Proxy 实例,并在 run() 方法中使用它启动嵌入式代理服务器。
注意:我们尚未创建 S3Proxy 类的 bean,这将在下一节完成。
4. 访问 Azure Blob Storage
现在通过 S3Proxy 访问 Azure Blob Storage,创建 StorageConfiguration 类并注入之前创建的云无关 StorageProperties。所有必要的 bean 都将在这个新类中定义。
首先创建 BlobStore bean,它代表我们将交互的底层存储后端:
@Bean
public BlobStore azureBlobStore() {
    return ContextBuilder
      .newBuilder("azureblob")
      .credentials(storageProperties.getIdentity(), storageProperties.getCredential())
      .build(BlobStoreContext.class)
      .getBlobStore();
}
使用 Apache jclouds 的 ContextBuilder 创建配置为 azureblob 提供商的 BlobStoreContext 实例,然后从该上下文获取 BlobStore 实例。
同时从注入的 StorageProperties 实例传递安全凭证。*对于 Azure Blob Storage,存储账户名称作为 identity,对应的访问密钥作为 credential*。
配置好 BlobStore 后,定义 S3Proxy bean:
@Bean
public S3Proxy s3Proxy(BlobStore blobStore) {
    return S3Proxy
      .builder()
      .blobStore(blobStore)
      .endpoint(URI.create(storageProperties.getProxyEndpoint()))
      .build();
}
使用 Blobstore 实例和 application.yaml 中配置的 proxyEndpoint 创建 S3Proxy bean。该 bean 负责将 S3 API 调用转换为底层存储后端调用。
最后创建 S3Client bean:
@Bean
public S3Client s3Client() {
    S3Configuration s3Configuration = S3Configuration
      .builder()
      .checksumValidationEnabled(false)
      .build();
    AwsCredentials credentials = AwsBasicCredentials.create(
        storageProperties.getIdentity(),
        storageProperties.getCredential()
    );
    return S3Client
      .builder()
      .region(Region.of(storageProperties.getRegion()))
      .endpointOverride(URI.create(storageProperties.getProxyEndpoint()))
      .credentialsProvider(StaticCredentialsProvider.create(credentials))
      .serviceConfiguration(s3Configuration)
      .build();
}
⚠️ 注意:我们在 S3Configuration 中禁用了校验和验证。这是必需的,因为 Azure 返回非 MD5 格式的 ETag,使用默认配置会导致错误。
为简单起见,本教程中其他后端存储也使用相同的 S3Client bean。如果不使用 Azure Blob Storage,可以移除此配置。
配置好这些 bean 后,应用现在可以通过熟悉的 S3 API 与 Azure Blob Storage 交互。
5. 访问 GCP Cloud Storage
访问 Google Cloud Storage 时,只需修改 BlobStore bean。
首先为 Google Cloud Storage 创建新的 BlobStore bean。使用Spring profiles 根据激活的 profile 条件性创建 Azure 或 GCP BlobStore bean:
@Bean
@Profile("azure")
public BlobStore azureBlobStore() {
    // ... 同上
}

@Bean
@Profile("gcp")
public BlobStore gcpBlobStore() {
    return ContextBuilder
      .newBuilder("google-cloud-storage")
      .credentials(storageProperties.getIdentity(), storageProperties.getCredential())
      .build(BlobStoreContext.class)
      .getBlobStore();
}
当激活 gcp profile 时,使用 google-cloud-storage 提供商创建 BlobStore 实例。
对于 Google Cloud Storage,identity* 是服务账户的邮箱地址(如 dev-account@project-id.iam.gserviceaccount.com),*credential 是对应的 RSA 私钥**。
通过此配置更改,应用现在可以通过 S3 API 与 Google Cloud Storage 交互。
6. 使用文件系统进行本地开发和测试
6.1. 配置本地环境
首先在 StorageProperties 类中添加新属性,指定本地文件系统存储的基础目录:
private String localFileBaseDirectory;

// 标准的 setter 和 getter
创建新的 LocalStorageConfiguration 类。使用 @Profile 为 local 和 test profile 激活该类。在此类中更新 bean 以适配本地文件系统:
@Configuration
@Profile("local | test")
@EnableConfigurationProperties(StorageProperties.class)
public class LocalStorageConfiguration {

    private final StorageProperties storageProperties;

    // 标准构造器

    @Bean
    public BlobStore blobStore() {
        Properties properties = new Properties();
        String fileSystemDir = storageProperties.getLocalFileBaseDirectory();
        properties.setProperty("jclouds.filesystem.basedir", fileSystemDir);
        return ContextBuilder
          .newBuilder("filesystem")
          .overrides(properties)
          .build(BlobStoreContext.class)
          .getBlobStore();
    }

    @Bean
    public S3Proxy s3Proxy(BlobStore blobStore) {
        return S3Proxy
          .builder()
          .awsAuthentication(AuthenticationType.NONE, null, null)
          .blobStore(blobStore)
          .endpoint(URI.create(storageProperties.getProxyEndpoint()))
          .build();
    }

}
使用 filesystem 提供商创建 BlobStore bean 并配置基础目录。
然后为文件系统 BlobStore 创建 S3Proxy bean。注意将认证类型设为 NONE,因为本地文件系统存储不需要任何认证。
最后创建不需要任何凭证的简化版 S3Client bean:
@Bean
public S3Client s3Client() {
    return S3Client
      .builder()
      .region(Region.US_EAST_1)
      .endpointOverride(URI.create(storageProperties.getProxyEndpoint()))
      .build();
}
上述代码硬编码了 US_EAST_1 区域,但在此配置中区域选择实际无关紧要。
通过此设置,应用现在配置为使用本地文件系统作为存储后端。这无需连接真实的云存储服务,降低了成本并加速了开发和测试周期。
6.2. 测试与 S3Client 的交互
现在编写测试验证 S3Client 确实能与本地文件系统存储交互。
首先在 application-local.yaml 中定义必要属性:
com:
  baeldung:
    storage:
      proxy-endpoint: http://127.0.0.1:8080
      bucket-name: baeldungbucket
      local-file-base-directory: tmp-store
设置测试类:
@SpringBootTest
@TestInstance(Lifecycle.PER_CLASS)
@ActiveProfiles({ "local", "test" })
@EnableConfigurationProperties(StorageProperties.class)
class LocalFileSystemStorageIntegrationTest {

    @Autowired
    private S3Client s3Client;

    @Autowired
    private StorageProperties storageProperties;

    @BeforeAll
    void setup() {
        File directory = new File(storageProperties.getLocalFileBaseDirectory());
        directory.mkdir();

        String bucketName = storageProperties.getBucketName();
        try {
            s3Client.createBucket(request -> request.bucket(bucketName));
        } catch (BucketAlreadyOwnedByYouException exception) {
            // 忽略异常
        }
    }

    @AfterAll
    void teardown() {
        File directory = new File(storageProperties.getLocalFileBaseDirectory());
        FileUtils.forceDelete(directory);
    }

}
在 @BeforeAll 注解的 setup() 方法中,创建基础目录和存储桶(如果不存在)。在 @AfterAll 注解的 teardown() 方法中删除基础目录以清理测试环境。
最后编写测试验证能否使用 S3Client 上传文件:
@Test
void whenFileUploaded_thenFileSavedInFileSystem() {
    // 准备要上传的测试文件
    String key = RandomString.make(10) + ".txt";
    String fileContent = RandomString.make(50);
    MultipartFile fileToUpload = createTextFile(key, fileContent);

    // 将文件保存到文件系统
    s3Client.putObject(request ->
        request
          .bucket(storageProperties.getBucketName())
          .key(key)
          .contentType(fileToUpload.getContentType()),
        RequestBody.fromBytes(fileToUpload.getBytes()));

    // 通过检查文件系统中是否存在来验证保存成功
    List<S3Object> savedObjects = s3Client.listObjects(request ->
        request.bucket(storageProperties.getBucketName())
    ).contents();
    assertThat(savedObjects)
      .anyMatch(savedObject -> savedObject.key().equals(key));
}

private MultipartFile createTextFile(String fileName, String content) {
    byte[] fileContentBytes = content.getBytes();
    InputStream inputStream = new ByteArrayInputStream(fileContentBytes);
    return new MockMultipartFile(fileName, fileName, "text/plain", inputStream);
}
在测试方法中,首先准备随机名称和内容的 MultipartFile。然后使用 S3Client 将文件上传到测试存储桶。
最后通过列出存储桶中所有对象并断言存在随机 key 的文件来验证保存成功。
7. 总结
本文探讨了在 Spring Boot 应用中集成 S3Proxy 的方法。
我们介绍了必要的配置步骤,并设置了可跨不同存储后端使用的云无关存储属性。
然后展示了如何通过 Amazon S3 API 访问 Azure Blob Storage 和 GCP Cloud Storage。
最后建立了使用文件系统的本地开发和测试环境。
✅ 所有代码示例均可在 GitHub 获取。