1. 概述
本文将带你掌握如何在 Java Web 应用中使用 Liquibase 安全地演进数据库 schema。我们会先从通用 Java 项目入手,再深入 Spring 与 Hibernate 集成的高级用法。
Liquibase 的核心思想是通过一系列 changelog 文件来描述数据库 schema 的演进过程。这些 changelog 支持多种格式:SQL、XML、JSON、YAML。本文聚焦于 XML 格式,因为它在企业项目中更为常见且结构清晰。
项目中可以有多个 changelog 文件,按时间或功能拆分变更。所有变更最终通过一个名为 master.xml 的根文件统一管理。Liquibase 会读取这个主文件,并按顺序执行其中引用的变更集(changeSet)。
✅ 推荐使用 include 或 includeAll 来组织多个 changelog 文件,避免单个文件臃肿。
首先,在 pom.xml 中引入最新版依赖:
<dependency>
    <groupId>org.liquibase</groupId>
    <artifactId>liquibase-core</artifactId>
    <version>4.27.0</version>
</dependency>
2. 数据库变更日志(Change Log)
来看一个简单的 XML changelog 示例。文件名为 20170503041524_added_entity_Car.xml,作用是创建一张 car 表:
<databaseChangeLog xmlns="http://www.liquibase.org/xml/ns/dbchangelog" xmlns:xsi="http://www.w3.org/2001/XMLSchema-instance"
    xsi:schemaLocation="http://www.liquibase.org/xml/ns/dbchangelog http://www.liquibase.org/xml/ns/dbchangelog/dbchangelog-latest.xsd">
   <!--Added the entity Car-->
   <changeSet id="20170503041524-1" author="zhangsan">
      <createTable tableName="car">
         <column name="id" type="bigint" autoIncrement="${autoIncrement}">
            <constraints primaryKey="true" nullable="false" />
         </column>
         <column name="make" type="varchar(255)">
            <constraints nullable="true" />
         </column>
         <column name="brand" type="varchar(255)">
            <constraints nullable="true" />
         </column>
         <column name="price" type="double">
            <constraints nullable="true" />
         </column>
      </createTable>
   </changeSet>
</databaseChangeLog>
关键点:
- ✅
changeSet是最小执行单元,由id和author唯一标识,确保变更只执行一次 - ✅
id推荐使用时间戳前缀(如20170503041524-1),避免团队协作冲突 - ❌ 已提交的 changeSet 禁止修改,否则会导致 checksum 校验失败。如有调整,应新建 changeSet 回滚或修正
接下来,将该文件注册到 master.xml:
<databaseChangeLog xmlns="http://www.liquibase.org/xml/ns/dbchangelog" xmlns:xsi="http://www.w3.org/2001/XMLSchema-instance"
    xsi:schemaLocation="http://www.liquibase.org/xml/ns/dbchangelog http://www.liquibase.org/xml/ns/dbchangelog/dbchangelog-latest.xsd">

    <include file="classpath:config/liquibase/changelog/00000000000000_initial_schema.xml" relativeToChangelogFile="false" />
    <include file="classpath:config/liquibase/changelog/20170503041524_added_entity_Car.xml" relativeToChangelogFile="false" />
</databaseChangeLog>
⚠️ 注意:relativeToChangelogFile="false" 表示路径基于 classpath 根目录解析。
Liquibase 会自动记录已执行的 changeSet(通过 DATABASECHANGELOG 表),下次启动时跳过已应用的变更。
3. 通过 Spring Bean 启动 Liquibase
如果你使用 Spring,最直接的方式是定义一个 SpringLiquibase Bean:
@Bean
public SpringLiquibase liquibase() {
    SpringLiquibase liquibase = new SpringLiquibase();
    liquibase.setChangeLog("classpath:config/liquibase/master.xml");
    liquibase.setDataSource(dataSource());
    return liquibase;
}
这是最基础的配置。实际项目中建议使用更完整的配置,例如支持异步执行、环境控制等:
@Bean
public SpringLiquibase liquibase(@Qualifier("taskExecutor") TaskExecutor taskExecutor,
        DataSource dataSource, LiquibaseProperties liquibaseProperties) {

    SpringLiquibase liquibase = new AsyncSpringLiquibase(taskExecutor, env);
    liquibase.setDataSource(dataSource);
    liquibase.setChangeLog("classpath:config/liquibase/master.xml");
    liquibase.setContexts(liquibaseProperties.getContexts());
    liquibase.setDefaultSchema(liquibaseProperties.getDefaultSchema());
    liquibase.setDropFirst(liquibaseProperties.isDropFirst());

    if (env.acceptsProfiles("dev,no-liquibase")) {
        liquibase.setShouldRun(false);
    } else {
        liquibase.setShouldRun(liquibaseProperties.isEnabled());
        log.debug("Configuring Liquibase");
    }
    return liquibase;
}
📌 要点:
AsyncSpringLiquibase可避免阻塞应用启动- 通过 Profile 控制是否启用,便于本地开发调试
4. 在 Spring Boot 中使用 Liquibase
Spring Boot 对 Liquibase 做了自动配置。只需引入 liquibase-core 依赖,框架会自动创建并执行 SpringLiquibase Bean。
但有两个前提:
- ✅
master.xml必须放在src/main/resources/config/liquibase/master.xml - ✅ 或者通过配置项指定自定义路径
修改默认 changelog 路径:
liquibase.change-log=classpath:db/changelog.xml
Spring Boot 会自动识别该配置并加载对应文件。
5. 在 Spring Boot 中禁用 Liquibase
某些场景下(如测试环境使用内存 DB),你可能希望跳过 Liquibase 迁移。
使用以下配置即可:
spring.liquibase.enabled=false
⚠️ 注意:Spring Boot 2.x 之前版本使用的是 liquibase.enabled=false,升级时需注意兼容性。
6. 使用 Maven 插件生成 changelog
手动编写 changelog 容易出错。Liquibase 提供 Maven 插件,可从现有数据库自动生成。
6.1 插件配置
在 pom.xml 中添加插件:
<plugin>
   <groupId>org.liquibase</groupId>
   <artifactId>liquibase-maven-plugin</artifactId>
   <version>4.27.0</version>
   <configuration>
      <driver>org.h2.Driver</driver>
      <url>jdbc:h2:file:./target/h2db/db/carapp</url>
      <username>carapp</username>
      <password></password>
      <outputChangeLogFile>src/main/resources/liquibase-outputChangeLog.xml</outputChangeLogFile>
   </configuration>
</plugin>
6.2 从现有数据库生成 changelog
运行命令:
mvn liquibase:generateChangeLog
生成的文件可用于:
- 初始化新环境 DB
- 备份当前 schema 状态
示例输出:
<databaseChangeLog ...>
   <changeSet id="00000000000001" author="jhipster">
      <createTable tableName="jhi_persistent_audit_event">
         <column name="event_id" type="bigint" autoIncrement="${autoIncrement}">
            <constraints primaryKey="true" nullable="false" />
         </column>
         <column name="principal" type="varchar(50)">
            <constraints nullable="false" />
         </column>
         <column name="event_date" type="timestamp" />
         <column name="event_type" type="varchar(255)" />
      </createTable>
      <createTable tableName="jhi_persistent_audit_evt_data">
         <column name="event_id" type="bigint">
            <constraints nullable="false" />
         </column>
         <column name="name" type="varchar(150)">
            <constraints nullable="false" />
         </column>
         <column name="value" type="varchar(255)" />
      </createTable>
      <addPrimaryKey columnNames="event_id, name" tableName="jhi_persistent_audit_evt_data" />
      <createIndex indexName="idx_persistent_audit_event" tableName="jhi_persistent_audit_event" unique="false">
         <column name="principal" type="varchar(50)" />
         <column name="event_date" type="timestamp" />
      </createIndex>
      <createIndex indexName="idx_persistent_audit_evt_data" tableName="jhi_persistent_audit_evt_data" unique="false">
         <column name="event_id" type="bigint" />
      </createIndex>
      <addForeignKeyConstraint baseColumnNames="event_id" baseTableName="jhi_persistent_audit_evt_data" constraintName="fk_evt_pers_audit_evt_data" referencedColumnNames="event_id" referencedTableName="jhi_persistent_audit_event" />
   </changeSet>

   <changeSet id="20170503041524-1" author="jhipster">
      <createTable tableName="car">
         <column name="id" type="bigint" autoIncrement="${autoIncrement}">
            <constraints primaryKey="true" nullable="false" />
         </column>
         <column name="make" type="varchar(255)">
            <constraints nullable="true" />
         </column>
         <column name="brand" type="varchar(255)">
            <constraints nullable="true" />
         </column>
         <column name="price" type="double">
            <constraints nullable="true" />
         </column>
      </createTable>
   </changeSet>
</databaseChangeLog>
6.3 生成两个数据库之间的差异 changelog
使用 diff 命令对比两个数据库结构差异:
mvn liquibase:diff
需在插件配置中指定两个数据库连接:
<configuration>
   <changeLogFile>src/main/resources/config/liquibase/master.xml</changeLogFile>
   <url>jdbc:h2:file:./target/h2db/db/carapp</url>
   <username>carapp</username>
   <password></password>
   <driver>org.h2.Driver</driver>
   <referenceUrl>jdbc:h2:file:./target/h2db/db/carapp2</referenceUrl>
   <referenceDriver>org.h2.Driver</referenceDriver>
   <referenceUsername>devuser</referenceUsername>
   <referencePassword>devpass123</referencePassword>
</configuration>
生成的 changelog 仅包含差异部分:
<databaseChangeLog ...>
    <changeSet author="John" id="1439227853089-1">
        <dropColumn columnName="brand" tableName="car"/>
    </changeSet>
</databaseChangeLog>
💡 实战技巧:让 Hibernate 在 dev 环境自动生成 schema,再用 diff 对比生产库,快速生成上线脚本。
7. 使用 Liquibase Hibernate 插件
若项目使用 Hibernate,推荐使用 liquibase-hibernate5 插件,直接对比实体类与数据库生成 changelog。
7.1 插件配置
在 Maven 插件中添加依赖:
<plugin>
   <groupId>org.liquibase</groupId>
   <artifactId>liquibase-maven-plugin</artifactId>
   <version>4.27.0</version>
   <dependencies>
      <dependency>
         <groupId>org.liquibase.ext</groupId>
         <artifactId>liquibase-hibernate5</artifactId>
         <version>3.6</version>
      </dependency>
   </dependencies>
   <configuration>
      <changeLogFile>src/main/resources/config/liquibase/master.xml</changeLogFile>
      <diffChangeLogFile>src/main/resources/config/liquibase/changelog/${maven.build.timestamp}_changelog.xml</diffChangeLogFile>
      <driver>org.h2.Driver</driver>
      <url>jdbc:h2:file:./target/h2db/db/carapp</url>
      <username>carapp</username>
      <password></password>
      <referenceUrl>hibernate:spring:com.car.app.domain?dialect=org.hibernate.dialect.H2Dialect
       &hibernate.physical_naming_strategy=org.springframework.boot.orm.jpa.hibernate.SpringPhysicalNamingStrategy
       &hibernate.implicit_naming_strategy=org.springframework.boot.orm.jpa.hibernate.SpringImplicitNamingStrategy
      </referenceUrl>
      <verbose>true</verbose>
      <logging>debug</logging>
   </configuration>
</plugin>
关键点:
referenceUrl使用hibernate:spring:前缀扫描实体包- 必须指定
dialect和命名策略,确保类型映射正确
7.2 从数据库与实体差异生成 changelog
实体类修改后,运行:
mvn liquibase:diff
插件会自动对比当前数据库与 Hibernate 实体,生成精准的 schema 变更脚本。这是实现 生产环境安全演进 的利器。
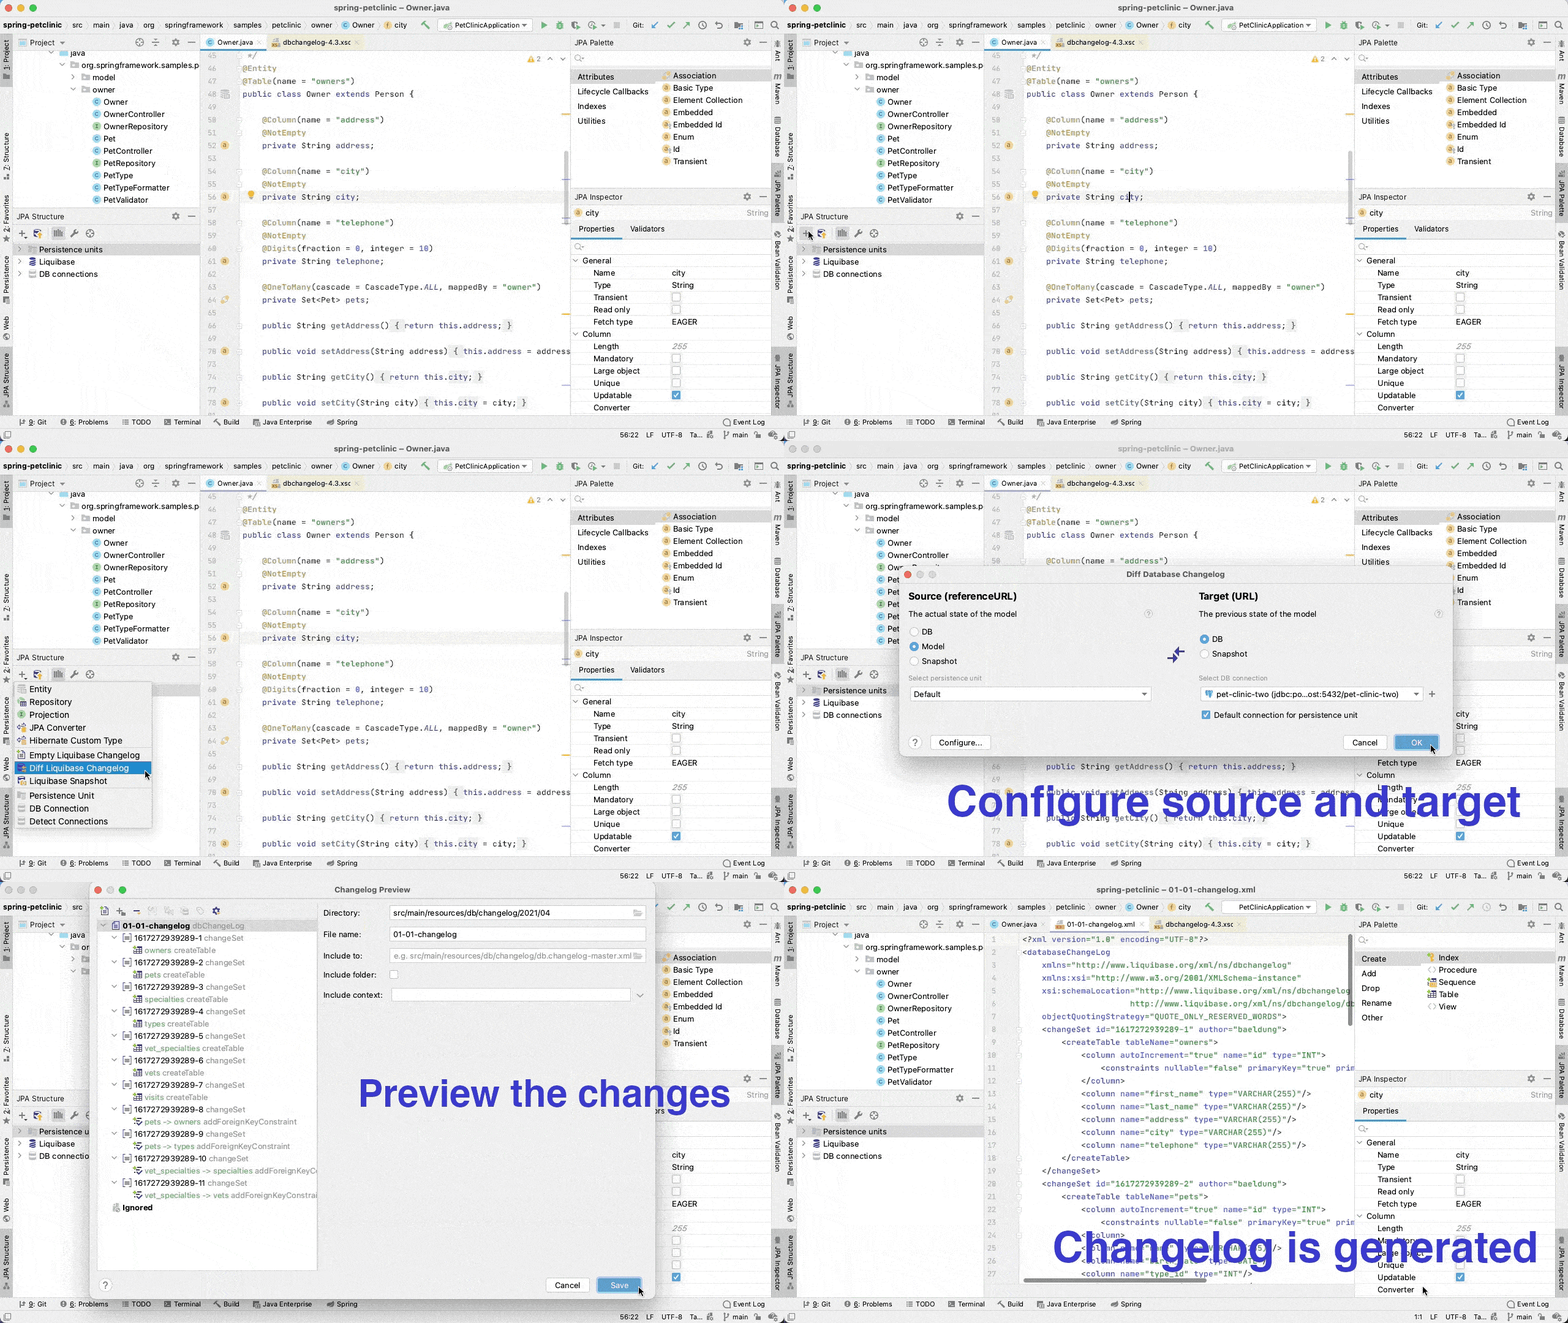
8. 在 IntelliJ IDEA 中使用 JPA Buddy 插件生成 changelog
如果你使用非 Hibernate 的 JPA 实现(如 EclipseLink),或不想引入额外依赖,推荐使用 JPA Buddy 插件。
它深度集成 IntelliJ IDEA,提供可视化方式生成差异 changelog:
- 安装 JPA Buddy 插件
- 打开 JPA Structure 面板
- 选择源(数据库 / JPA 实体)和目标(数据库 / Liquibase 快照)
- 自动生成 changelog
✅ 相比 liquibase-hibernate 插件,JPA Buddy 优势:
- 支持自定义 Java 类型与 DB 类型映射
- 兼容 Hibernate 自定义类型和 JPA Converter
- 无需配置 Maven 插件,IDE 内一键操作
9. 总结
本文系统介绍了 Liquibase 在 Java 项目中的多种实践方式:
- ✅ 手动编写 changelog:适合精细控制
- ✅ Maven 插件生成:提升效率,减少出错
- ✅ 结合 Hibernate:实现实体驱动的 schema 演进
- ✅ 使用 JPA Buddy:IDE 友好,适合非 Hibernate 场景
合理使用这些工具,能让你的数据库 schema 管理更加 安全、可追溯、可协作。
完整示例代码见 GitHub:https://github.com/eugenp/tutorials/tree/master/jhipster-modules/jhipster-microservice/car-app
