1. 概述
本文将带你完整走一遍 Maven 工件创建与公开发布的流程。我们将覆盖项目结构搭建、Maven 构建 JAR 文件,以及发布到 GitHub Packages 的全流程。最后还会演示客户端如何将我们的包作为 Maven 依赖安装使用。
⚠️ 注意:整个过程需要 GitHub 账号和基础 Maven 知识,这些就不赘述了。
2. 创建 Maven 项目
我们以一个单元测试工具库为例。首先创建 Maven 项目并配置 pom.xml 的核心属性:
关键点:发布到 GitHub Packages 时,groupId 必须使用 io.github.<github_username> 格式。其他基础配置包括 artifactId、version、项目名称、描述、打包方式(设为 jar)和 Java 版本:
<project>
    <modelVersion>4.0.0</modelVersion>
    <groupId>io.github.etrandafir93</groupId>
    <artifactId>utilitest</artifactId>
    <version>1.0.0-SNAPSHOT</version>
    <packaging>jar</packaging>

    <name>Utilitest</name>
    <description>A collection of test helpers for AssertJ, Mockito and Awaitility</description>
    <url>https://github.com/etrandafir93/utilitest</url>

    <properties>
        <java.version>11</java.version>
    </properties>

    <!-- license, distribution, dependenceis, build... etc. -->

</project>
3. 添加开源协议
开源项目的协议是法律文件,规定他人如何使用、修改和分发你的代码。在 Maven 项目中通过 pom.xml 的 <license> 节点添加:
<licenses>
    <license>
        <name>MIT License</name>
        <url>http://www.opensource.org/licenses/mit-license.php</url>
    </license>
</licenses>
这里选择了 MIT 协议,允许任何人自由使用、修改和分发代码,只需保留原始协议和版权声明。也可以选择 Apache 2.0、GPL 等其他协议(详见 opensource.org)。
同时需要在项目根目录添加 LICENSE 文件:
utilitest
├── src
│   ├── main
│   └── test
├── LICENSE
└── pom.xml
4. 发布到 GitHub Packages
接下来配置 Maven 将构件发布到 GitHub。需要在 pom.xml 中添加 <distributionManagement> 节点,包含三个关键属性:
-
id:固定设为github -
name:仓库所有者(个人或组织名称) -
url:发布地址,格式为https://maven.pkg.github.com/{owner}/{repository}
配置示例:
<distributionManagement>
    <repository>
        <id>github</id>
        <name>etrandafir93</name>
        <url>https://maven.pkg.github.com/etrandafir93/utilitest</url>
    </repository>
</distributionManagement>
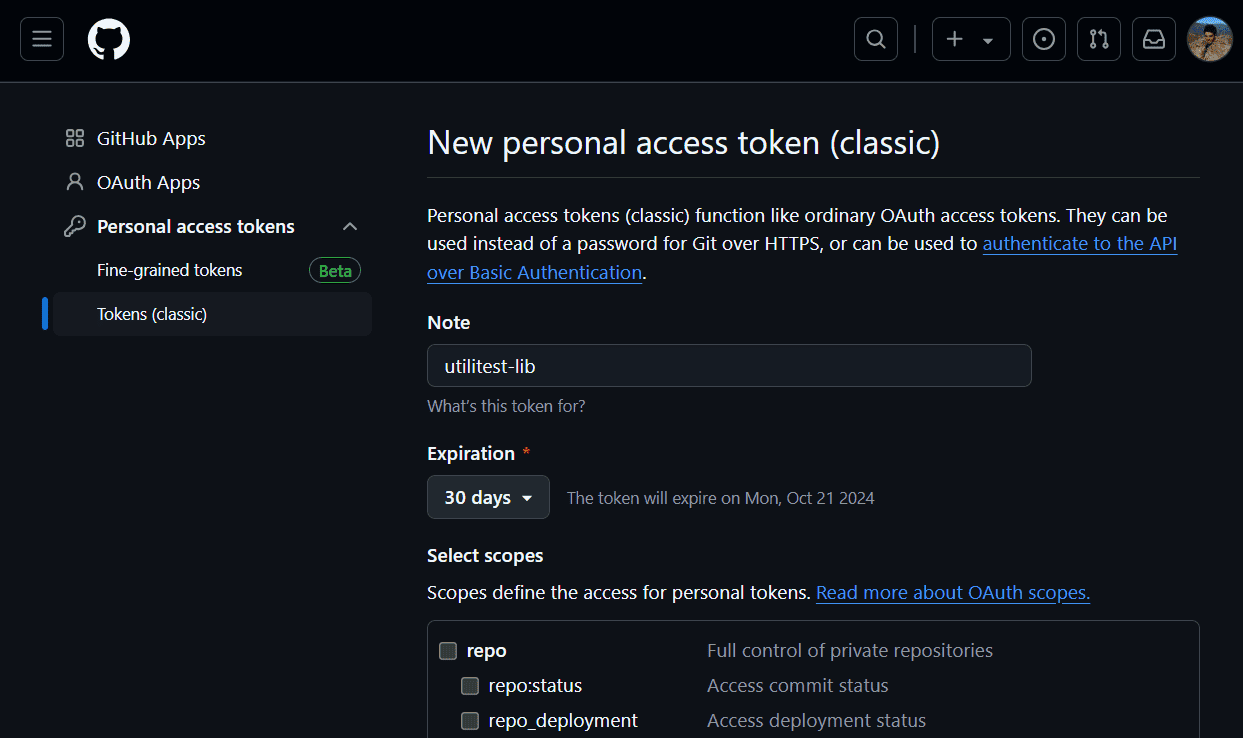
然后需要生成 GitHub 个人访问令牌(Personal Access Token):
- 访问 开发者设置页面
- 生成新令牌,设置权限范围和过期时间
接着在 ~/.m2/settings.xml 中添加认证信息:
<servers>
    <server>
        <id>github</id>
        <username>etrandafir93</username>
        <password>{access_token}</password>
    </server>
</servers>
同时配置仓库地址(在 <profiles> 节点):
<profiles>
    <profile>
      <id>github</id>
      <repositories>
        <repository>
          <id>central</id>
          <url>https://repo1.maven.org/maven2</url>
        </repository>
        <repository>
          <id>github</id>
          <url>https://maven.pkg.github.com/etrandafir93/utilitest</url>
          <snapshots>
            <enabled>true</enabled>
          </snapshots>
        </repository>
      </repositories>
    </profile>
</profiles>
✅ 配置完成!现在执行 mvn deploy 即可发布:
> mvn deploy

[INFO] Scanning for projects...
[INFO]
[INFO] ------------------< io.github.etrandafir93:utilitest >------------------
[INFO] Building Utilitest 1.0.0-SNAPOSHOT
[INFO]   from pom.xml
[INFO] --------------------------------[ jar ]---------------------------------

    [ .... ]

Uploaded to github: https://maven.pkg.github.com/etrandafir93/utilitest/io/github/etrandafir93/utilitest/ 1.0.0-SNAPOSHOT/utilitest-1.0.0-SNAPOSHOT.pom (3.7 kB at 1.1 kB/s)

Uploaded to github: https://maven.pkg.github.com/etrandafir93/utilitest/io/github/etrandafir93/utilitest/ 1.0.0-SNAPOSHOT/utilitest-1.0.0-SNAPOSHOT.jar (4.5 kB at 1.4 kB/s)

Uploaded to github: https://maven.pkg.github.com/etrandafir93/utilitest/io/github/etrandafir93/utilitest/ maven-metadata.xml (368 B at 343 B/s)

[INFO] ------------------------------------------------------------------------
[INFO] BUILD SUCCESS
[INFO] ------------------------------------------------------------------------
[INFO] Total time:  17.463 s
[INFO] Finished at: 2024-09-21T19:44:10+02:00
[INFO] ------------------------------------------------------------------------
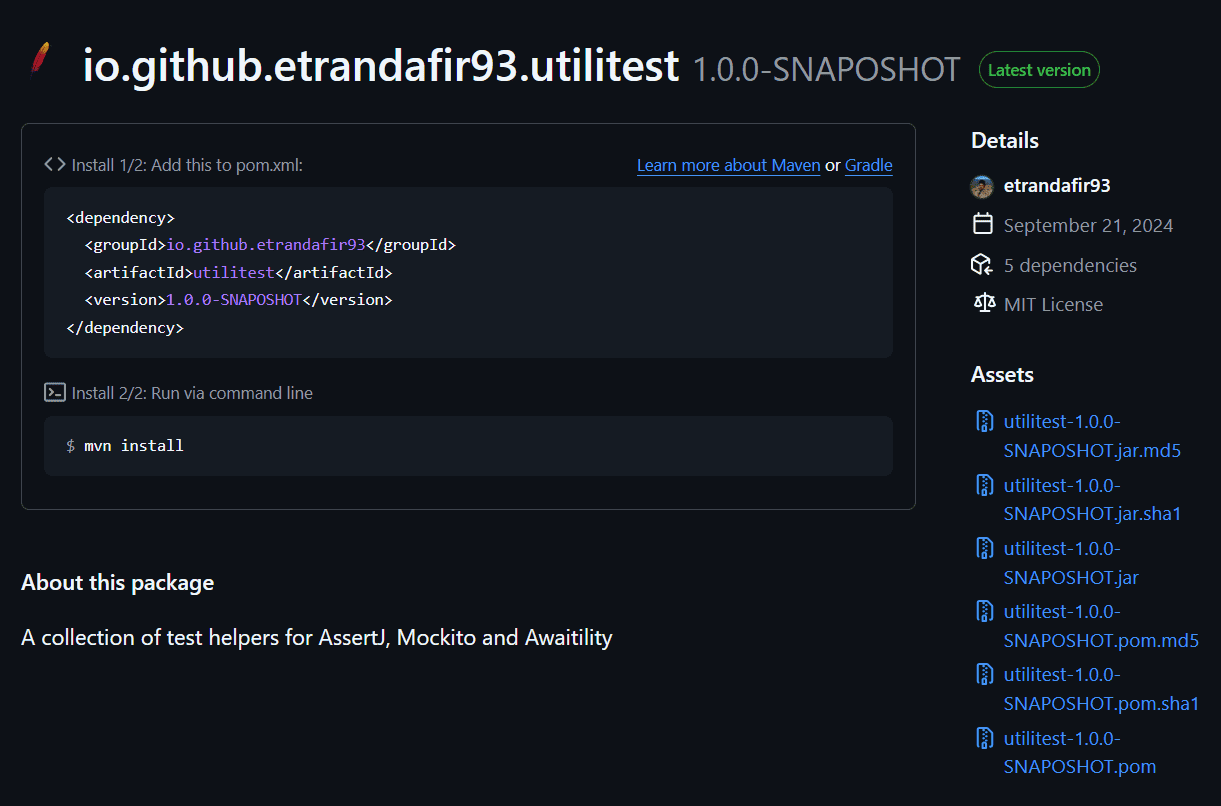
发布成功后,在 GitHub 仓库页面能看到已上传的包:
5. 安装 Maven 依赖
GitHub Packages 的构件默认继承仓库可见性。由于我们的仓库是公开的,可以直接作为 Maven 依赖使用。
但即使包是公开的,GitHub 仍要求客户端使用个人访问令牌认证。生成令牌的流程相同,但这次只需授予只读权限。
在客户端项目的 ~/.m2/settings.xml 或 pom.xml 中添加仓库配置:
<repository>
    <id>github</id>
    <name>etrandafir93</name>
    <url>https://maven.pkg.github.com/etrandafir93/*</url>
</repository>
最后添加依赖即可使用:
<dependency>
    <groupId>io.github.etrandafir93</groupId>
    <artifactId>utilitest</artifactId>
    <version>1.0.0-SNAPOSHOT</version>
    <scope>test</scope>
</dependency>
6. 总结
本文完整演示了:
- 创建 Maven 项目并构建 JAR
- 配置开源协议
- 发布到 GitHub Packages
- 客户端安装使用
踩坑提醒:
- 确保
groupId符合io.github.<username>格式 - 个人访问令牌权限要配置正确
- 发布前先在本地
mvn clean install验证构建
现在你可以轻松把自己的工具库分享给社区了!