1. 概述
在本教程中,我们将使用 Gatling 在 Jenkins 流水线中集成负载测试。首先,确保你对 Gatling 的基本概念有所了解,可以先参考我们的 Gatling 入门指南。
2. 使用 Maven 创建 Gatling 项目
我们的目标是将 Gatling 编写的负载测试嵌入到 Jenkins 的 CI/CD 流水线中。为了实现自动化测试,我们可以使用 Maven 来打包和执行 Gatling 测试。
2.1. 添加依赖
Gatling 提供了一个 Maven 插件 —— gatling-maven-plugin,它允许我们在 Maven 构建阶段执行 Gatling 测试。这样我们就可以将负载测试集成到任意 CI 工具中。
下面是我们项目中需要添加到 pom.xml 的依赖:
<dependency>
    <groupId>io.gatling.highcharts</groupId>
    <artifactId>gatling-charts-highcharts</artifactId>
    <version>3.10.5</version>
</dependency>
<dependency>
    <groupId>io.gatling</groupId>
    <artifactId>gatling-app</artifactId>
    <version>3.10.5</version>
</dependency>
<dependency>
    <groupId>io.gatling</groupId>
    <artifactId>gatling-recorder</artifactId>
    <version>3.10.5</version>
</dependency>
同时,还需要在 pom.xml 的 <plugins> 部分中添加 Gatling Maven 插件:
<plugin>
    <groupId>io.gatling</groupId>
    <artifactId>gatling-maven-plugin</artifactId>
    <version>4.8.1</version>
    <configuration>
        <simulationClass>org.baeldung.${SimulationClass}</simulationClass>
    </configuration>
</plugin>
✅
SimulationClass是你实际要运行的模拟类名。Gatling 核心版本和插件版本可以不同,确保使用最新的版本。
2.2. 编写测试场景
Gatling 使用 Scala 编写模拟测试脚本,其 DSL 简洁直观,适合快速构建测试逻辑。
你可以使用 Gatling Recorder 或者手动编写 Scala 脚本来定义测试场景。例如一个简单的 GET 请求模拟:
class SimpleSimulation extends Simulation {
  val httpProtocol = http
    .baseUrl("http://your-api.com")
    .acceptHeader("application/json")

  val scn = scenario("SimpleTest")
    .exec(
      http("Get Request")
        .get("/api/data")
    )

  setUp(
    scn.inject(atOnceUsers(10))
  ).protocols(httpProtocol)
}
2.3. 运行测试
编写完测试代码后,可以通过 Maven 命令执行测试:
mvn clean package
mvn gatling:test
执行完成后,Gatling 会生成 HTML 报告,位于 target/gatling 目录下。
3. 在 Jenkins 中集成 Gatling
将 Gatling 集成到 Jenkins 流水线中,可以在每次构建时自动运行负载测试,从而验证新代码是否引入了性能问题。
3.1. 创建 Jenkinsfile
在项目根目录下创建 Jenkinsfile,内容如下:
pipeline {
    agent any
    stages {
        stage("Build Maven") {
            steps {
                sh 'mvn -B clean package'
            }
        }
        stage("Run Gatling") {
            steps {
                sh 'mvn gatling:test'
            }
            post {
                always {
                    gatlingArchive()
                }
            }
        }
    }
}
该流水线分为两个阶段:
- Build Maven:执行 Maven 构建
- Run Gatling:运行 Gatling 测试并归档报告
提交代码后,Jenkins 会读取该文件并自动执行流水线。
3.2. 创建 Jenkins Pipeline
登录 Jenkins,点击 New Item,选择 Pipeline 类型并命名(如 gatling-load-test)。
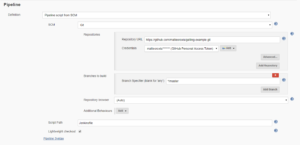
在 Pipeline 配置页面中,选择 Pipeline script from SCM,填写仓库地址、分支、凭证和 Jenkinsfile 路径。
配置界面如下图所示:
3.3. 安装 Gatling Jenkins 插件
在运行流水线前,需要安装 Gatling Jenkins 插件。该插件可以帮助我们:
- 发布 Gatling 测试报告
- 展示性能趋势图(最近 15 次构建)
- 快速查看每次构建的响应时间、失败率等关键指标
gatlingArchive() 正是该插件提供的一个步骤,用于归档和展示报告。
安装完成后重启 Jenkins,确保插件生效。
3.4. 使用 Jenkins 从节点执行负载测试
⚠️ 注意:运行负载测试会消耗大量资源,不建议在 Jenkins 主节点上执行。
建议使用 Jenkins 的 slave node 来运行 Gatling 测试步骤。在 Jenkinsfile 中,agent any 表示使用任意可用的执行器节点。
确保你已正确配置 Jenkins slave 节点,并且具备运行 Gatling 所需的 Java、Maven 环境。
4. 执行流水线
回到 Jenkins 首页,选择你创建的流水线,点击 Build Now。
流水线执行完毕后,你会看到类似如下图表:
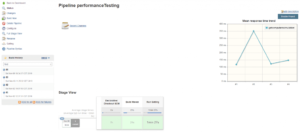
5. 查看测试结果
在流水线执行页面中,点击左侧菜单的 Gatling,可以查看以下信息:
- 平均响应时间
- 95th 百分位响应时间
- KO 请求比例(失败请求)
页面底部会列出所有构建的 Gatling 报告链接,点击即可在 Jenkins 中直接查看完整的 HTML 报告:

6. 小结
在本教程中,我们介绍了如何将 Gatling 负载测试集成到 Jenkins 流水线中。主要包括:
✅ 创建 Gatling Maven 项目
✅ 编写测试脚本
✅ 编写 Jenkinsfile
✅ 创建 Jenkins Pipeline
✅ 安装 Gatling Jenkins 插件以展示报告
✅ 使用从节点执行负载测试避免资源争抢
如果你希望深入了解如何设计测试场景来监控网站性能,推荐阅读我们的另一篇 Gatling 网站负载测试教程。
完整代码可在 GitHub 上找到。