1. 简介
如今,Microsoft Azure 对 Java 的支持已经相当成熟和稳定。
本文将手把手带你把一个 Spring Boot 应用部署到 Azure 平台,涵盖从环境准备到容器化部署的完整流程。适合有一定云平台使用经验的开发者参考,避免踩坑。
2. Maven 依赖与配置
要使用 Azure 的云服务,首先你得有一个 Azure 账号。可以在这里注册一个免费账户:https://azure.microsoft.com/en-us/free/
注册并登录后,使用 Azure CLI 创建一个服务主体(Service Principal),用于后续自动化部署的身份认证:
> az login
To sign in, use a web browser to open the page \
https://microsoft.com/devicelogin and enter the code XXXXXXXX to authenticate.
> az ad sp create-for-rbac --name "app-name" --password "password"
{
    "appId": "aaaaaaaa-aaaa-aaaa-aaaa-aaaaaaaaaaaa",
    "displayName": "app-name",
    "name": "http://app-name",
    "password": "password",
    "tenant": "tttttttt-tttt-tttt-tttt-tttttttttttt"
}
拿到这些凭证后,需要将它们配置到 Maven 的 settings.xml 文件中,作为后续部署插件的身份认证依据。在 <servers> 节点下添加:
<server>
    <id>azure-auth</id>
    <configuration>
        <client>aaaaaaaa-aaaa-aaaa-aaaa-aaaaaaaaaaaa</client>
        <tenant>tttttttt-tttt-tttt-tttt-tttttttttttt</tenant>
        <key>password</key>
        <environment>AZURE</environment>
    </configuration>
</server>
✅ 提示:
<id>的值(这里是azure-auth)将在 Maven 插件配置中引用,务必记牢。
接下来,在项目的 pom.xml 中引入 azure-webapp-maven-plugin:
<plugin>
    <groupId>com.microsoft.azure</groupId>
    <artifactId>azure-webapp-maven-plugin</artifactId>
    <version>1.1.0</version>
    <configuration>
        <!-- ... 具体配置见下文 -->
    </configuration>
</plugin>
插件的最新版本可在此查询:Maven Central。后续所有部署操作都将依赖此插件。
3. 部署 Spring Boot 应用到 Azure
环境准备就绪,现在来部署一个简单的 Spring Boot 应用。该应用包含一个接口:
@GetMapping("/hello")
public String hello() {
    return "hello azure!";
}
Azure 支持将 Java Web 应用部署到 Tomcat 或 Jetty 等 Web 容器。通过 azure-webapp-maven-plugin,我们可以直接将应用作为 ROOT 应用部署到容器,也可以选择 FTP 方式上传。
⚠️ 注意:由于是部署到 Web 容器,项目需要打包成 WAR 文件。如果还不熟悉,可以参考我们之前关于 Spring Boot WAR 包部署到 Tomcat 的文章。
3.1 Web 容器部署
部署到 Windows 实例的 Tomcat:
<configuration>
    <javaVersion>1.8</javaVersion>
    <javaWebContainer>tomcat 8.5</javaWebContainer>
    <!-- 其他配置 -->
</configuration>
部署到 Linux 实例:
<configuration>
    <linuxRuntime>tomcat 8.5-jre8</linuxRuntime>
    <!-- 其他配置 -->
</configuration>
完整的插件配置还需要包含认证、应用名称和资源组:
<configuration>
    <authentication>
        <serverId>azure-auth</serverId>
    </authentication>
    <appName>spring-azure</appName>
    <resourceGroup>baeldung</resourceGroup>
    <!-- ... -->
</configuration>
<appName>:指定创建的 App Service 名称。<resourceGroup>:指定资源所属的资源组(Resource Group),所有 Azure 资源都必须归属于一个资源组。
✅ 准备就绪,执行部署命令:
> mvn clean package azure-webapp:deploy
...
[INFO] Start deploying to Web App spring-baeldung...
[INFO] Authenticate with ServerId: azure-auth
[INFO] [Correlation ID: cccccccc-cccc-cccc-cccc-cccccccccccc] \
Instance discovery was successful
[INFO] Target Web App doesn't exist. Creating a new one...
[INFO] Creating App Service Plan 'ServicePlanssssssss-bbbb-0000'...
[INFO] Successfully created App Service Plan.
[INFO] Successfully created Web App.
[INFO] Starting to deploy the war file...
[INFO] Successfully deployed Web App at \
https://spring-baeldung.azurewebsites.net
...
部署成功!访问 https://spring-baeldung.azurewebsites.net/hello,即可看到返回的 hello azure!。
⚠️ 踩坑提示:部署时,Azure 会自动创建一个 App Service Plan(应用服务计划)。如果你已有现成的计划,可通过
<appServicePlanName>指定,避免重复创建和产生额外费用:
<configuration>
    <!-- ... -->
    <appServicePlanName>ServicePlanssssssss-bbbb-0000</appServicePlanName>
</configuration>
3.2 FTP 部署
FTP 部署方式提供了更细粒度的控制。配置如下:
<configuration>
    <authentication>
        <serverId>azure-auth</serverId>
    </authentication>
    <appName>spring-baeldung</appName>
    <resourceGroup>baeldung</resourceGroup>
    <javaVersion>1.8</javaVersion>
    <deploymentType>ftp</deploymentType>
    <resources>
        <resource>
            <directory>${project.basedir}/target</directory>
            <targetPath>webapps</targetPath>
            <includes>
                <include>*.war</include>
            </includes>
        </resource>
    </resources>
</configuration>
此配置会将 target 目录下的 WAR 文件上传到 Tomcat 的 webapps 目录。
执行部署命令后,输出类似:
> mvn clean package azure-webapp:deploy
...
[INFO] Successfully deployed Web App at \
https://spring-baeldung.azurewebsites.net
✅ 注意:FTP 部署的应用不会作为 ROOT 应用。假设你的 WAR 包名为 azure-0.1.war,则需通过 https://spring-baeldung.azurewebsites.net/azure-0.1/hello 访问,才能看到 hello azure! 的响应。
4. 带自定义配置的部署
生产应用通常需要连接数据库。Azure 支持 SQL Server、MySQL、PostgreSQL 等多种数据库服务。
为简化演示,这里使用 Azure 的 In-App MySQL(应用内 MySQL),其配置方式与其他 Azure 数据库服务类似。
4.1 在 Azure 上启用 In-App MySQL
目前无法通过一条命令创建并启用 In-App MySQL 的应用,需分步操作。
先用 CLI 创建资源组、应用服务计划和 Web 应用:
az group create --location japanwest --name baeldung-group
az appservice plan create --name baeldung-plan --resource-group baeldung-group --sku B1
az webapp create --name baeldung-webapp --resource-group baeldung-group \
  --plan baeldung-plan --runtime java|1.8|Tomcat|8.5
创建完成后,必须在 Azure 门户中手动启用 In-App MySQL:
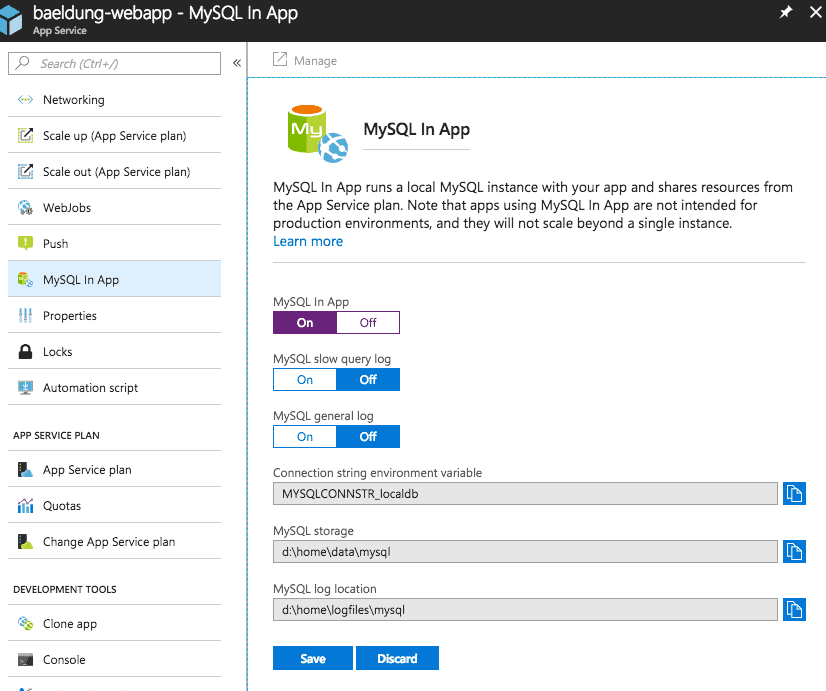
启用后,可在应用文件系统的 /home/data/mysql 目录下找到名为 MYSQLCONNSTR_xxx.txt 的文件,其中包含数据库连接 URL、用户名和密码等信息。
4.2 使用 Azure In-App MySQL 的 Spring Boot 应用
创建一个简单的 User 实体和两个接口用于注册和查询:
@PostMapping("/user")
public String register(@RequestParam String name) {
    userRepository.save(userNamed(name));
    return "registered";
}

@GetMapping("/user")
public Iterable<User> userlist() {
    return userRepository.findAll();
}
本地开发使用 H2,生产环境切换到 MySQL。通常在 application.properties 中配置数据源:
spring.datasource.url=jdbc:h2:file:~/test
spring.datasource.username=sa
spring.datasource.password=
但在 Azure 部署时,我们不能将生产数据库密码写死在代码里。正确的做法是通过 azure-webapp-maven-plugin 的 <appSettings> 将配置项注入到应用运行时环境:
<configuration>
    <authentication>
        <serverId>azure-auth</serverId>
    </authentication>
    <javaVersion>1.8</javaVersion>
    <resourceGroup>baeldung-group</resourceGroup>
    <appName>baeldung-webapp</appName>
    <appServicePlanName>baeldung-plan</appServicePlanName>
    <appSettings>
        <property>
            <name>spring.datasource.url</name>
            <value>jdbc:mysql://127.0.0.1:55738/localdb</value>
        </property>
        <property>
            <name>spring.datasource.username</name>
            <value>uuuuuu</value>
        </property>
        <property>
            <name>spring.datasource.password</name>
            <value>pppppp</value>
        </property>
    </appSettings>
</configuration>
执行部署:
> mvn clean package azure-webapp:deploy
...
[INFO] Successfully deployed Web App at \
https://baeldung-webapp.azurewebsites.net
部署成功后,测试接口:
> curl -d "" -X POST https://baeldung-webapp.azurewebsites.net/user\?name\=baeldung
registered

> curl https://baeldung-webapp.azurewebsites.net/user
[{"id":1,"name":"baeldung"}]
响应正常,说明数据库连接和应用逻辑都已正确部署。
5. 部署容器化的 Spring Boot 应用
前文演示了部署到 Web 容器。如果想部署为独立的可执行 JAR(Standalone JAR),就需要将应用容器化。
我们可以使用 docker-maven-plugin 来自动化 Docker 镜像的构建和推送。
<plugin>
    <groupId>com.spotify</groupId>
    <artifactId>docker-maven-plugin</artifactId>
    <version>1.1.0</version>
    <configuration>
        <!-- ... -->
    </configuration>
</plugin>
最新版本参考:Maven Central
5.1 Azure 容器注册表 (ACR)
首先,需要在 Azure 上创建一个容器注册表来存放镜像:
az acr create --admin-enabled --resource-group baeldung-group \
  --location japanwest --name baeldungadr --sku Basic
然后获取注册表的登录凭据:
> az acr credential show --name baeldungadr --query passwords[0]
{
  "additionalProperties": {},
  "name": "password",
  "value": "xxxxxxxxxxxxxxxxxxxxxxxxxxxxxxxx"
}
将这些凭据添加到 Maven 的 settings.xml 中,用于镜像推送时的身份认证:
<server>
    <id>baeldungadr</id>
    <username>baeldungadr</username>
    <password>xxxxxxxxxxxxxxxxxxxxxxxxxxxxxxxx</password>
</server>
5.2 Maven 插件配置
在 pom.xml 中配置 docker-maven-plugin:
<properties>
    <azure.containerRegistry>baeldungadr</azure.containerRegistry>
    <docker.image.prefix>${azure.containerRegistry}.azurecr.io</docker.image.prefix>
</properties>

<build>
    <plugins>
        <plugin>
            <groupId>com.spotify</groupId>
            <artifactId>docker-maven-plugin</artifactId>
            <version>1.0.0</version>
            <configuration>
                <imageName>${docker.image.prefix}/${project.artifactId}</imageName>
                <registryUrl>https://${docker.image.prefix}</registryUrl>
                <serverId>${azure.containerRegistry}</serverId>
                <dockerDirectory>docker</dockerDirectory>
                <resources>
                    <resource>
                        <targetPath>/</targetPath>
                        <directory>${project.build.directory}</directory>
                        <include>${project.build.finalName}.jar</include>
                    </resource>
                </resources>
            </configuration>
        </plugin>
    </plugins>
</build>
插件会读取 dockerDirectory 指定目录下的 Dockerfile。内容如下:
FROM frolvlad/alpine-oraclejdk8:slim
VOLUME /tmp
ADD azure-0.1.jar app.jar
RUN sh -c 'touch /app.jar'
EXPOSE 8080
ENTRYPOINT [ "sh", "-c", "java -Djava.security.egd=file:/dev/./urandom -jar /app.jar" ]
5.3 在 Docker 实例中运行 Spring Boot 应用
构建镜像并推送到 ACR:
> mvn docker:build -DpushImage
...
[INFO] Building image baeldungadr.azurecr.io/azure-0.1
...
Successfully tagged baeldungadr.azurecr.io/azure-0.1:latest
[INFO] Pushing baeldungadr.azurecr.io/azure-0.1
...
latest: digest: sha256:0f0f... size: 1375
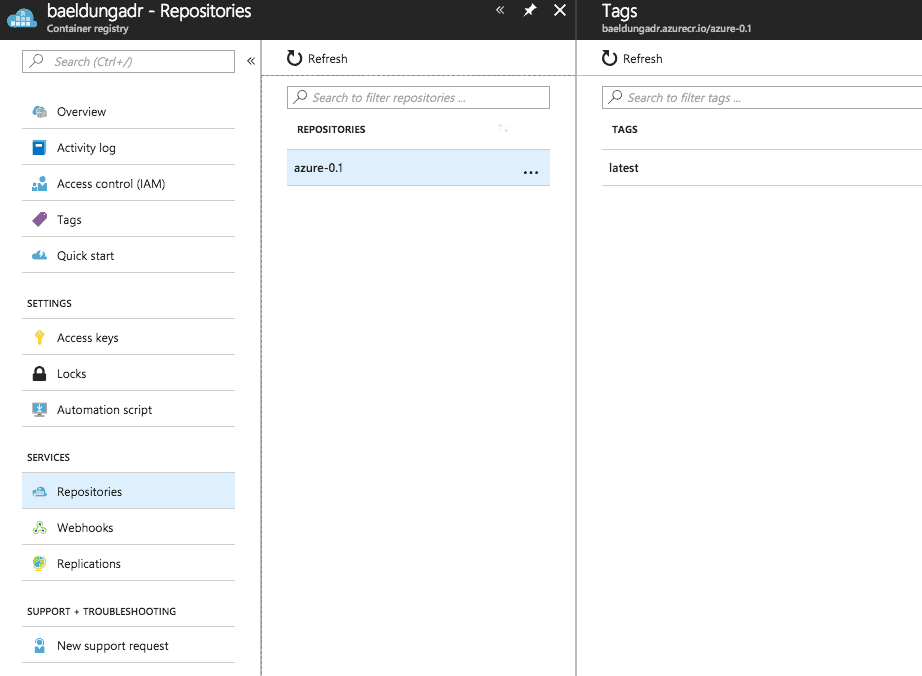
推送成功后,可在 Azure 门户的容器注册表中看到镜像:
现在,可以直接在 Azure 上创建一个容器实例来运行这个镜像:
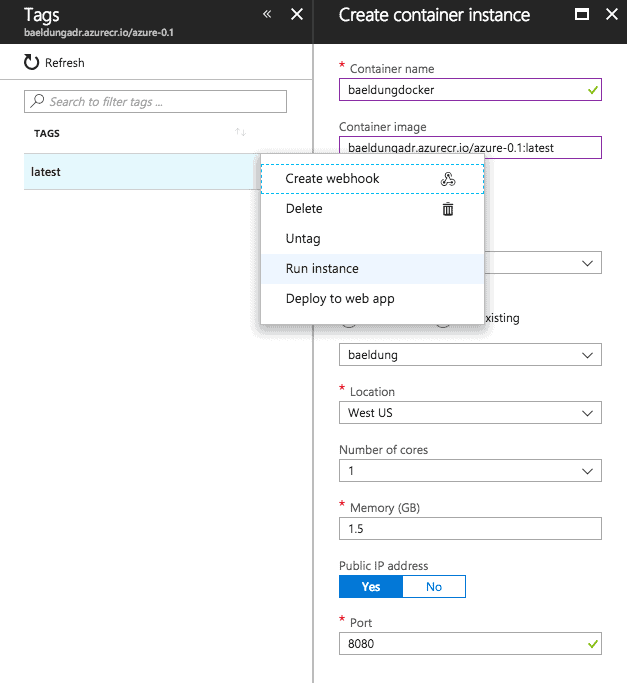
实例启动后,通过其公网 IP 访问应用:
> curl http://a.x.y.z:8080/hello
hello azure!
5.4 Docker 容器部署
假设你已经有了一个容器镜像(无论来自 ACR、Docker Hub 还是私有仓库),也可以使用 azure-webapp-maven-plugin 将其部署为 Azure App Service。
只需在插件配置中指定容器相关设置:
<configuration>
    <containerSettings>
        <imageName>${docker.image.prefix}/${project.artifactId}</imageName>
        <registryUrl>https://${docker.image.prefix}</registryUrl>
        <serverId>${azure.containerRegistry}</serverId>
    </containerSettings>
    <!-- ... 其他配置如 appName, resourceGroup 等 -->
</configuration>
执行 mvn azure-webapp:deploy 后,插件会帮你将应用部署到一个基于指定镜像的容器实例中。之后即可通过实例的 IP 或 App Service 的 URL 访问服务。
6. 总结
本文系统地介绍了将 Spring Boot 应用部署到 Azure 的多种方式:
- ✅ Web 容器部署:适合传统的 WAR 包应用。
- ✅ FTP 部署:提供更灵活的文件上传控制。
- ✅ 带自定义配置的部署:通过
<appSettings>安全地管理生产环境配置。 - ✅ 容器化部署:使用 Docker 镜像,实现更现代、更灵活的部署模式。
虽然我们覆盖了 azure-webapp-maven-plugin 的大部分核心功能,但其能力远不止于此。更多高级特性可参考其官方文档:GitHub 仓库。
文中所有代码示例均可在 GitHub 上找到:https://github.com/eugenp/tutorials/tree/master/azure