1. 概述
本文将探讨在 Spring Boot 应用运行时动态调整日志级别的几种方式。Spring Boot 默认集成了日志功能,但生产环境中我们常常需要在不重启服务的前提下,临时提升某个包或类的日志级别(比如从 INFO 调到 DEBUG 或 TRACE),用于排查问题。
我们将介绍以下四种实用方案:
✅ 使用 Spring Boot Actuator 的 loggers 接口
✅ 利用 Logback 的配置文件自动扫描(auto-scan)功能
✅ 借助 Spring Boot Admin 图形化管理工具
✅ 直接调用 LoggingSystem API 编程式修改
这些方法各有适用场景,你可以根据团队技术栈和运维习惯灵活选择。
2. 使用 Spring Boot Actuator 的 loggers 接口
Spring Boot Actuator 提供了 /actuator/loggers 接口,允许我们查看和修改运行时的日志级别,是最简单粗暴且无需额外依赖的方式。
2.1 环境准备
首先引入 Actuator 依赖:
<dependency>
    <groupId>org.springframework.boot</groupId>
    <artifactId>spring-boot-starter-actuator</artifactId>
    <version>3.1.5</version>
</dependency>
⚠️ 注意:Actuator 的大多数接口默认是关闭的,需要在 application.properties 中显式开启:
# 开启 loggers 接口
management.endpoints.web.exposure.include=loggers
management.endpoint.loggers.enabled=true
接着创建一个测试用的 Controller,模拟不同级别的日志输出:
@RestController
@RequestMapping("/log")
public class LoggingController {
    private Log log = LogFactory.getLog(LoggingController.class);

    @GetMapping
    public String log() {
        log.trace("This is a TRACE level message");
        log.debug("This is a DEBUG level message");
        log.info("This is an INFO level message");
        log.warn("This is a WARN level message");
        log.error("This is an ERROR level message");
        return "See the log for details";
    }
}
2.2 动态调整日志级别
启动应用后,先调用一次 /log 接口,观察日志输出:
curl http://localhost:8080/log
此时控制台应仅显示 INFO 及以上级别的日志:
2019-09-02 09:51:53.498  INFO 12208 --- [nio-8080-exec-1] c.b.s.b.m.logging.LoggingController      : This is an INFO level message
2019-09-02 09:51:53.498  WARN 12208 --- [nio-8080-exec-1] c.b.s.b.m.logging.LoggingController      : This is a WARN level message
2019-09-02 09:51:53.498 ERROR 12208 --- [nio-8080-exec-1] c.b.s.b.m.logging.LoggingController      : This is an ERROR level message
通过 loggers 接口查看当前 com.baeldung.spring.boot.management.logging 包的日志级别:
curl http://localhost:8080/actuator/loggers/com.baeldung.spring.boot.management.logging
返回结果:
{"configuredLevel":null,"effectiveLevel":"INFO"}
现在通过 POST 请求将其调整为 TRACE 级别:
curl -i -X POST \
  -H 'Content-Type: application/json' \
  -d '{"configuredLevel": "TRACE"}' \
  http://localhost:8080/actuator/loggers/com.baeldung.spring.boot.management.logging
返回 HTTP 204 表示成功。再次查询确认:
curl http://localhost:8080/actuator/loggers/com.baeldung.spring.boot.management.logging
{"configuredLevel":"TRACE","effectiveLevel":"TRACE"}
✅ 成功!再次调用 /log 接口,所有日志都会输出:
2019-09-02 09:59:20.283 TRACE 12208 --- [io-8080-exec-10] c.b.s.b.m.logging.LoggingController      : This is a TRACE level message
2019-09-02 09:59:20.283 DEBUG 12208 --- [io-8080-exec-10] c.b.s.b.m.logging.LoggingController      : This is a DEBUG level message
...
💡 小贴士:
configuredLevel为null表示使用继承的级别,非null表示显式设置。设为null可恢复默认。
3. 使用 Logback 配置文件自动扫描
Spring Boot 默认使用 Logback 作为日志框架。Logback 支持配置文件热加载,无需重启即可生效。
3.1 启用 auto-scan
在 src/main/resources 下创建 logback.xml:
<configuration scan="true" scanPeriod="15 seconds">
    <appender name="STDOUT" class="ch.qos.logback.core.ConsoleAppender">
        <encoder>
            <pattern>%d{HH:mm:ss.SSS} [%thread] %-5level %logger{36} - %msg%n</pattern>
        </encoder>
    </appender>

    <logger name="com.baeldung.spring.boot.management.logging" level="INFO" />

    <root level="info">
        <appender-ref ref="STDOUT" />
    </root>
</configuration>
关键点:
scan="true":开启配置文件变更监听scanPeriod="15 seconds":每 15 秒检查一次,避免默认 60 秒等待太久
3.2 实时修改配置
启动应用,调用 /log 接口,日志级别为 INFO。
直接修改 logback.xml 中的 logger 级别为 TRACE:
<logger name="com.baeldung.spring.boot.management.logging" level="TRACE" />
等待约 15 秒,Logback 自动重载配置。再次调用接口,即可看到 TRACE 和 DEBUG 日志输出:
10:24:18.429 [http-nio-8080-exec-2] TRACE c.b.s.b.m.logging.LoggingController - This is a TRACE level message
10:24:18.430 [http-nio-8080-exec-2] DEBUG c.b.s.b.m.logging.LoggingController - This is a DEBUG level message
...
⚠️ 踩坑提醒:
scanPeriod设置过短(如 1s)可能影响性能,建议生产环境设为 30s 或 60s。
4. 使用 Spring Boot Admin 图形化管理
如果你的团队已经接入 Spring Boot Admin,那么调整日志级别就变得可视化、傻瓜化了。
4.1 搭建 Admin Server
新建一个项目作为 Admin Server,引入依赖:
<dependency>
    <groupId>de.codecentric</groupId>
    <artifactId>spring-boot-admin-starter-server</artifactId>
    <version>3.1.5</version>
</dependency>
启动类加上 @EnableAdminServer 注解。
4.2 配置客户端
在目标应用(即需要调日志级别的服务)中添加依赖:
<dependency>
    <groupId>de.codecentric</groupId>
    <artifactId>spring-boot-admin-starter-client</artifactId>
    <version>3.1.5</version>
</dependency>
<dependency>
    <groupId>org.springframework.boot</groupId>
    <artifactId>spring-boot-starter-security</artifactId>
    <version>3.1.5</version>
</dependency>
application.properties 配置:
# 应用基本信息
spring.application.name=spring-boot-management
server.port=8081

# 安全认证
spring.security.user.name=client
spring.security.user.password=client

# Admin Server 地址
spring.boot.admin.client.url=http://localhost:8080
spring.boot.admin.client.username=admin
spring.boot.admin.client.password=admin

# 传递元数据(用于登录客户端详情页)
spring.boot.admin.client.instance.metadata.user.name=${spring.security.user.name}
spring.boot.admin.client.instance.metadata.user.password=${spring.security.user.password}

# 暴露必要接口
management.endpoints.web.exposure.include=httptrace,loggers,health,info,metrics
由于修改日志级别是 POST 请求,需关闭 Actuator 的 CSRF 保护:
@Configuration
@EnableWebSecurity
public class SecurityConfig extends WebSecurityConfigurerAdapter {
    @Override
    protected void configure(HttpSecurity http) throws Exception {
        http.csrf().ignoringAntMatchers("/actuator/**");
    }
}
4.3 图形化操作
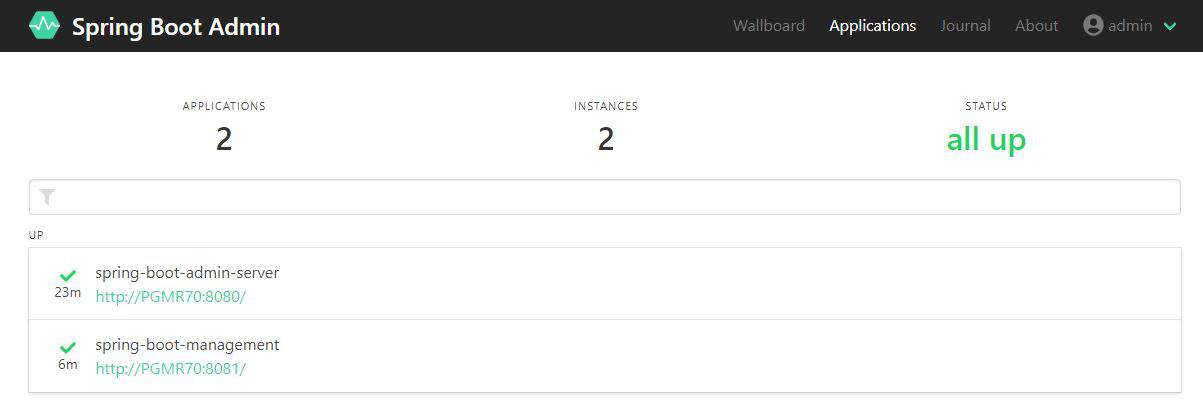
启动 Admin Server 和客户端应用。
访问 http://localhost:8080,使用 admin/admin 登录,即可看到注册的客户端应用:
点击应用进入详情页,左侧菜单选择 Loggers:
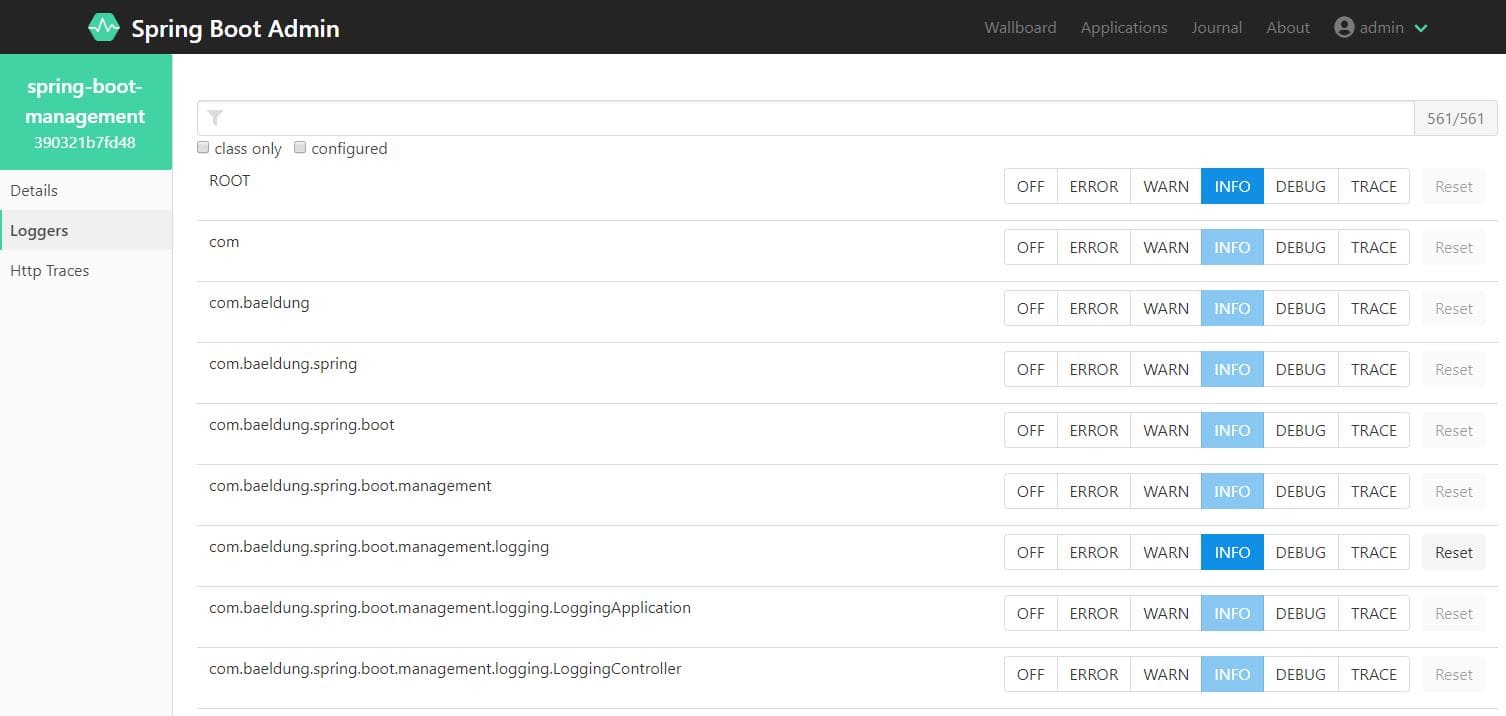
找到目标 logger(如 com.baeldung.spring.boot.management.logging),点击下拉框改为 TRACE,保存:
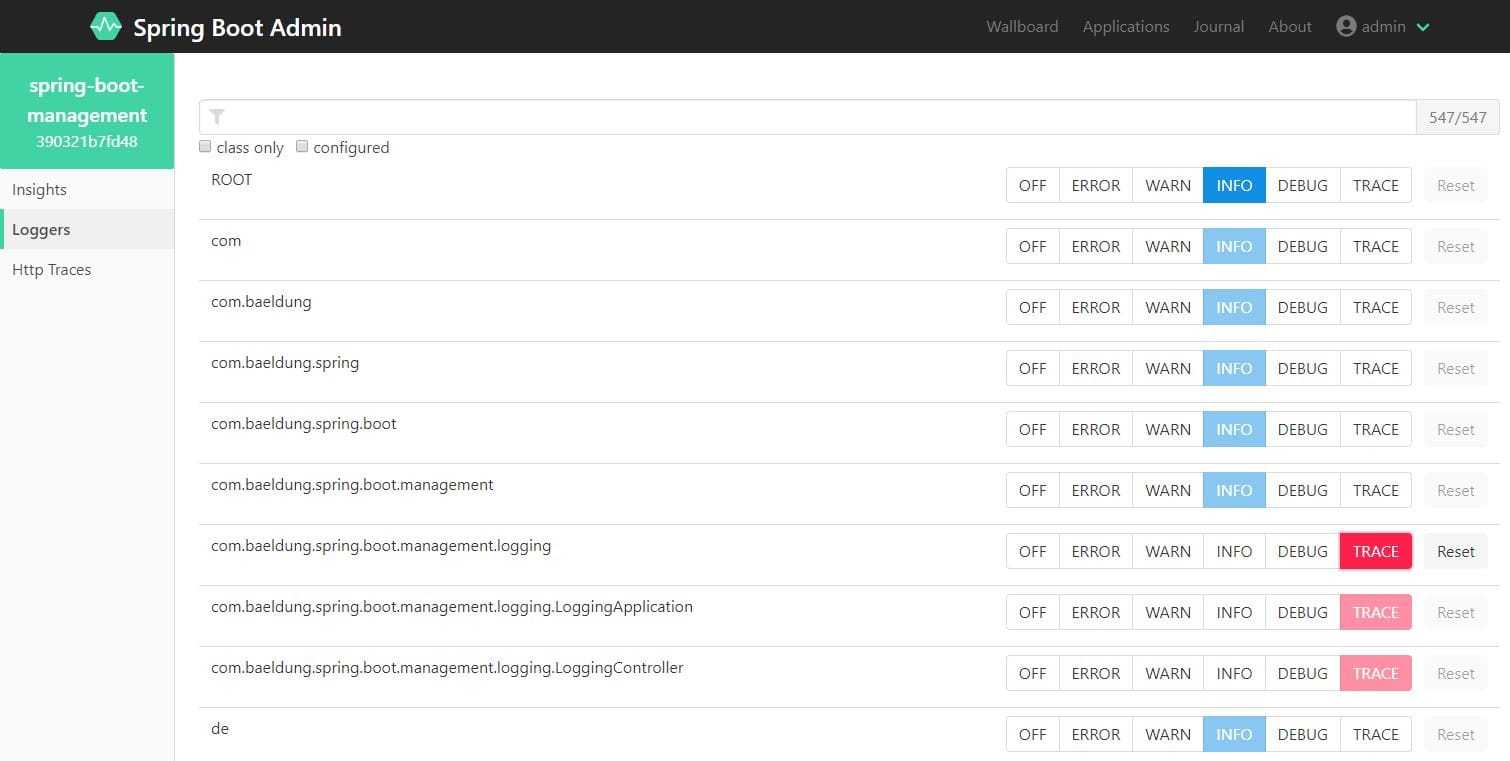
✅ 搞定!无需敲命令,点点鼠标即可生效。
5. 编程式调用 LoggingSystem
Spring Boot 提供了 LoggingSystem 抽象,允许我们通过代码直接控制日志级别,适合封装成内部工具接口。
示例:添加一个临时 debug 接口
@GetMapping("/change-to-error")
public String changeLogLevelToError() {
    LoggingSystem system = LoggingSystem.get(LoggingController.class.getClassLoader());
    system.setLogLevel(LoggingController.class.getName(), LogLevel.ERROR);
    return "changed log level to error";
}
💡 说明:
LoggingSystem是 Spring Boot 的内部组件,会根据 classpath 自动选择 Logback、Log4j2 等实现,具有良好的兼容性。
6. 总结
| 方案 | 优点 | 缺点 | 推荐场景 |
|---|---|---|---|
| Actuator loggers | 零依赖、标准 REST API | 需暴露接口,安全性需考虑 | 大多数场景首选 |
| Logback auto-scan | 无需编码,文件驱动 | 修改需登录服务器,生效有延迟 | 配合配置中心使用 |
| Spring Boot Admin | 图形化、易用性强 | 需额外搭建 Admin Server | 已使用 SBA 的团队 |
| LoggingSystem API | 可编程、灵活 | 需自行封装接口 | 内部工具、自动化脚本 |
生产环境建议结合使用:
- 日常运维用 Spring Boot Admin
- 紧急排查用 Actuator 接口
- 配置变更用 Logback + 配置中心
🔗 示例代码已托管至 GitHub: