1. 概述
本文将带你了解如何通过 Spring Cloud Netflix Eureka 实现 客户端服务发现。
客户端服务发现允许服务间相互通信,无需硬编码主机名和端口。这种架构中唯一的"固定点"是服务注册中心,每个服务都必须向它注册。
⚠️ 这种方式有个缺点:所有客户端都必须实现特定逻辑与注册中心交互,这会导致实际请求前多一次网络往返。
使用 Netflix Eureka 时,每个客户端可同时作为服务器,将自身状态复制给连接的对等节点。换句话说,客户端从服务注册中心获取所有已连接节点的列表,并通过负载均衡算法向其他服务发起后续请求。
客户端必须向注册中心发送心跳信号,以表明自己的存活状态。
为达成目标,我们将实现三个微服务:
- 服务注册中心(Eureka Server)
- 向注册中心注册的 REST 服务(Eureka Client)
- 消费 REST 服务的 Web 应用(Spring Cloud Netflix Feign Client)
2. Eureka Server
实现服务注册中心的 Eureka Server 非常简单,只需三步:
- 添加
spring-cloud-starter-netflix-eureka-server依赖 - 在
@SpringBootApplication上添加@EnableEurekaServer注解 - 配置必要属性
我们一步步来操作。
首先创建 Maven 项目并添加依赖。注意所有项目都引入了 spring-cloud-starter-parent:
<dependency>
    <groupId>org.springframework.cloud</groupId>
    <artifactId>spring-cloud-starter-netflix-eureka-server</artifactId>
</dependency>

<dependencyManagement>
    <dependencies>
        <dependency>
            <groupId>org.springframework.cloud</groupId>
            <artifactId>spring-cloud-starter-parent</artifactId>
            <version>2023.0.0</version>
            <type>pom</type>
            <scope>import</scope>
        </dependency>
    </dependencies>
</dependencyManagement>
最新 Spring Cloud 版本可在 Spring 官方文档 查看。
然后创建主应用类:
@SpringBootApplication
@EnableEurekaServer
public class EurekaServerApplication {
    public static void main(String[] args) {
        SpringApplication.run(EurekaServerApplication.class, args);
    }
}
最后在 application.yml 中配置:
server:
  port: 8761
eureka:
  client:
    registerWithEureka: false
    fetchRegistry: false
这里配置了应用端口(Eureka 服务器默认端口是 8761)。我们通过 registerWithEureka: false 告诉内置的 Eureka 客户端不要向自己注册,因为当前应用应作为服务器运行。
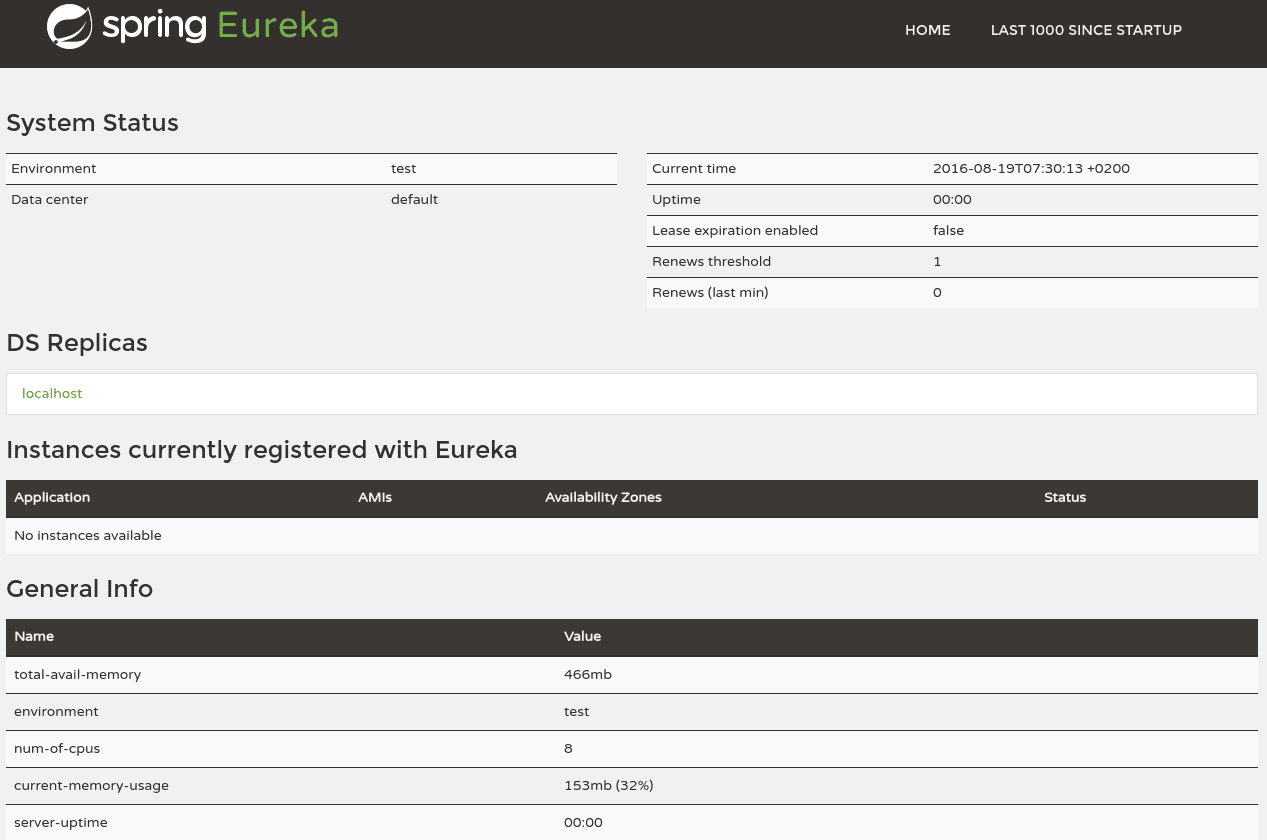
现在访问 http://localhost:8761 查看 Eureka 控制台,稍后我们将在其中检查已注册实例。当前页面会显示基础指标(如状态和健康指标):
3. Eureka Client
要让 @SpringBootApplication 具备服务发现能力,需在 classpath 中添加 Spring Discovery Client(如 spring-cloud-starter-netflix-eureka-client),并在 @Configuration 类上添加 @EnableDiscoveryClient 或 @EnableEurekaClient 注解。
✅ 注意:如果 classpath 已包含 spring-cloud-starter-netflix-eureka-client,该注解可省略。
为丰富客户端功能,我们还在 pom.xml 中添加 spring-boot-starter-web 并实现 REST 控制器。
先添加依赖(版本由 spring-cloud-starter-parent 自动管理):
<dependency>
    <groupId>org.springframework.cloud</groupId>
    <artifactId>spring-cloud-starter-netflix-eureka-client</artifactId>
</dependency>
<dependency>
    <groupId>org.springframework.boot</groupId>
    <artifactId>spring-boot-starter-web</artifactId>
</dependency>
实现主应用类:
@SpringBootApplication
@RestController
public class EurekaClientApplication implements GreetingController {

    @Autowired
    @Lazy
    private EurekaClient eurekaClient;

    @Value("${spring.application.name}")
    private String appName;

    public static void main(String[] args) {
        SpringApplication.run(EurekaClientApplication.class, args);
    }

    @Override
    public String greeting() {
        return String.format(
          "Hello from '%s'!", eurekaClient.getApplication(appName).getName());
    }
}
以及 GreetingController 接口:
public interface GreetingController {
    @RequestMapping("/greeting")
    String greeting();
}
也可直接在
EurekaClientApplication中声明映射,但接口形式便于在服务端和客户端间共享。
接下来配置 application.yml:
- 设置
spring.application.name唯一标识客户端 - 让 Spring Boot 自动选择随机端口(后续通过服务名访问)
- 指定注册中心地址
spring:
  application:
    name: spring-cloud-eureka-client
server:
  port: 0
eureka:
  client:
    serviceUrl:
      defaultZone: ${EUREKA_URI:http://localhost:8761/eureka}
  instance:
    preferIpAddress: true
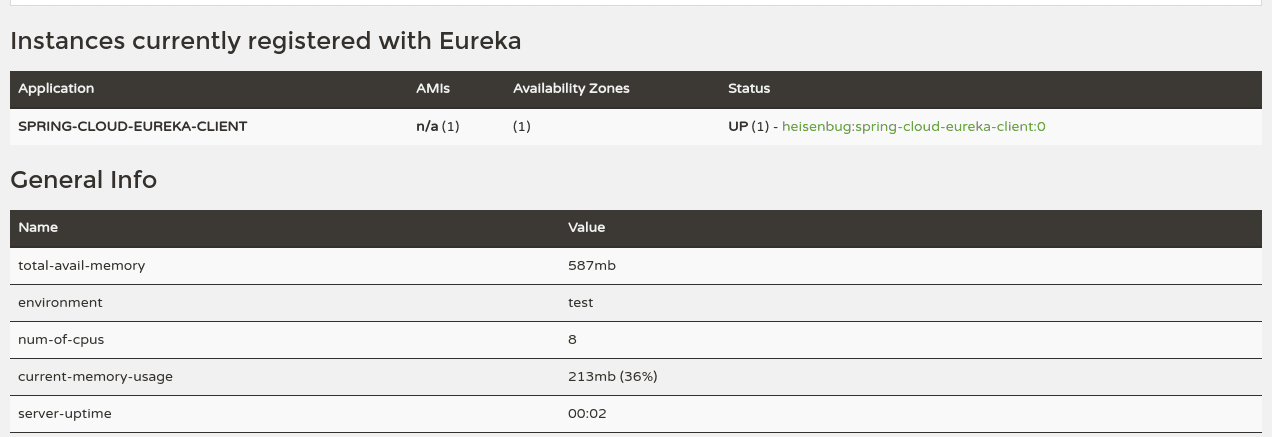
这种配置便于后续服务扩展。启动客户端后,再次访问 http://localhost:8761 查看注册状态:
4. Feign Client
最后实现使用 Spring Netflix Feign Client 消费服务的 Web 应用,完成三微服务架构。
Feign 本质是支持服务发现的 Spring RestTemplate,通过接口与接口通信。这些接口在运行时自动实现,且使用服务名而非 URL 替代服务地址。
❌ 如果不用 Feign,需手动注入 EurekaClient:
@Autowired
private EurekaClient eurekaClient;

@RequestMapping("/get-greeting-no-feign")
public String greeting(Model model) {
    InstanceInfo service = eurekaClient
      .getApplication("spring-cloud-eureka-client")
      .getInstances()
      .get(0);

    String hostName = service.getHostName();
    int port = service.getPort();
    // ... 手动发起 HTTP 请求
}
RestTemplate 也可通过服务名访问 Eureka 客户端,但本文不展开。
为搭建 Feign Client 项目,在 pom.xml 添加四个依赖:
<dependency>
    <groupId>org.springframework.cloud</groupId>
    <artifactId>spring-cloud-starter-feign</artifactId>
</dependency>
<dependency>
    <groupId>org.springframework.cloud</groupId>
    <artifactId>spring-cloud-starter-netflix-eureka-client</artifactId>
</dependency>
<dependency>
    <groupId>org.springframework.boot</groupId>
    <artifactId>spring-boot-starter-web</artifactId>
</dependency>
<dependency>
    <groupId>org.springframework.boot</groupId>
    <artifactId>spring-boot-starter-thymeleaf</artifactId>
</dependency>
关键点:
spring-cloud-starter-feign提供 Feign 支持- 需在
@Configuration上添加@EnableFeignClients启用 - 接口添加
@FeignClient("service-name")即可注入控制器
最佳实践:将带有 @RequestMapping 的接口放在独立模块共享。服务端实现为 @Controller,客户端扩展为 @FeignClient。
Feign Client 接口示例:
@FeignClient("spring-cloud-eureka-client")
public interface GreetingClient {
    @RequestMapping("/greeting")
    String greeting();
}
主应用类(兼控制器):
@SpringBootApplication
@EnableFeignClients
@Controller
public class FeignClientApplication {
    @Autowired
    private GreetingClient greetingClient;

    public static void main(String[] args) {
        SpringApplication.run(FeignClientApplication.class, args);
    }

    @RequestMapping("/get-greeting")
    public String greeting(Model model) {
        model.addAttribute("greeting", greetingClient.greeting());
        return "greeting-view";
    }
}
Thymeleaf 模板:
<!DOCTYPE html>
<html xmlns:th="http://www.thymeleaf.org">
    <head>
        <title>Greeting Page</title>
    </head>
    <body>
        <h2 th:text="${greeting}"/>
    </body>
</html>
application.yml 配置与客户端类似:
spring:
  application:
    name: spring-cloud-eureka-feign-client
server:
  port: 8080
eureka:
  client:
    serviceUrl:
      defaultZone: ${EUREKA_URI:http://localhost:8761/eureka}
启动服务后访问 http://localhost:8080/get-greeting,将显示:
Hello from SPRING-CLOUD-EUREKA-CLIENT!
5. 踩坑:TransportException: Cannot Execute Request on Any Known Server
运行 Eureka 服务器时,常遇到如下异常:
com.netflix.discovery.shared.transport.TransportException: Cannot execute request on any known server
根本原因通常是 application.yml 配置错误。Eureka 客户端有两个关键属性:
registerWithEureka:设为true时,服务器启动时内置客户端会尝试向 Eureka 注册fetchRegistry:设为true时,内置客户端会尝试获取注册表
⚠️ 启动 Eureka 服务器时,我们不希望内置客户端注册自己!如果这些属性为 true(默认值),启动时内置客户端会尝试注册和获取注册表,但此时注册表尚未就绪,导致 TransportException。
正确配置(Eureka 服务器专用):
eureka:
  client:
    registerWithEureka: false
    fetchRegistry: false
6. 总结
本文介绍了如何使用 Spring Netflix Eureka Server 实现服务注册中心,并向其注册 Eureka Client。
由于第 3 步的 Eureka Client 监听随机端口,离开注册中心无法确定自身位置。通过 Feign Client 和注册中心,即使服务位置变化,我们也能定位并消费 REST 服务。
最后我们了解了微服务架构中服务发现的整体应用。完整代码可在 GitHub 获取,其中还包含使用 docker-compose 创建容器的 Docker 相关文件。