1. 概述
本教程将介绍 Spring Cloud Netflix Hystrix——这个容错库。我们将通过该库实现熔断器(Circuit Breaker)企业级模式,该模式旨在防止应用程序中不同级别的故障级联。
其原理类似于电子学:Hystrix 会监控方法调用相关服务时的失败情况。一旦检测到失败,它就会打开熔断器并将调用转发到降级方法(fallback method)。
该库会容忍一定阈值内的失败。超过阈值后,熔断器将保持打开状态。这意味着所有后续调用都会被转发到降级方法,以防止未来再次失败。这为相关服务提供了恢复缓冲时间。
2. REST 生产者
为了演示熔断器模式,我们首先需要一个服务。我们称之为“REST 生产者”,因为它将为下一步创建的、启用了 Hystrix 的“REST 消费者”提供数据。
使用 spring-boot-starter-web 依赖创建一个新的 Maven 项目:
<dependency>
    <groupId>org.springframework.boot</groupId>
    <artifactId>spring-boot-starter-web</artifactId>
    <version>2.2.6.RELEASE</version>
</dependency>
项目本身被有意设计得非常简单。它包含一个带有 @RequestMapping 注解的 GET 方法的控制器接口,该方法返回一个简单的 String;一个实现该接口的 @RestController;以及一个 @SpringBootApplication。
我们从接口开始:
public interface GreetingController {
    @GetMapping("/greeting/{username}")
    String greeting(@PathVariable("username") String username);
}
以及实现:
@RestController
public class GreetingControllerImpl implements GreetingController {

    @Override
    public String greeting(@PathVariable("username") String username) {
        return String.format("Hello %s!\n", username);
    }
}
接下来编写主应用类:
@SpringBootApplication
public class RestProducerApplication {
    public static void main(String[] args) {
        SpringApplication.run(RestProducerApplication.class, args);
    }
}
最后一步是在 application.properties 中配置监听端口。我们不使用默认端口 8080,因为该端口需要预留给下一步的应用程序。同时定义一个应用名称,以便后续的客户端应用程序查找我们的生产者:
server.port=9090
spring.application.name=rest-producer
现在可以使用 cURL 测试生产者:
$> curl http://localhost:9090/greeting/Cid
Hello Cid!
3. 集成 Hystrix 的 REST 消费者
我们的演示场景将实现一个使用 RestTemplate 和 Hystrix 消费上一步 REST 服务的 Web 应用程序。为简洁起见,我们称之为“REST 消费者”。
创建一个新的 Maven 项目,添加以下依赖:
spring-cloud-starter-hystrixspring-boot-starter-webspring-boot-starter-thymeleaf
<dependency>
    <groupId>org.springframework.cloud</groupId>
    <artifactId>spring-cloud-starter-hystrix</artifactId>
    <version>1.4.7.RELEASE</version>
</dependency>
<dependency>
    <groupId>org.springframework.boot</groupId>
    <artifactId>spring-boot-starter-web</artifactId>
    <version>2.2.6.RELEASE</version>
</dependency>
<dependency>
    <groupId>org.springframework.boot</groupId>
    <artifactId>spring-boot-starter-thymeleaf</artifactId>
    <version>2.2.6.RELEASE</version>
</dependency>
熔断器生效的关键:Hystrix 会扫描 @Component 或 @Service 注解的类,寻找带有 @HystrixCommand 注解的方法,为其创建代理并监控调用。
首先创建一个可注入的 @Service 类,它将被注入到 @Controller 中。由于我们使用 Thymeleaf 构建 Web 应用程序,还需要一个 HTML 模板作为视图。
以下是带有 @HystrixCommand 和关联降级方法的 @Service 实现。降级方法必须与原始方法签名一致:
@Service
public class GreetingService {
    @HystrixCommand(fallbackMethod = "defaultGreeting")
    public String getGreeting(String username) {
        return new RestTemplate()
          .getForObject("http://localhost:9090/greeting/{username}",
          String.class, username);
    }

    private String defaultGreeting(String username) {
        return "Hello User!";
    }
}
RestConsumerApplication 作为主应用类。@EnableCircuitBreaker 注解会扫描类路径中的兼容熔断器实现。要显式使用 Hystrix,需添加 @EnableHystrix:
@SpringBootApplication
@EnableCircuitBreaker
public class RestConsumerApplication {
    public static void main(String[] args) {
        SpringApplication.run(RestConsumerApplication.class, args);
    }
}
配置控制器使用 GreetingService:
@Controller
public class GreetingController {

    @Autowired
    private GreetingService greetingService;

    @GetMapping("/get-greeting/{username}")
    public String getGreeting(Model model, @PathVariable("username") String username) {
        model.addAttribute("greeting", greetingService.getGreeting(username));
        return "greeting-view";
    }
}
HTML 模板如下:
<!DOCTYPE html>
<html xmlns:th="http://www.thymeleaf.org">
    <head>
        <title>Greetings from Hystrix</title>
    </head>
    <body>
        <h2 th:text="${greeting}"/>
    </body>
</html>
在 application.properties 中确保应用监听指定端口:
server.port=8080
观察 Hystrix 熔断器效果:启动消费者,访问 http://localhost:8080/get-greeting/Cid。正常情况下显示:
Hello Cid!
模拟生产者故障:停止生产者服务,刷新浏览器后,将看到来自 @Service 降级方法的通用消息:
Hello User!
4. 集成 Hystrix 和 Feign 的 REST 消费者
现在我们修改上一步的项目,使用 Spring Netflix Feign 作为声明式 REST 客户端替代 Spring RestTemplate。
优势在于后续可轻松重构 Feign Client 接口,使用 Spring Netflix Eureka 进行服务发现。
复制消费者项目并添加依赖:
- 生产者项目
spring-cloud-starter-feign
<dependency>
    <groupId>com.baeldung.spring.cloud</groupId>
    <artifactId>spring-cloud-hystrix-rest-producer</artifactId>
    <version>1.0.0-SNAPSHOT</version>
</dependency>
<dependency>
    <groupId>org.springframework.cloud</groupId>
    <artifactId>spring-cloud-starter-feign</artifactId>
    <version>1.1.5.RELEASE</version>
</dependency>
现在使用 GreetingController 扩展 Feign Client。Hystrix 降级实现为带 @Component 注解的静态内部类(也可通过 @Bean 方法返回降级类实例)。
@FeignClient 的 name 属性是必需的,用于通过服务发现(如 Eureka)或 URL 查找应用:
@FeignClient(
  name = "rest-producer"
  url = "http://localhost:9090",
  fallback = GreetingClient.GreetingClientFallback.class
)
public interface GreetingClient extends GreetingController {

    @Component
    public static class GreetingClientFallback implements GreetingController {

        @Override
        public String greeting(@PathVariable("username") String username) {
            return "Hello User!";
        }
    }
}
在 RestConsumerFeignApplication 中添加 @EnableFeignClients 启用 Feign 集成:
@SpringBootApplication
@EnableCircuitBreaker
@EnableFeignClients
public class RestConsumerFeignApplication {

    public static void main(String[] args) {
        SpringApplication.run(RestConsumerFeignApplication.class, args);
    }
}
修改控制器使用自动装配的 Feign Client 替代之前的 @Service:
@Controller
public class GreetingController {
    @Autowired
    private GreetingClient greetingClient;

    @GetMapping("/get-greeting/{username}")
    public String getGreeting(Model model, @PathVariable("username") String username) {
        model.addAttribute("greeting", greetingClient.greeting(username));
        return "greeting-view";
    }
}
为区分示例,在 application.properties 中修改监听端口:
server.port=8082
测试此 Feign 消费者,预期结果与上一步相同。
5. 使用 Hystrix 实现缓存降级
现在将 Hystrix 集成到 Spring Cloud 项目中。该云项目中有一个与数据库交互并获取书籍评分的评分服务。
假设数据库是高负载资源,其响应延迟可能波动,甚至可能暂时不可用。我们将使用 Hystrix 熔断器降级到缓存读取数据来处理此场景。
5.1. 设置与配置
在评分模块添加 spring-cloud-starter-hystrix 依赖:
<dependency>
    <groupId>org.springframework.cloud</groupId>
    <artifactId>spring-cloud-starter-hystrix</artifactId>
</dependency>
当评分在数据库中插入/更新/删除时,通过 Repository 将相同数据复制到 Redis 缓存。Redis 相关内容可参考此文。
更新 RatingService,用 @HystrixCommand 包装数据库查询方法,并配置降级到 Redis 读取:
@HystrixCommand(
  commandKey = "ratingsByIdFromDB",
  fallbackMethod = "findCachedRatingById",
  ignoreExceptions = { RatingNotFoundException.class })
public Rating findRatingById(Long ratingId) {
    return Optional.ofNullable(ratingRepository.findOne(ratingId))
      .orElseThrow(() ->
        new RatingNotFoundException("Rating not found. ID: " + ratingId));
}

public Rating findCachedRatingById(Long ratingId) {
    return cacheRepository.findCachedRatingById(ratingId);
}
⚠️ 注意:降级方法必须与包装方法签名相同且位于同一类中。当 findRatingById 失败或超过给定阈值延迟时,Hystrix 将降级到 findCachedRatingById。
由于 Hystrix 功能通过 AOP 透明注入,若存在其他切面(如 Spring 事务切面),需调整切面执行顺序。这里设置 Spring 事务 AOP 切面优先级低于 Hystrix AOP 切面:
@EnableHystrix
@EnableTransactionManagement(
  order=Ordered.LOWEST_PRECEDENCE,
  mode=AdviceMode.ASPECTJ)
public class RatingServiceApplication {
    @Bean
    @Primary
    @Order(value=Ordered.HIGHEST_PRECEDENCE)
    public HystrixCommandAspect hystrixAspect() {
        return new HystrixCommandAspect();
    }

    // 其他 Bean 和配置
}
5.2. 测试 Hystrix 降级
配置完成后,可通过关闭 H2 数据库测试熔断效果。但首先需将 H2 作为外部进程运行(而非嵌入式数据库)。
将 H2 库(h2-1.4.193.jar)复制到指定目录并启动服务:
>java -cp h2-1.4.193.jar org.h2.tools.Server -tcp
TCP server running at tcp://192.168.99.1:9092 (only local connections)
更新 rating-service.properties 中的数据源 URL:
spring.datasource.url = jdbc:h2:tcp://localhost/~/ratings
按前文启动服务,然后关闭外部 H2 实例测试书籍评分。
当 H2 数据库不可达时,Hystrix 自动降级到 Redis 读取书籍评分。完整示例代码见此处。
6. 作用域使用
通常 @HystrixCommand 注解的方法在线程池上下文中执行。但有时需要在本地作用域(如 @SessionScope 或 @RequestScope)运行,可通过注解参数实现:
@HystrixCommand(fallbackMethod = "getSomeDefault", commandProperties = {
  @HystrixProperty(name = "execution.isolation.strategy", value = "SEMAPHORE")
})
7. Hystrix 仪表盘
Hystrix 的一个实用功能是支持通过仪表盘监控状态。
启用方式:在消费者的 pom.xml 中添加:
spring-cloud-starter-hystrix-dashboardspring-boot-starter-actuator
<dependency>
    <groupId>org.springframework.cloud</groupId>
    <artifactId>spring-cloud-starter-hystrix-dashboard</artifactId>
    <version>1.4.7.RELEASE</version>
</dependency>
<dependency>
    <groupId>org.springframework.boot</groupId>
    <artifactId>spring-boot-starter-actuator</artifactId>
    <version>2.2.6.RELEASE</version>
</dependency>
前者需通过 @Configuration 类添加 @EnableHystrixDashboard 启用,后者会自动在 Web 应用中启用所需指标。
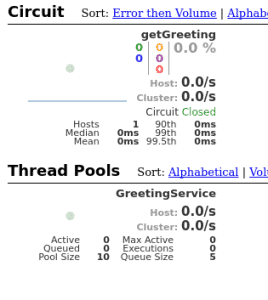
重启应用后,访问 http://localhost:8080/hystrix,输入 Hystrix 流的指标 URL 即可开始监控。最终界面类似下图:
✅ 监控单个 Hystrix 流很方便,但当需要监控多个应用时,Spring Cloud 提供了 Turbine 工具聚合流到统一仪表盘(配置超出本文范围,但值得了解)。也可通过消息传递(Turbine Stream)收集流。
8. 总结
如上所述,我们已能通过 Spring Netflix Hystrix 结合 Spring RestTemplate 或 Spring Netflix Feign 实现熔断器模式。这意味着:
- 可使用默认数据实现服务消费降级
- 能监控数据使用情况
完整源码见 GitHub。
