1. 概述
本文将详细介绍 如何使用 Spring Security 5 构建一个 OAuth 2.0 资源服务器。
我们将分别实现两种主流的令牌验证方式:
✅ JWT(JSON Web Token)
✅ Opaque Token(不透明令牌)
在进入代码实现之前,先快速梳理一下背景知识,确保理解底层逻辑。毕竟踩过坑才知道,光会配置不理解原理,出问题时根本无从下手。
2. 背景知识
2.1 JWT 与 Opaque Token 的区别
- JWT:是一种自包含的令牌格式(遵循 RFC 7519),以 JSON 结构明文携带用户信息、过期时间、签发者等元数据。资源服务器可直接解析并验证签名,无需每次都调用授权服务器。
- Opaque Token:顾名思义,内容对外“不透明”,只是一个随机字符串。它本身不包含任何有效信息,资源服务器必须通过 Token Introspection 接口向授权服务器发起请求,查询该令牌是否有效、权限如何。
🔍 简单粗暴理解:JWT 是“自带身份证”,Opaque Token 是“需要联网查号”。
2.2 什么是资源服务器(Resource Server)
在 OAuth 2.0 体系中,资源服务器是负责保护受保护资源的服务应用。它不负责发令牌,只负责验令牌。
当客户端携带 Authorization: Bearer <token> 请求资源时,资源服务器需验证以下几点:
- ✅ 令牌是否由可信的授权服务器签发
- ✅ 是否已过期
- ✅ 当前服务是否是目标受众(audience)
- ✅ 是否具备访问该资源所需的权限(如 scope)
下面是典型的授权码流程时序图,我们重点关注第 8、9 步:
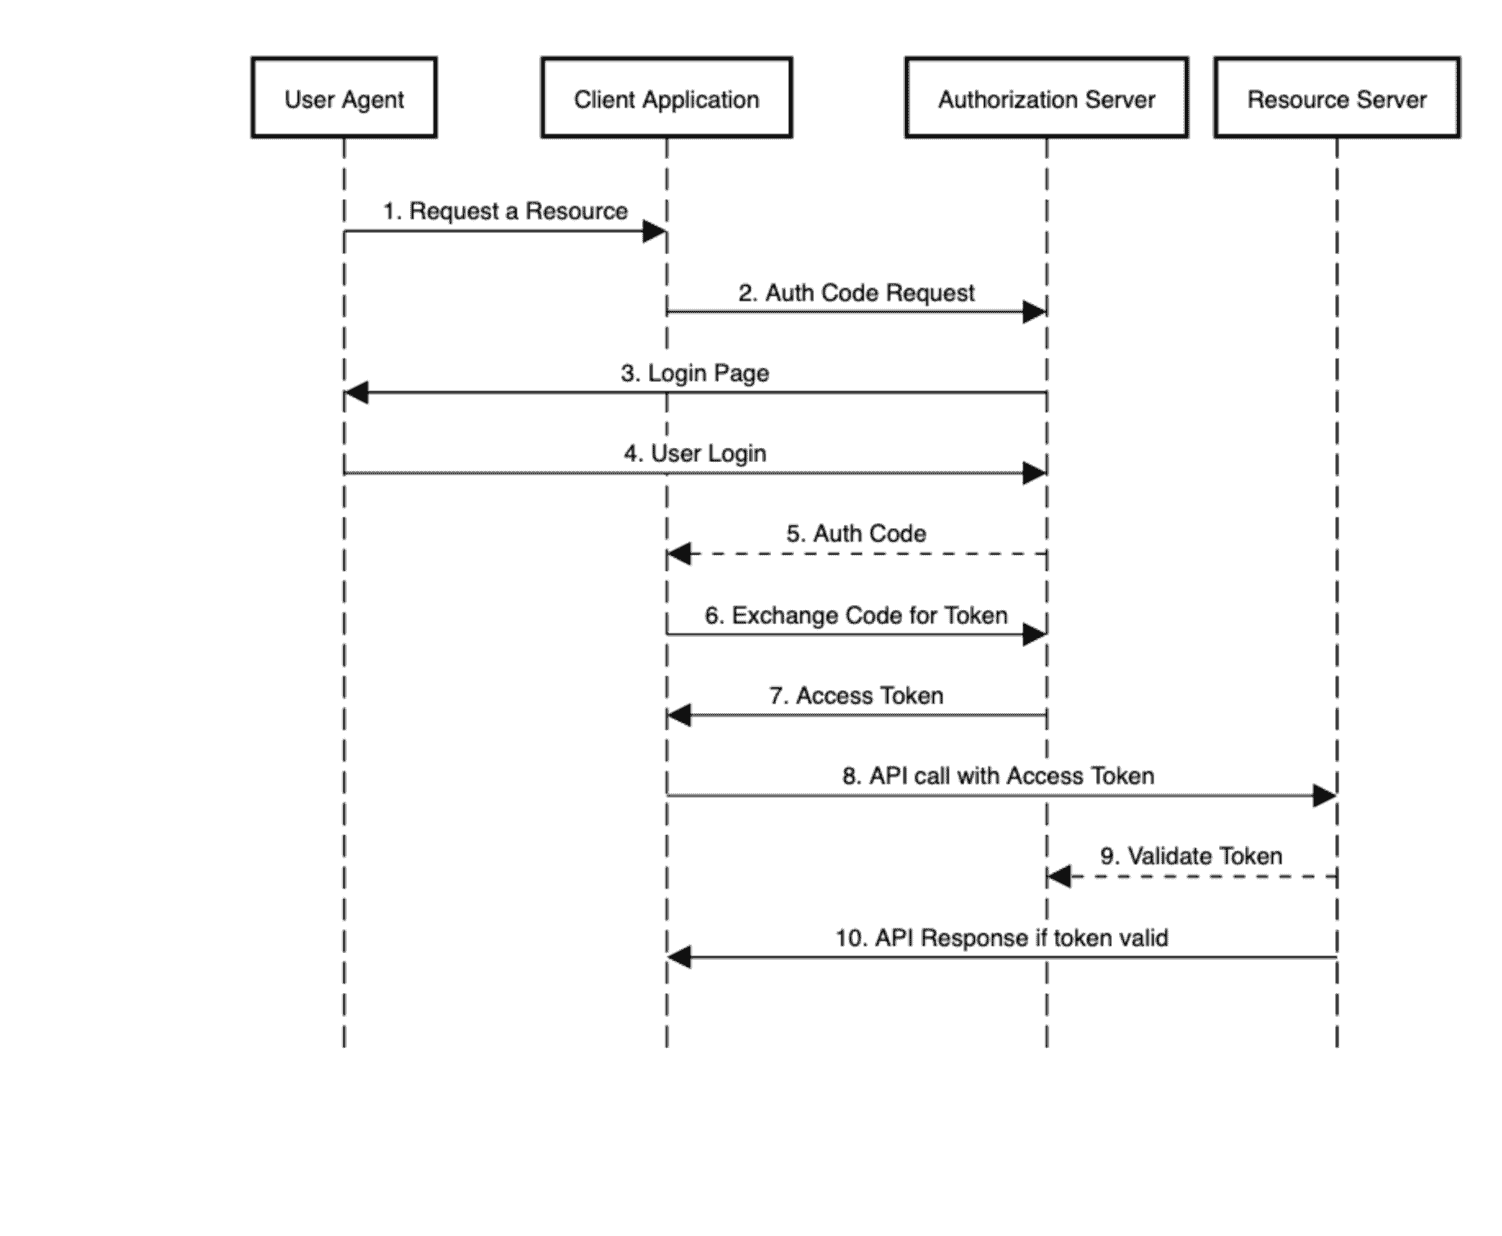
图中第 8 步:客户端调用资源服务器
第 9 步:资源服务器向授权服务器验证令牌(本文重点)
3. 授权服务器搭建(Keycloak 嵌入式)
我们使用 Keycloak 作为授权服务器。它是开源的身份与访问管理方案,支持 OpenID Connect 和 OAuth 2.0。
💡 本文重点在资源服务器,因此 Keycloak 的配置细节不再展开。感兴趣可参考:《Spring Boot 集成嵌入式 Keycloak》
我们预设了两个客户端:
fooClient→ 对应 JWT 资源服务器barClient→ 对应 Opaque Token 资源服务器
Keycloak 运行在 http://localhost:8083/auth/realms/baeldung
4. 资源服务器 – 使用 JWT
4.1 Maven 依赖
核心依赖是 spring-boot-starter-oauth2-resource-server,它自动引入 Spring Security 并提供资源服务器支持。
<dependency>
    <groupId>org.springframework.boot</groupId>
    <artifactId>spring-boot-starter-web</artifactId>
    <version>2.7.5</version>
</dependency>
<dependency>
    <groupId>org.springframework.boot</groupId>
    <artifactId>spring-boot-starter-oauth2-resource-server</artifactId>
    <version>2.7.5</version>
</dependency>
<dependency>
    <groupId>org.apache.commons</groupId>
    <artifactId>commons-lang3</artifactId>
    <version>3.13.0</version>
</dependency>
⚠️ 注意:无需显式引入
spring-security-*,starter 已包含。
4.2 模型类(Model)
定义一个简单的 POJO 作为受保护资源:
public class Foo {
    private long id;
    private String name;

    // 构造函数、getter、setter 省略
}
4.3 接口层(API)
提供 REST 接口供客户端操作 Foo 资源:
@RestController
@RequestMapping("/foos")
public class FooController {

    @GetMapping("/{id}")
    public Foo findOne(@PathVariable Long id) {
        return new Foo(Long.parseLong(randomNumeric(2)), randomAlphabetic(4));
    }

    @GetMapping
    public List<Foo> findAll() {
        List<Foo> fooList = new ArrayList<>();
        fooList.add(new Foo(Long.parseLong(randomNumeric(2)), randomAlphabetic(4)));
        fooList.add(new Foo(Long.parseLong(randomNumeric(2)), randomAlphabetic(4)));
        fooList.add(new Foo(Long.parseLong(randomNumeric(2)), randomAlphabetic(4)));
        return fooList;
    }

    @ResponseStatus(HttpStatus.CREATED)
    @PostMapping
    public void create(@RequestBody Foo newFoo) {
        logger.info("Foo created");
    }
}
支持:GET 单个、GET 列表、POST 创建。
4.4 安全配置(Security Configuration)
关键配置类,定义访问控制策略:
@Configuration
public class JWTSecurityConfig {

    @Bean
    public SecurityFilterChain filterChain(HttpSecurity http) throws Exception {
        http.authorizeRequests(authz -> authz
                .antMatchers(HttpMethod.GET, "/foos/**")
                    .hasAuthority("SCOPE_read")
                .antMatchers(HttpMethod.POST, "/foos")
                    .hasAuthority("SCOPE_write")
                .anyRequest()
                    .authenticated())
            .oauth2ResourceServer(oauth2 -> oauth2.jwt());
        return http.build();
    }
}
- GET 请求需具备
SCOPE_read权限 - POST 请求需具备
SCOPE_write权限 .oauth2ResourceServer(oauth2 -> oauth2.jwt())明确声明支持 JWT 令牌
✅ 注意:Spring Security 5.4+ 使用
SecurityFilterChain替代旧版WebSecurityConfigurerAdapter
4.5 配置文件(application.yml)
server:
  port: 8081
  servlet:
    context-path: /resource-server-jwt

spring:
  security:
    oauth2:
      resourceserver:
        jwt:
          issuer-uri: http://localhost:8083/auth/realms/baeldung
issuer-uri指定授权服务器地址,Spring 会自动获取其 OpenID Connect 提供商配置(如 JWK Set URI)- 启动时会自动拉取公钥用于验证 JWT 签名
⚠️ 若授权服务器未启动,资源服务器将无法初始化。若需独立部署,可改用
jwk-set-uri:
jwk-set-uri: http://localhost:8083/auth/realms/baeldung/protocol/openid-connect/certs
4.6 测试验证
使用 JUnit + RestAssured 模拟客户端请求:
@Test
public void givenUserWithReadScope_whenGetFooResource_thenSuccess() {
    String accessToken = obtainAccessToken("read"); // 从 Keycloak 获取带 read scope 的 token

    Response response = RestAssured.given()
      .header(HttpHeaders.AUTHORIZATION, "Bearer " + accessToken)
      .get("http://localhost:8081/resource-server-jwt/foos");

    assertThat(response.as(List.class)).hasSizeGreaterThan(0);
}
- ✅ 成功返回数据 → 表示 JWT 被正确验证并放行
- 整个过程透明,开发者无需手动处理 JWT 解析
5. 资源服务器 – 使用 Opaque Token
5.1 Maven 依赖
Opaque Token 需要额外依赖用于 Token Introspection:
<dependency>
    <groupId>com.nimbusds</groupId>
    <artifactId>oauth2-oidc-sdk</artifactId>
    <version>8.19</version>
    <scope>runtime</scope>
</dependency>
⚠️ 注意:
runtime范围即可,编译期不需要。
5.2 模型与控制器
新增 Bar 资源:
public class Bar {
    private long id;
    private String name;
    // 构造函数、getter、setter
}
控制器 BarController 提供 /bars 接口,结构与 FooController 类似。
5.3 配置文件(application.yml)
server:
  port: 8082
  servlet:
    context-path: /resource-server-opaque

spring:
  security:
    oauth2:
      resourceserver:
        opaque:
          introspection-uri: http://localhost:8083/auth/realms/baeldung/protocol/openid-connect/token/introspect
          introspection-client-id: barClient
          introspection-client-secret: barClientSecret
introspection-uri:Keycloak 的令牌验证接口- 需提供客户端凭证用于调用该接口
5.4 安全配置
@Configuration
public class OpaqueSecurityConfig {

    @Value("${spring.security.oauth2.resourceserver.opaque.introspection-uri}")
    String introspectionUri;

    @Value("${spring.security.oauth2.resourceserver.opaque.introspection-client-id}")
    String clientId;

    @Value("${spring.security.oauth2.resourceserver.opaque.introspection-client-secret}")
    String clientSecret;

    @Bean
    public SecurityFilterChain filterChain(HttpSecurity http) throws Exception {
        http.authorizeRequests(authz -> authz
                .antMatchers(HttpMethod.GET, "/bars/**")
                    .hasAuthority("SCOPE_read")
                .antMatchers(HttpMethod.POST, "/bars")
                    .hasAuthority("SCOPE_write")
                .anyRequest()
                    .authenticated())
            .oauth2ResourceServer(oauth2 -> oauth2.opaqueToken(token ->
                token.introspectionUri(this.introspectionUri)
                     .introspectionClientCredentials(this.clientId, this.clientSecret)));
        return http.build();
    }
}
.opaqueToken()表示启用不透明令牌支持- 显式配置 introspection 地址和客户端凭据
5.5 测试验证
测试 write 权限是否能成功创建资源:
@Test
public void givenUserWithWriteScope_whenPostNewBarResource_thenCreated() {
    String accessToken = obtainAccessToken("read write");
    Bar newBar = new Bar(Long.parseLong(randomNumeric(2)), randomAlphabetic(4));

    Response response = RestAssured.given()
      .contentType(ContentType.JSON)
      .header(HttpHeaders.AUTHORIZATION, "Bearer " + accessToken)
      .body(newBar)
      .log().all()
      .post("http://localhost:8082/resource-server-opaque/bars");

    assertThat(response.getStatusCode()).isEqualTo(HttpStatus.CREATED.value());
}
- ✅ 返回 201 → 表示 Opaque Token 被成功验证并授权
6. 总结
本文完整演示了如何使用 Spring Security 5 构建两种类型的 OAuth 2.0 资源服务器:
| 方式 | 优点 | 缺点 |
|---|---|---|
| ✅ JWT | 无状态、高性能、无需网络调用 | 无法主动吊销 |
| ✅ Opaque Token | 可实时控制、支持吊销 | 每次请求需调用 introspection 接口,有性能开销 |
🎯 核心要点:
- Spring Security 的 DSL 配置极其简洁
- JWT 使用
.jwt(),Opaque 使用.opaqueToken()- 生产环境建议结合缓存优化 Opaque Token 的验证性能
所有示例代码已托管至 GitHub:https://github.com/Baeldung/spring-security-oauth/tree/master/oauth-resource-server