1. 引言
在使用 Spring 构建 Web 应用时,如何组织应用上下文(Application Context)是一个核心问题。Spring 提供了多种上下文配置方式,理解它们的结构和关系,能帮助我们避免“踩坑”、写出更清晰的架构。
本文将深入剖析 Spring Web 应用中最常见的上下文组织方式,重点讲解 根上下文(Root Context) 与 DispatcherServlet 上下文 的关系及配置方式。
⚠️ 注意:本文主要讨论的是传统 Spring MVC(非 Spring Boot)的配置方式,适用于较老版本的 Spring。在 Spring Boot 中这些配置大多被自动处理,但仍建议理解其底层原理。
2. 根 Web 应用上下文
每个 Spring Web 应用都拥有一个与应用生命周期绑定的“根 Web 应用上下文”(Root Web Application Context)。
这个上下文在应用启动时创建,关闭时销毁,由 ContextLoaderListener 监听管理。它是整个应用共享 Bean 的集中地,通常用于存放服务层(Service)、数据访问层(DAO)、配置类等非 Web 层组件。
✅ 核心特点:
- 实现了
WebApplicationContext接口,可访问ServletContext - 与 Web 框架无关,是 Spring Web 的基础能力
- 所有 DispatcherServlet 上下文都以它为父上下文
2.1. ContextLoaderListener
根上下文由 org.springframework.web.context.ContextLoaderListener 管理,属于 spring-web 模块。
默认情况下,它会加载 /WEB-INF/applicationContext.xml 文件。但我们可以通过配置更改上下文类型和位置。
配置方式有两种:
- 在
web.xml中声明 - 在 Servlet 3.x 环境中通过 Java 代码编程式配置
下面我们分别来看。
2.2. 使用 web.xml 配置 XML 上下文
在 web.xml 中注册 ContextLoaderListener:
<listener>
    <listener-class>
        org.springframework.web.context.ContextLoaderListener
    </listener-class>
</listener>
通过 contextConfigLocation 参数指定配置文件位置:
<context-param>
    <param-name>contextConfigLocation</param-name>
    <param-value>/WEB-INF/rootApplicationContext.xml</param-value>
</context-param>
支持多个文件(逗号分隔)或通配符:
<!-- 多个文件 -->
<context-param>
    <param-name>contextConfigLocation</param-name>
    <param-value>/WEB-INF/context1.xml, /WEB-INF/context2.xml</param-value>
</context-param>

<!-- 通配符 -->
<context-param>
    <param-name>contextConfigLocation</param-name>
    <param-value>/WEB-INF/*-context.xml</param-value>
</context-param>
✅ 所有配置最终合并为一个应用上下文。
2.3. 使用 web.xml 配置 Java 注解上下文
我们也可以使用 Java 配置替代 XML。通过 contextClass 指定上下文实现类:
<context-param>
    <param-name>contextClass</param-name>
    <param-value>
        org.springframework.web.context.support.AnnotationConfigWebApplicationContext
    </param-value>
</context-param>
然后通过 contextConfigLocation 指定配置类或包路径:
<!-- 指定配置类 -->
<context-param>
    <param-name>contextConfigLocation</param-name>
    <param-value>
        com.example.config.RootApplicationConfig,
        com.example.config.NormalWebAppConfig
    </param-value>
</context-param>

<!-- 指定扫描包 -->
<context-param>
    <param-name>contextConfigLocation</param-name>
    <param-value>com.example.config</param-value>
</context-param>
可以混合使用类和包路径。
2.4. Servlet 3.x 编程式配置
Servlet 3.x 支持无 web.xml 配置。Spring 利用 WebApplicationInitializer 接口实现编程式注册。
Spring 启动时会扫描实现 WebApplicationInitializer 的类,并调用其 onStartup 方法:
public class ApplicationInitializer implements WebApplicationInitializer {

    @Override
    public void onStartup(ServletContext servletContext)
      throws ServletException {
        // 自定义初始化逻辑
    }
}
2.5. 使用 Servlet 3.x 配置 XML 上下文
通过编程方式创建 XML 上下文:
public class ApplicationInitializer implements WebApplicationInitializer {

    @Override
    public void onStartup(ServletContext servletContext)
      throws ServletException {

        // 1. 创建 XML 上下文
        XmlWebApplicationContext rootContext = new XmlWebApplicationContext();

        // 2. 设置配置文件位置
        rootContext.setConfigLocations("/WEB-INF/rootApplicationContext.xml");

        // 3. 创建并注册 ContextLoaderListener
        servletContext.addListener(new ContextLoaderListener(rootContext));
    }
}
✅
setConfigLocations是contextConfigLocation的编程等价写法。
2.6. 使用 Servlet 3.x 配置 Java 注解上下文
更推荐的方式是继承 AbstractContextLoaderInitializer,减少样板代码:
public class AnnotationsBasedApplicationInitializer
  extends AbstractContextLoaderInitializer {

    @Override
    protected WebApplicationContext createRootApplicationContext() {
        AnnotationConfigWebApplicationContext rootContext
          = new AnnotationConfigWebApplicationContext();
        rootContext.register(RootApplicationConfig.class);
        return rootContext;
    }
}
✅
register()方法可精确注册配置类,避免包扫描开销。
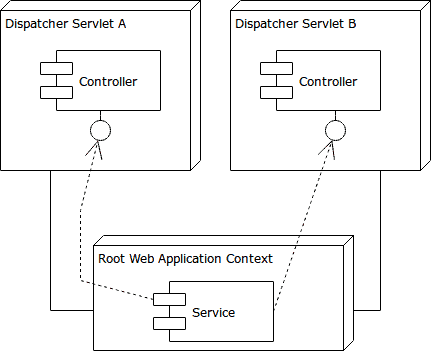
3. DispatcherServlet 上下文
每个 DispatcherServlet 都有自己独立的应用上下文,用于配置 MVC 相关组件,如控制器(Controller)、视图解析器(ViewResolver)、拦截器等。
根上下文是所有 DispatcherServlet 上下文的父上下文,因此子上下文可以访问父上下文的 Bean,反之不行。
3.1. 使用 web.xml 配置 XML 上下文
在 web.xml 中声明 DispatcherServlet:
<servlet>
    <servlet-name>normal-webapp</servlet-name>
    <servlet-class>
        org.springframework.web.servlet.DispatcherServlet
    </servlet-class>
    <load-on-startup>1</load-on-startup>
</servlet>
<servlet-mapping>
    <servlet-name>normal-webapp</servlet-name>
    <url-pattern>/api/*</url-pattern>
</servlet-mapping>
默认加载 WEB-INF/normal-webapp-servlet.xml。可通过 contextConfigLocation 自定义:
<servlet>
    <servlet-name>normal-webapp</servlet-name>
    <servlet-class>
        org.springframework.web.servlet.DispatcherServlet
    </servlet-class>
    <init-param>
        <param-name>contextConfigLocation</param-name>
        <param-value>/WEB-INF/normal/*.xml</param-value>
    </init-param>
    <load-on-startup>1</load-on-startup>
</servlet>
3.2. 使用 web.xml 配置 Java 注解上下文
类似 ContextLoaderListener,通过 contextClass 和 contextConfigLocation 配置:
<servlet>
    <servlet-name>normal-webapp-annotations</servlet-name>
    <servlet-class>
        org.springframework.web.servlet.DispatcherServlet
    </servlet-class>
    <init-param>
        <param-name>contextClass</param-name>
        <param-value>
            org.springframework.web.context.support.AnnotationConfigWebApplicationContext
        </param-value>
    </init-param>
    <init-param>
        <param-name>contextConfigLocation</param-name>
        <param-value>com.example.config.NormalWebAppConfig</param-value>
    </init-param>
    <load-on-startup>1</load-on-startup>
</servlet>
3.3. 使用 Servlet 3.x 配置 XML 上下文
编程式注册 DispatcherServlet:
@Override
public void onStartup(ServletContext servletContext) throws ServletException {
    XmlWebApplicationContext normalWebAppContext = new XmlWebApplicationContext();
    normalWebAppContext.setConfigLocation("/WEB-INF/normal-webapp-servlet.xml");

    ServletRegistration.Dynamic normal = servletContext.addServlet(
        "normal-webapp",
        new DispatcherServlet(normalWebAppContext)
    );
    normal.setLoadOnStartup(1);
    normal.addMapping("/api/*");
}
3.4. 使用 Servlet 3.x 配置 Java 注解上下文
继承 AbstractDispatcherServletInitializer,简化配置:
public class SecureWebAppInitializer extends AbstractDispatcherServletInitializer {

    @Override
    protected WebApplicationContext createServletApplicationContext() {
        AnnotationConfigWebApplicationContext secureWebAppContext
          = new AnnotationConfigWebApplicationContext();
        secureWebAppContext.register(SecureWebAppConfig.class);
        return secureWebAppContext;
    }

    @Override
    protected String[] getServletMappings() {
        return new String[] { "/s/api/*" };
    }

    @Override
    protected String getServletName() {
        return "secure-dispatcher";
    }
}
✅ 此类同时处理根上下文和 DispatcherServlet 上下文注册。
4. 父子上下文关系
根上下文是所有 DispatcherServlet 上下文的父上下文。
- ✅ 子上下文可访问父上下文的 Bean(如 Service)
- ❌ 父上下文不能访问子上下文的 Bean(如 Controller)
典型分工:
- 根上下文:Service、Repository、DataSource、TransactionManager
- DispatcherServlet 上下文:Controller、ViewResolver、HandlerMapping
多 DispatcherServlet 场景
当应用需要多个独立的 MVC 配置时(如 REST API + 传统 MVC),可配置多个 DispatcherServlet。
✅ 示例:公开接口
/api/*和安全接口/s/api/*使用不同配置。
注意事项:
- 每个
AbstractDispatcherServletInitializer实例注册一个DispatcherServlet - 只能有一个根上下文(由
AbstractContextLoaderInitializer创建) - 多个
DispatcherServlet需重写getServletName()避免命名冲突
@Override
protected String getServletName() {
    return "secure-dispatcher";
}
- 建议使用
@Order注解明确初始化顺序。
5. 父子上下文实战示例
假设我们有两个模块:公开模块和安全模块,共享一个 GreeterService。
5.1. 共享服务
package com.example.services;

@Service
public class GreeterService {
    @Resource
    private Greeting greeting;

    public String greet() {
        return greeting.getMessage();
    }
}
在根上下文中启用组件扫描:
@Configuration
@ComponentScan(basePackages = "com.example.services")
public class RootApplicationConfig {}
或 XML:
<context:component-scan base-package="com.example.services" />
5.2. 控制器
// 公开控制器
@Controller
public class HelloWorldController {
    @Autowired
    private GreeterService greeterService;

    @RequestMapping("/welcome")
    public ModelAndView helloWorld() {
        String message = "<h3>Normal " + greeterService.greet() + "</h3>";
        return new ModelAndView("welcome", "message", message);
    }
}

// 安全控制器
@Controller
public class SecureController {
    @Autowired
    private GreeterService greeterService;

    @RequestMapping("/secure-welcome")
    public ModelAndView secureHello() {
        String message = "<h3>Secure " + greeterService.greet() + "</h3>";
        return new ModelAndView("welcome", "message", message);
    }
}
5.3. DispatcherServlet 上下文
// 公开上下文
@Configuration
@EnableWebMvc
@ComponentScan(basePackages = "com.example.normal")
public class NormalWebAppConfig {}

// 安全上下文
@Configuration
@EnableWebMvc
@ComponentScan(basePackages = "com.example.secure")
public class SecureWebAppConfig {}
5.4. 整合配置
Java 配置方式:
// 根上下文初始化器
public class RootContextInitializer extends AbstractContextLoaderInitializer {
    @Override
    protected WebApplicationContext createRootApplicationContext() {
        AnnotationConfigWebApplicationContext rootContext = new AnnotationConfigWebApplicationContext();
        rootContext.register(RootApplicationConfig.class);
        return rootContext;
    }
}

// 公开 Dispatcher
public class NormalWebAppInitializer extends AbstractDispatcherServletInitializer {
    @Override
    protected WebApplicationContext createServletApplicationContext() {
        AnnotationConfigWebApplicationContext ctx = new AnnotationConfigWebApplicationContext();
        ctx.register(NormalWebAppConfig.class);
        return ctx;
    }
    @Override
    protected String[] getServletMappings() {
        return new String[]{"/api/*"};
    }
    @Override
    protected String getServletName() {
        return "normal-dispatcher";
    }
}

// 安全 Dispatcher
public class SecureWebAppInitializer extends AbstractDispatcherServletInitializer {
    @Override
    protected WebApplicationContext createServletApplicationContext() {
        AnnotationConfigWebApplicationContext ctx = new AnnotationConfigWebApplicationContext();
        ctx.register(SecureWebAppConfig.class);
        return ctx;
    }
    @Override
    protected String[] getServletMappings() {
        return new String[]{"/s/api/*"};
    }
    @Override
    protected String getServletName() {
        return "secure-dispatcher";
    }
}
web.xml 配置方式:
<!-- 根上下文 -->
<listener>
    <listener-class>org.springframework.web.context.ContextLoaderListener</listener-class>
</listener>

<!-- 公开 DispatcherServlet -->
<servlet>
    <servlet-name>normal-webapp</servlet-name>
    <servlet-class>org.springframework.web.servlet.DispatcherServlet</servlet-class>
    <load-on-startup>1</load-on-startup>
</servlet>
<servlet-mapping>
    <servlet-name>normal-webapp</servlet-name>
    <url-pattern>/api/*</url-pattern>
</servlet-mapping>

<!-- 安全 DispatcherServlet -->
<servlet>
    <servlet-name>secure-webapp</servlet-name>
    <servlet-class>org.springframework.web.servlet.DispatcherServlet</servlet-class>
    <load-on-startup>1</load-on-startup>
</servlet>
<servlet-mapping>
    <servlet-name>secure-webapp</servlet-name>
    <url-pattern>/s/api/*</url-pattern>
</servlet-mapping>
6. 合并多个上下文
除了父子上下文,还可以通过以下方式合并配置:
6.1. 导入上下文
- Java 配置中导入其他
@Configuration类:
@Configuration
@Import(SomeOtherConfiguration.class)
public class Config {}
- 导入 XML 配置:
@Configuration
@ImportResource("classpath:basicConfig.xml")
public class Config {}
- XML 中导入其他 XML 文件:
<import resource="greeting.xml" />
✅ 这些方式能有效拆分大配置,提升模块化程度。
7. Spring Boot 中的 Web 上下文
Spring Boot 自动配置了上下文结构,开发者通常无需手动管理。
关键差异:
- ❌ 不使用
WebApplicationInitializer - ✅ 自动注册
Servlet、Filter、Listener类型的 Bean
例如:
@Bean
public Servlet myServlet() {
    return new MyCustomServlet();
}
默认映射规则:
- Filter:自动映射到
/* - 单个 Servlet:映射到
/ - 多个 Servlet:映射到
/beanName/*
如需精细控制,可使用:
ServletRegistrationBeanFilterRegistrationBeanServletListenerRegistrationBean
8. 总结
- ✅ 根上下文是共享 Bean 的中心,由
ContextLoaderListener管理 - ✅ 每个
DispatcherServlet拥有独立上下文,且以根上下文为父 - ✅ 多
DispatcherServlet适用于不同 MVC 配置场景 - ✅ 推荐使用
AbstractContextLoaderInitializer和AbstractDispatcherServletInitializer简化配置 - ⚠️ Spring Boot 中这些配置大多被自动处理,但理解原理仍很重要
📌 源码示例:GitHub - spring-mvc-basics-4