1. 概述
Spring Security 5 为 Spring WebFlux 中的非阻塞式 WebClient 类提供了 OAuth2 支持。
在本教程中,我们将分析使用该类访问受保护资源的不同方式,并深入探讨 Spring 是如何处理 OAuth2 授权流程的。
2. 场景搭建
根据 OAuth2 规范,除了我们关注的客户端(Client)外,还需要一个授权服务器(Authorization Server)和资源服务器(Resource Server)。
我们可以使用像 Google 或 GitHub 这样的知名授权提供商。为了更好地理解 OAuth2 客户端的角色,也可以使用我们自己的服务器,这里有一个实现示例。由于这不是本文的重点,我们不会深入配置细节,只需要知道以下几点:
授权服务器:
- 运行在端口 8081
- 提供
/oauth/authorize、/oauth/token和/oauth/check_token接口 - 配置了示例用户(如 john/123)和一个 OAuth 客户端(fooClientIdPassword/secret)
资源服务器:
- 独立于授权服务器,运行在端口 8082
- 提供一个简单的受保护资源
Foo,可通过/foos/{id}接口访问
⚠️ 注意:Spring 生态中存在多个提供 OAuth 相关功能的项目,各项目的特性可在 Spring Projects 矩阵 中查看。
本文涉及的 WebClient 及所有响应式 WebFlux 功能属于 Spring Security 5 项目,因此我们将主要使用该框架。
3. Spring Security 5 内部机制
为了更好地理解后续示例,我们先来了解一下 Spring Security 是如何在内部处理 OAuth2 功能的。
该框架支持以下能力:
✅ 依靠 OAuth2 提供商账户登录用户
✅ 将我们的服务配置为 OAuth2 客户端
✅ 自动管理授权流程
✅ 自动刷新令牌
✅ 必要时存储凭证
3.1. 提供商(Providers)
Spring 定义了 OAuth2 Provider 的角色,负责暴露受 OAuth2 保护的资源。
在我们的例子中,认证服务将承担 Provider 的职责。
3.2. 客户端注册(Client Registrations)
ClientRegistration 是一个实体,包含在 OAuth2(或 OpenID)提供商中注册的客户端的所有相关信息。
在我们的场景中,它是在授权服务器上注册的客户端,标识为 bael-client-id。
3.3. 已授权客户端(Authorized Clients)
当资源所有者(即最终用户)授权客户端访问其资源后,系统会创建一个 OAuth2AuthorizedClient 实体。
它的职责是将访问令牌与客户端注册信息和资源所有者(由 Principal 对象表示)关联起来。
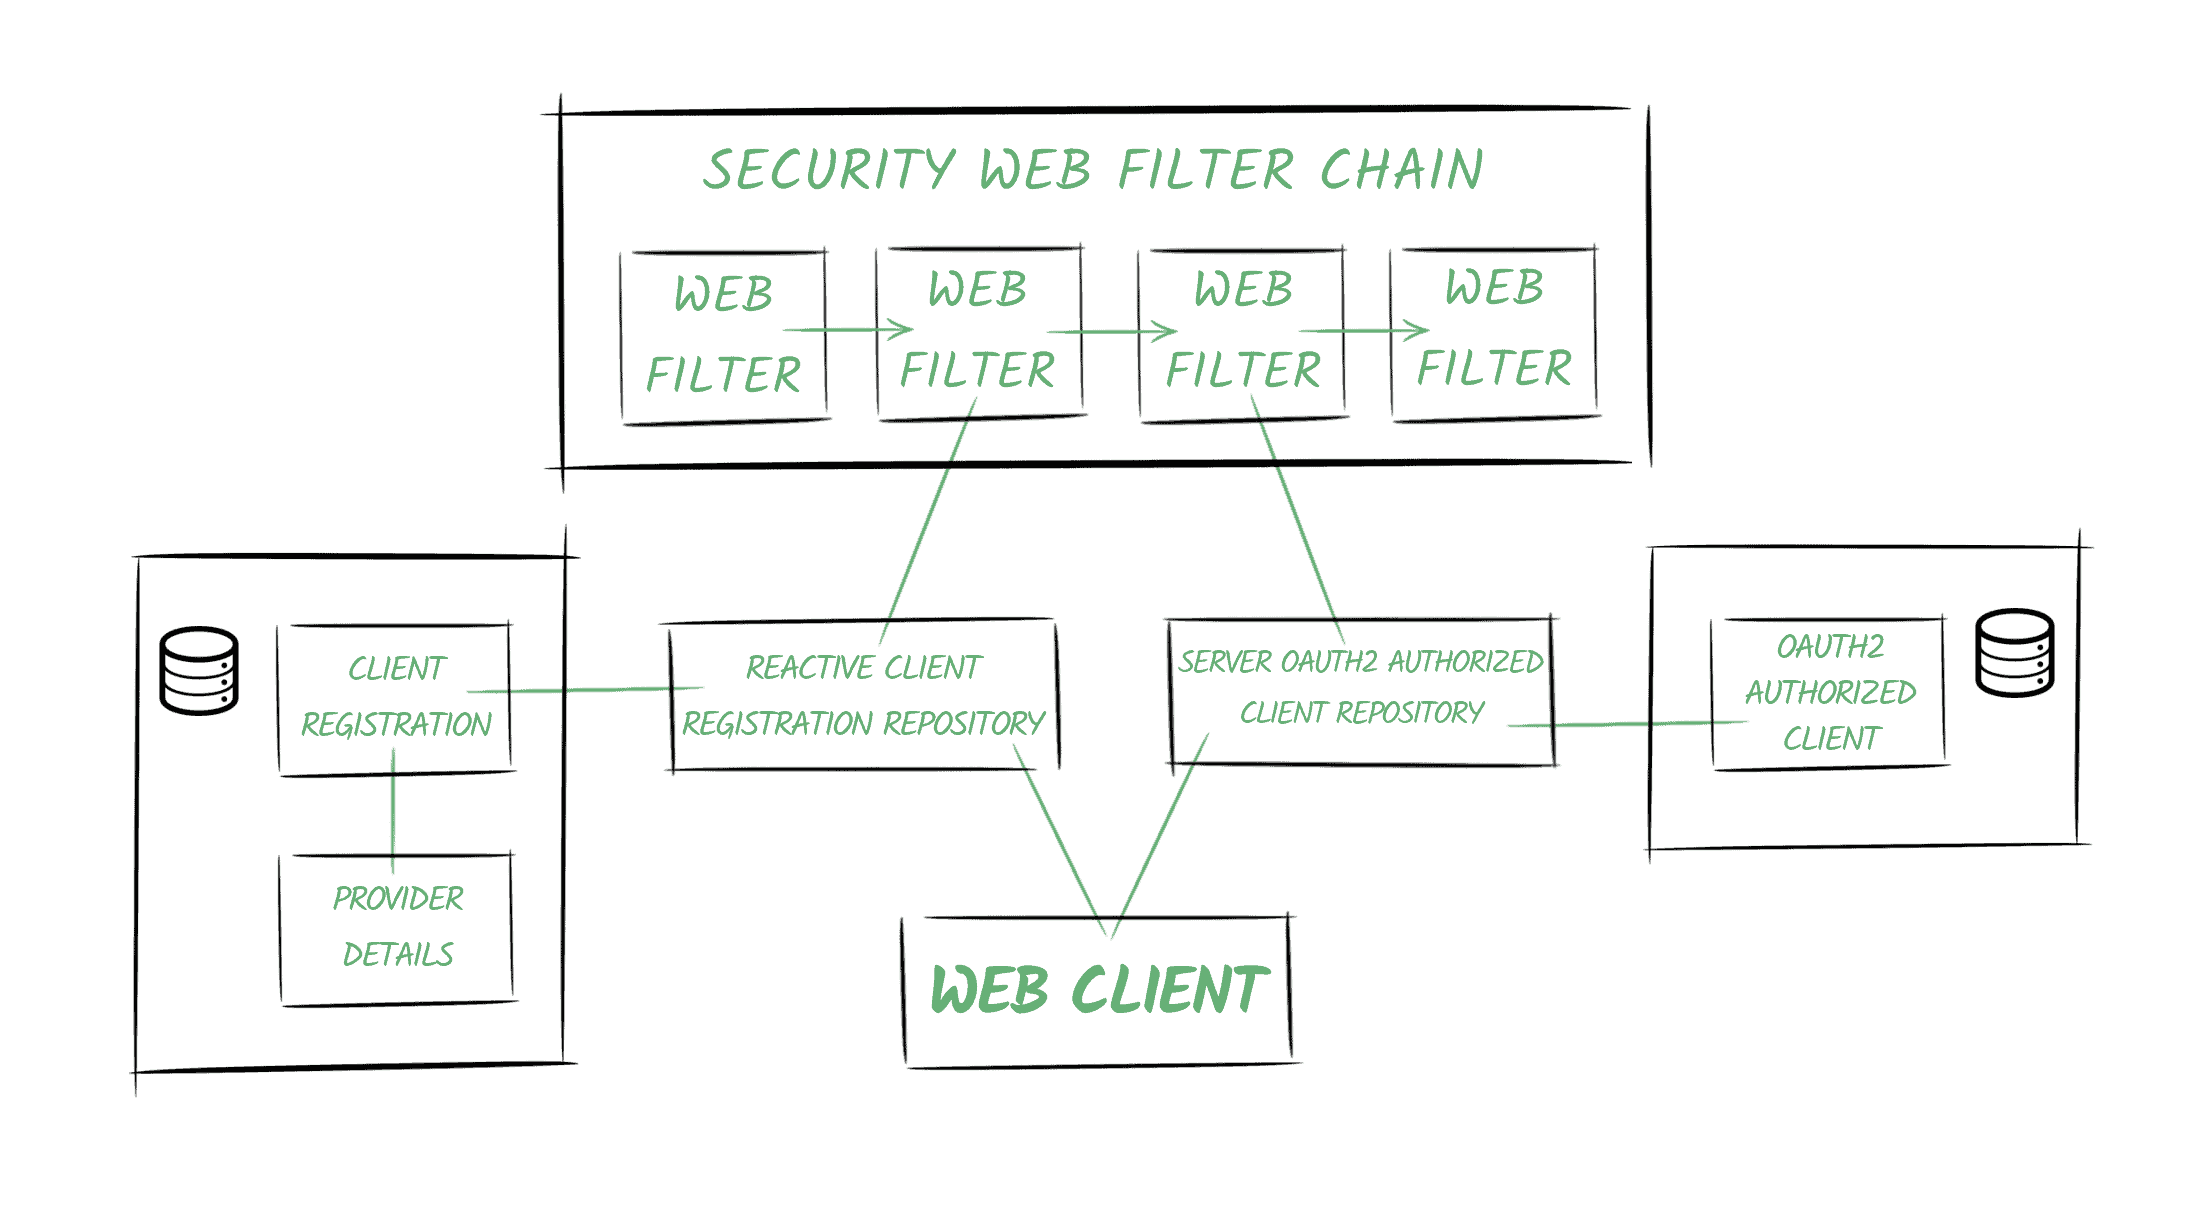
3.4. 仓库(Repositories)
Spring Security 还提供了用于访问上述实体的仓库类。
在响应式栈中,使用的是 ReactiveClientRegistrationRepository 和 ServerOAuth2AuthorizedClientRepository,默认使用内存存储。
✅ Spring Boot 2.x 会自动创建这些仓库类的 Bean 并注入上下文。
3.5. 安全 Web 过滤器链(Security Web Filter Chain)
Spring Security 5 的核心概念之一是响应式的 SecurityWebFilterChain 实体。
顾名思义,它是一系列 WebFilter 对象的链式集合。
当我们启用 OAuth2 功能时,Spring Security 会向链中添加两个过滤器:
- 一个用于响应授权请求(如
/oauth2/authorization/{registrationId}),或抛出ClientAuthorizationRequiredException。它包含对ReactiveClientRegistrationRepository的引用,负责构建授权请求并重定向用户代理。 - 第二个过滤器根据我们启用的功能(OAuth2 客户端功能或 OAuth2 登录功能)有所不同。它的主要职责是创建
OAuth2AuthorizedClient实例,并使用ServerOAuth2AuthorizedClientRepository进行存储。
3.6. WebClient
WebClient 会配置一个 ExchangeFilterFunction,其中包含对仓库的引用。
它会使用这些仓库来获取访问令牌,并自动将其添加到请求中。
4. Spring Security 5 支持 —— 客户端凭证模式(Client Credentials Flow)
Spring Security 允许我们将应用配置为 OAuth2 客户端。
本文中,我们将使用 WebClient 实例通过客户端凭证模式(Client Credentials)和授权码模式(Authorization Code)来获取资源。
首先需要配置客户端注册信息和用于获取访问令牌的提供商。
4.1. 客户端与提供商配置
如 OAuth2 登录文章 所述,我们可以通过编程方式配置,也可以使用 Spring Boot 的自动配置功能:
spring.security.oauth2.client.registration.bael.authorization-grant-type=client_credentials
spring.security.oauth2.client.registration.bael.client-id=bael-client-id
spring.security.oauth2.client.registration.bael.client-secret=bael-secret

spring.security.oauth2.client.provider.bael.token-uri=http://localhost:8085/oauth/token
这些就是使用客户端凭证模式获取资源所需的全部配置。
4.2. 使用 WebClient
该授权类型适用于机器与机器之间的通信,无需用户参与。
例如,假设我们有一个定时任务需要使用 WebClient 获取受保护资源:
@Autowired
private WebClient webClient;

@Scheduled(fixedRate = 5000)
public void logResourceServiceResponse() {

    webClient.get()
      .uri("http://localhost:8084/retrieve-resource")
      .retrieve()
      .bodyToMono(String.class)
      .map(string
        -> "Retrieved using Client Credentials Grant Type: " + string)
      .subscribe(logger::info);
}
4.3. 配置 WebClient
接下来配置 webClient 实例:
@Bean
WebClient webClient(ReactiveClientRegistrationRepository clientRegistrations) {
    ServerOAuth2AuthorizedClientExchangeFilterFunction oauth =
      new ServerOAuth2AuthorizedClientExchangeFilterFunction(
        clientRegistrations,
        new UnAuthenticatedServerOAuth2AuthorizedClientRepository());
    oauth.setDefaultClientRegistrationId("bael");
    return WebClient.builder()
      .filter(oauth)
      .build();
}
如前所述,客户端注册仓库由 Spring Boot 自动创建并注入上下文。
这里使用了 UnAuthenticatedServerOAuth2AuthorizedClientRepository,因为这是机器间通信,没有用户参与。我们默认使用 bael 客户端注册。
如果不设置默认值,也可以在请求中显式指定:
webClient.get()
  .uri("http://localhost:8084/retrieve-resource")
  .attributes(
    ServerOAuth2AuthorizedClientExchangeFilterFunction
      .clientRegistrationId("bael"))
  .retrieve()
  // ...
4.4. 测试效果
启动应用并启用 DEBUG 日志,可以看到 Spring Security 自动执行的调用:
o.s.w.r.f.client.ExchangeFunctions:
  HTTP POST http://localhost:8085/oauth/token
o.s.http.codec.json.Jackson2JsonDecoder:
  Decoded [{access_token=89cf72cd-183e-48a8-9d08-661584db4310,
    token_type=bearer,
    expires_in=41196,
    scope=read
    (truncated)...]
o.s.w.r.f.client.ExchangeFunctions:
  HTTP GET http://localhost:8084/retrieve-resource
o.s.core.codec.StringDecoder:
  Decoded "This is the resource!"
c.b.w.c.service.WebClientChonJob:
  Retrieved the following resource using Client Credentials Grant Type: This is the resource!
第二次执行时,由于令牌尚未过期,应用不会重新申请令牌,而是直接使用之前的令牌。
5. Spring Security 5 支持 —— 授权码模式(Authorization Code Flow)
授权码模式通常用于第三方应用需要访问用户资源的场景。
5.1. 客户端与提供商配置
要使用授权码模式,我们需要配置更多属性:
spring.security.oauth2.client.registration.bael.client-name=bael
spring.security.oauth2.client.registration.bael.client-id=bael-client-id
spring.security.oauth2.client.registration.bael.client-secret=bael-secret
spring.security.oauth2.client.registration.bael
  .authorization-grant-type=authorization_code
spring.security.oauth2.client.registration.bael
  .redirect-uri=http://localhost:8080/login/oauth2/code/bael

spring.security.oauth2.client.provider.bael.token-uri=http://localhost:8085/oauth/token
spring.security.oauth2.client.provider.bael
  .authorization-uri=http://localhost:8085/oauth/authorize
spring.security.oauth2.client.provider.bael.user-info-uri=http://localhost:8084/user
spring.security.oauth2.client.provider.bael.user-name-attribute=name
除了之前使用的属性,还需要:
✅ 授权服务器的认证接口
✅ 用户信息接口
✅ 重定向接口(用户认证后跳转的地址)
对于知名提供商,前两项通常无需手动配置。
Spring Security 会自动创建重定向接口,默认路径为 /[action]/oauth2/code/[registrationId],支持 authorize 和 login 两种 action。
该接口负责:
✅ 接收认证码(code)
✅ 使用 code 获取访问令牌
✅ 创建已授权客户端实例
✅ 重定向用户代理到原始请求地址
5.2. HTTP 安全配置
接下来配置 SecurityWebFilterChain。
最常见的是使用 Spring Security 的 OAuth2 登录功能来认证用户并授权访问资源。
只需在 ServerHttpSecurity 中添加 oauth2Login() 即可:
@Bean
public SecurityWebFilterChain springSecurityFilterChain(ServerHttpSecurity http) {
    http.authorizeExchange()
      .anyExchange()
      .authenticated()
      .and()
      .oauth2Login();
    return http.build();
}
5.3. 配置 WebClient
配置 WebClient 实例:
@Bean
WebClient webClient(
  ReactiveClientRegistrationRepository clientRegistrations,
  ServerOAuth2AuthorizedClientRepository authorizedClients) {
    ServerOAuth2AuthorizedClientExchangeFilterFunction oauth =
      new ServerOAuth2AuthorizedClientExchangeFilterFunction(
        clientRegistrations,
        authorizedClients);
    oauth.setDefaultOAuth2AuthorizedClient(true);
    return WebClient.builder()
      .filter(oauth)
      .build();
}
这次我们注入了客户端注册仓库和已授权客户端仓库。
启用 setDefaultOAuth2AuthorizedClient(true) 后,框架会从当前 Spring Security 管理的 Authentication 对象中获取客户端信息。
⚠️ 注意:这会导致所有 HTTP 请求都携带访问令牌,可能不是我们想要的行为。
后面我们会介绍更精确的方式指定特定请求使用的客户端。
5.4. 使用 WebClient
授权码模式需要能够处理重定向的用户代理(如浏览器)来执行流程。
因此,我们通常在用户与应用交互时使用该模式,例如通过 HTTP 接口:
@RestController
public class ClientRestController {

    @Autowired
    WebClient webClient;

    @GetMapping("/auth-code")
    Mono<String> useOauthWithAuthCode() {
        Mono<String> retrievedResource = webClient.get()
          .uri("http://localhost:8084/retrieve-resource")
          .retrieve()
          .bodyToMono(String.class);
        return retrievedResource.map(string ->
          "We retrieved the following resource using Oauth: " + string);
    }
}
5.5. 测试效果
调用接口后,应用首先检查用户是否已认证:
o.s.w.s.adapter.HttpWebHandlerAdapter: HTTP GET "/auth-code"
...
HTTP/1.1 302 Found
Location: /oauth2/authorization/bael
然后重定向到授权服务器进行认证:
HTTP/1.1 302 Found
Location: http://localhost:8085/oauth/authorize
  ?response_type=code
  &client_id=bael-client-id
  &state=...
  &redirect_uri=http%3A%2F%2Flocalhost%3A8080%2Flogin%2Foauth2%2Fcode%2Fbael
认证后,用户代理被重定向回我们的应用,并附带 code 和 state 参数:
o.s.w.s.adapter.HttpWebHandlerAdapter:HTTP GET "/login/oauth2/code/bael?code=...&state=...
应用使用 code 获取访问令牌:
o.s.w.r.f.client.ExchangeFunctions:HTTP POST http://localhost:8085/oauth/token
获取用户信息:
o.s.w.r.f.client.ExchangeFunctions:HTTP GET http://localhost:8084/user
最后重定向回原始请求地址:
HTTP/1.1 302 Found
Location: /auth-code
最终,WebClient 成功获取资源:
o.s.w.r.f.client.ExchangeFunctions:HTTP GET http://localhost:8084/retrieve-resource
o.s.w.r.f.client.ExchangeFunctions:Response 200 OK
o.s.core.codec.StringDecoder :Decoded "This is the resource!"
6. 替代方案:在调用时指定客户端注册
前面提到,使用 setDefaultOAuth2AuthorizedClient(true) 会导致所有请求都携带令牌。
如果禁用该选项,则需要在请求时显式指定客户端注册。
一种方式是使用 clientRegistrationId,就像在客户端凭证模式中那样。
由于我们将 Principal 与已授权客户端关联,因此可以使用 @RegisteredOAuth2AuthorizedClient 注解获取 OAuth2AuthorizedClient 实例:
@GetMapping("/auth-code-annotated")
Mono<String> useOauthWithAuthCodeAndAnnotation(
  @RegisteredOAuth2AuthorizedClient("bael") OAuth2AuthorizedClient authorizedClient) {
    Mono<String> retrievedResource = webClient.get()
      .uri("http://localhost:8084/retrieve-resource")
      .attributes(
        ServerOAuth2AuthorizedClientExchangeFilterFunction.oauth2AuthorizedClient(authorizedClient))
      .retrieve()
      .bodyToMono(String.class);
    return retrievedResource.map(string ->
      "Resource: " + string
        + " - Principal associated: " + authorizedClient.getPrincipalName()
        + " - Token will expire at: " + authorizedClient.getAccessToken()
          .getExpiresAt());
}
7. 避免使用 OAuth2 登录功能
通常我们会依赖 OAuth2 授权提供商来登录用户。
但如果我们不想使用登录功能,但仍希望访问受保护资源,就需要调整配置。
✅ 可以将重定向 URI 中的 login 替换为 authorize:
spring.security.oauth2.client.registration.bael
  .redirect-uri=http://localhost:8080/login/oauth2/code/bael
✅ 可以删除用户相关属性,因为我们不会使用它们创建 Principal。
现在配置 SecurityWebFilterChain 时,使用 oauth2Client() 而不是 oauth2Login()。
虽然我们不想依赖 OAuth2 登录,但仍需要在访问接口前认证用户,因此添加 formLogin():
@Bean
public SecurityWebFilterChain springSecurityFilterChain(ServerHttpSecurity http) {
    http.authorizeExchange()
      .anyExchange()
      .authenticated()
      .and()
      .oauth2Client()
      .and()
      .formLogin();
    return http.build();
}
启动应用并调用 /auth-code-annotated 接口:
- 首先使用表单登录
- 然后重定向到授权服务器进行资源授权
⚠️ 注意:理论上应该重定向回原始接口,但 Spring Security 似乎会重定向到根路径 /,这可能是一个 bug。后续请求会正常工作。
从响应中可以看到,这次已授权客户端关联的 Principal 是 bael-client-id,而非授权服务器中配置的 bael-user。
8. Spring 框架支持 —— 手动实现方式
Spring 5 原生只提供了一个与 OAuth2 相关的方法:HttpHeaders#setBearerAuth,用于方便地添加 Bearer Token 请求头。
我们来看一个手动执行 OAuth2 流程获取资源的示例:
@Autowired
WebClient client;

public Mono<String> obtainSecuredResource() {
    String encodedClientData =
      Base64.getEncoder().encodeToString("bael-client-id:bael-secret".getBytes());
    Mono<String> resource = client.post()
      .uri("localhost:8085/oauth/token")
      .header("Authorization", "Basic " + encodedClientData)
      .body(BodyInserters.fromFormData("grant_type", "client_credentials"))
      .retrieve()
      .bodyToMono(JsonNode.class)
      .flatMap(tokenResponse -> {
          String accessTokenValue = tokenResponse.get("access_token")
            .textValue();
          return client.get()
            .uri("localhost:8084/retrieve-resource")
            .headers(h -> h.setBearerAuth(accessTokenValue))
            .retrieve()
            .bodyToMono(String.class);
        });
    return resource.map(res ->
      "Retrieved the resource using a manual approach: " + res);
}
这个示例展示了手动实现 OAuth2 流程的繁琐之处,并演示了 setBearerAuth 的使用方法。
✅ 在实际项目中,我们还是推荐让 Spring Security 自动处理这些复杂流程。
9. 总结
在本文中,我们学习了如何将应用配置为 OAuth2 客户端,特别是如何配置和使用 WebClient 在全响应式栈中获取受保护资源。
接着我们分析了 Spring Security 5 的 OAuth2 机制如何在底层实现 OAuth2 规范。
如需完整示例代码,请访问 GitHub 项目。