1. Overview
In this tutorial, we’ll explore the basics of gamma correction, an important concept in digital imaging and display technology.
In most cases, gamma correction is applied automatically by devices and software without us even realizing it. Digital cameras, monitors, and image processing applications are designed to account for gamma correction to ensure that images appear consistent and natural across devices.
We’ll discuss the science behind human perception of brightness, introduce the gamma correction formula, and explain how it differs from simple brightness adjustments. We’ll also look at practical examples to illustrate these concepts.
2. Why Do We Need Gamma Correction?
Let’s take a look at why gamma correction is so important.
The human eye doesn’t linearly perceive brightness. Instead, we’re more sensitive to changes in darker tones than in lighter ones. This non-linear perception means that equal increments in physical brightness don’t correspond to equal increments in perceived brightness:
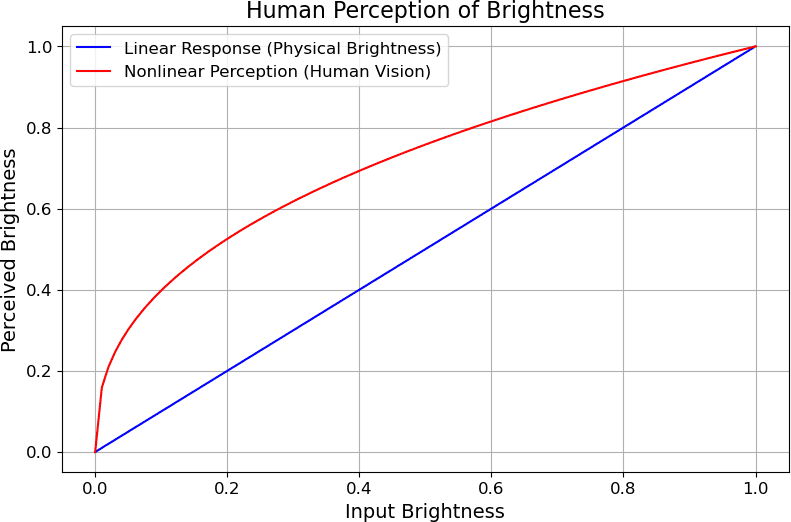
To account for this, gamma correction adjusts the luminance of images so that they appear natural to the human eye. By applying a non-linear transformation, we ensure that gradations of brightness are perceived uniformly across the entire range.
3. The Details of Gamma Correction
Now that we understand the importance of gamma correction in digital imaging, let’s examine the mathematical formula and its details.
3.1. The Formula
Here is the general form of the gamma correction equation:
![[V_{\text{out}} = A \cdot V_{\text{in}}^{\,\gamma}]](/wp-content/ql-cache/quicklatex.com-42e94383c1624f7879947e2e94e56976_l3.svg "Rendered by QuickLaTeX.com")
Let’s break it down:
-
 is the input luminance or pixel value, typically normalized between 0 and 1
 -
 is the gamma-corrected output value
 -
 is the exponent that defines the degree of correction
 -
 is the scaling coefficient, typically 1
3.2. How to Choose the Value of γ?
By choosing an appropriate  value, we can adjust the image to match the non-linear nature of human vision and display devices.
Common values are  during encoding and
  during decoding and display.
If  , the correction curve bends downward, compressing higher brightness levels and resulting in a darker output.
Conversely, if  , the curve bends upward, expanding lower brightness levels and producing a brighter output.
Here’s an example:

Let’s note that can’t be negative because applying a negative exponent to pixel intensity values would result in mathematical inconsistencies or undefined behavior, especially at zero, and would not produce meaningful or physically accurate corrections.
3.3. Do All Software Tools Follow the Formula?
In image manipulation programs such as GIMP and ImageMagick, specifying a gamma value greater than 1 brightens the image, while a value less than 1 darkens it.
This is because these programs apply gamma correction using the inverse of the specified gamma value, resulting in the opposite effect:
![[V_{\text{out}}=A\cdot V_{\text{in}}^{\,\frac{1}{\gamma}}]](/wp-content/ql-cache/quicklatex.com-cd4fb573dca4acb84b573f676a8f933a_l3.svg "Rendered by QuickLaTeX.com")
On the other hand, Adobe’s software suite, including Photoshop, SpeedGrade, Premiere Pro, After Effects, and others, follows the mathematical convention that a gamma greater than 1 darkens the image and a gamma less than 1 brightens it.
This difference is due to how each software implements gamma correction algorithms, so it’s important to be aware of these differences when adjusting gamma values in different tools.
3.4. What About the Scaling Factor?
As for the scaling factor , it’s usually set to 1 when working with normalized pixel values ranging from 0 to 1. This simplifies the equation to:
![[V_{\text{out}} = V_{\text{in}}^{\,\gamma}]](/wp-content/ql-cache/quicklatex.com-b6c75347c742fe19fc308fd0877a2cad_l3.svg "Rendered by QuickLaTeX.com")
However, can be adjusted to scale the output for specific display characteristics or to compensate for other factors in the rendering pipeline.
For example, if the maximum output value should be different due to hardware requirements or artistic effects, we modify accordingly.
4. Automatic vs. Manual Gamma Correction
While gamma correction is often applied behind the scenes, understanding the difference between automatic and manual gamma correction can help us better manage image quality in various contexts.
4.1. Automatic Gamma Correction
In most modern devices, gamma correction is handled automatically to ensure consistent image display across different hardware and software platforms. Cameras, monitors, and operating systems are designed to apply standard gamma settings that conform to industry norms:

Digital cameras automatically apply gamma encoding to raw sensor data to produce RGB images that look natural when viewed on standard displays. Similarly, monitors are calibrated to specific gamma values to match the expected input from image and video sources, providing a seamless viewing experience without the need for manual adjustments.
We can also display this process with superimposed curves:
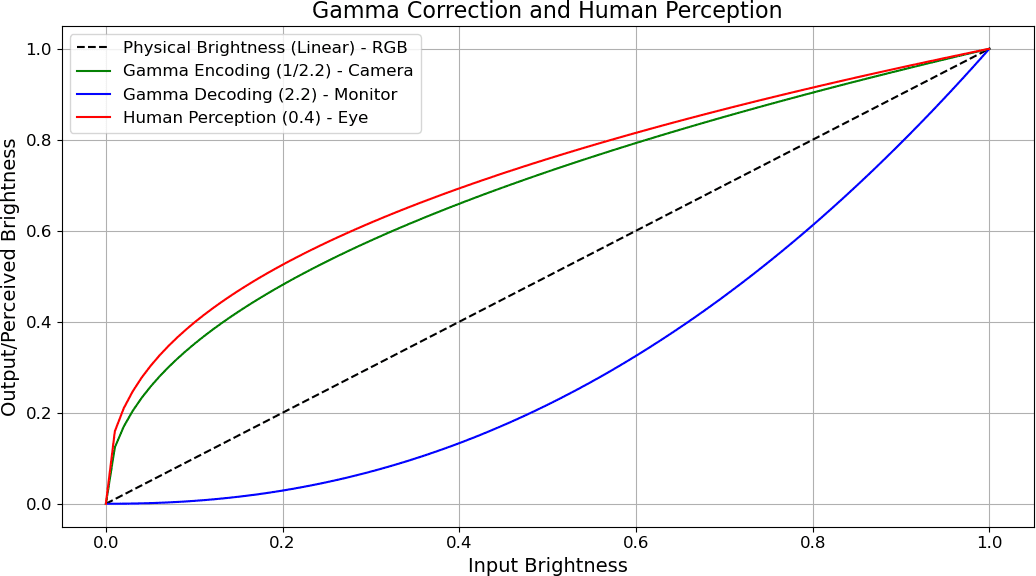
By applying gamma correction twice, once during capture and once during display, the digital imaging system ensures that what we see on the screen matches the scene as it would appear in real life. This process compensates for both the limitations of digital sensors and the characteristics of display devices.
4.2. Manual Gamma Correction
Despite the prevalence of automatic gamma correction, there are situations where manual adjustment is necessary. Professionals in fields such as photography, video editing, and graphic design may need to fine-tune gamma settings to achieve precise control over the appearance of their work.
Here is an example using GIMP, a cross-platform image manipulation tool:
This example shows that manual gamma correction allows us to visually adjust the luminance of images in a non-linear fashion and, according to our perception, preserve details in shadows or highlights that might otherwise be lost.
5. Difference From Simple Brightness Adjustment
Gamma correction can be confused with simple brightness adjustment, but they are fundamentally different processes.
Brightness adjustment subtracts from or adds a constant value to all pixel intensities, linearly shifting the image’s overall brightness. In contrast, gamma correction modifies pixel values non-linearly, affecting darker and lighter regions differently:
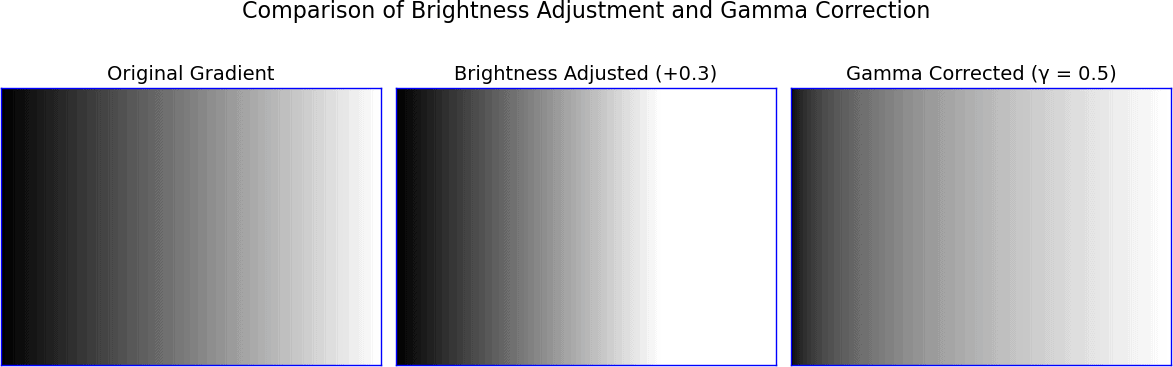
As we can see in this gradient comparison, gamma correction allows for more nuanced control over the image’s appearance, preserving details in shadows and highlights that might be lost with a simple brightness change.
6. Conclusion
In this article, we explored the basics of gamma correction, emphasizing its critical role in digital imaging and display technology. We began by examining the human perception of brightness, noting that the human eye’s sensitivity to luminance is non-linear. Then, we introduced the gamma correction formula that compensates for these perceptual differences and ensures that images appear natural and consistent across devices.
Gamma correction differs from simple brightness adjustments as it applies a non-linear transformation that preserves both shadows and highlights. This nuanced approach allows for a more accurate representation of visual information, as opposed to linear brightness changes that can result in a loss of image detail.
While most modern devices apply gamma correction automatically to maintain visual consistency across platforms, certain contexts, such as professional photography and graphic design, benefit from manual adjustments for greater control over image quality.