1. Overview
UEFI (Unified Extensible Firmware Interface) provides a modern and flexible environment for running programs without an operating system or before loading an existing operating system. It's useful for writing bare-metal applications that require minimal dependencies and low-level access to hardware.
In this tutorial, we'll see how to develop UEFI applications that are text-based or graphical. We'll cover how to compile and deploy them on QEMU and on real hardware via a USB stick.
The code is written in C and is quite large due to its low-level nature, so we'll only highlight the most important information here. The complete sources are available in our repository.
2. Setting the Environment
We'll be developing on an Ubuntu-based distribution for x86_64 architectures.
First, let's install these packages:
$ sudo apt update
$ sudo apt install build-essential binutils qemu-system-x86 ovmf gawk coreutils
Then, let's download the GNU-EFI 4.0.0 stable release:
$ wget -O gnu-efi.zip https://github.com/ncroxon/gnu-efi/archive/refs/tags/4.0.0.zip
$ unzip gnu-efi.zip && mv gnu-efi-4.0.0 gnu-efi
In gnu-efi/apps, we need a monospace bitmap font from the IBM fonts repository:
$ cd apps
$ wget -O baeldung-font-9x16.bdf \
https://raw.githubusercontent.com/farsil/ibmfonts/refs/heads/master/bdf/iv9x16u.bdf
Still in the apps subdirectory, let's create two empty files that will contain our C sources and add them to the TARGET_APPS declared in the Makefile:
$ touch baeldung.c         # sources for text-only app
$ touch baeldung-gui.c     # sources for GUI app
$ cp Makefile Makefile.bak # backup copy
$ sed -i '/old_ABI\.efi/ s/$/ baeldung.efi baeldung-gui.efi/' Makefile
$ make -pn | grep -E '^TARGET_APPS[[:space:]]*:?='
TARGET_APPS = [...] baeldung.efi baeldung-gui.efi [...]
At this point, we have everything we need to begin our UEFI development journey.
3. Text Mode Application
This section introduces our text-based UEFI application baeldung.c that reads user input, performs arithmetic operations, and demonstrates basic UEFI console support.
3.1. Code Structure
Our application consists of three helper functions and the mandatory efi_main() entry point:
#include <efi.h>
#include <efilib.h>

#define MAX_INPUT 100

// Helper function declarations
EFI_STATUS ReadLine(...){...}
EFI_STATUS WaitForEnter(...){...}
UINTN ConvertStrToUintn(...){...}

EFI_STATUS efi_main(...){...}
efi_main() is the standard entry point that the firmware loader calls when it hands control to our application.
3.2. Key Functions
ReadLine() handles keyboard input with basic line editing. It uses WaitForEvent() and ReadKeyStroke() for non-blocking input, and implements backspace support by manipulating the buffer and console output:
EFI_STATUS ReadLine(EFI_SYSTEM_TABLE *systab, CHAR16 *buffer, UINTN bufferSize) {
    [...]
    while (1) {
        uefi_call_wrapper(systab->BootServices->WaitForEvent, 3, 1, &(systab->ConIn->WaitForKey), &index);
        uefi_call_wrapper(systab->ConIn->ReadKeyStroke, 2, systab->ConIn, &key);

        // Handle Enter/Backspace/regular characters
        [...]
    }
    return EFI_SUCCESS;
}
uefi_call_wrapper() is a GNU-EFI macro that ensures correct calling conventions when invoking UEFI Boot Services functions like WaitForEvent() and ReadKeyStroke().
ConvertStrToUintn() converts strings to unsigned integers:
UINTN ConvertStrToUintn(CHAR16 *str) {
    UINTN num = 0;
    while (*str) {
        if (*str < L'0' || *str > L'9')
            break;
        num = num * 10 + (*str - L'0');
        str++;
    }
    return num;
}
Finally, WaitForEnter() also uses WaitForEvent() and ReadKeyStroke().
3.3. Application Workflow
The efi_main() function orchestrates the program flow:
EFI_STATUS efi_main(EFI_HANDLE image, EFI_SYSTEM_TABLE *systab) {
    [...]
    InitializeLib(image, systab);
    Print(u"Hello BAELDUNG!!!\n\n");

    // Ask for the first integer
    Print(u"Please enter the first integer: ");
    ReadLine(systab, inputBuffer, MAX_INPUT);
    number1 = ConvertStrToUintn(inputBuffer);

    // Ask for the second integer.
    [...]

    // Compute the sum
    sum = number1 + number2;
    Print(u"\nThe sum is: %d\n", sum);

    // Wait for Enter before exiting.
    Print(u"\nPress Enter to exit...\n");
    WaitForEnter(systab);

    return EFI_SUCCESS;
}
Before we move on to building and deploying, let's take a look at our graphics application, as the subsequent steps will be the same for both.
4. Minimal GUI Application
Our GUI-based UEFI application, baeldung-gui.c, uses the Graphics Output Protocol (GOP) to draw UI elements and handle basic interactivity.
It needs a custom font header baeldung-font9x16.h, which we'll discuss in detail in the next section. For better visibility on high resolution screens, we use 2x scaling:
#include <efi.h>
#include <efilib.h>
#include "baeldung-font9x16.h"

#define FONT_WIDTH   9     // Original font dimensions
#define FONT_HEIGHT 16
#define SCALE_FACTOR 2     // Rendering scale factor
Let's take a look at the most important sections of the code.
4.1. Core Drawing
The DrawCharScaled() function renders individual characters using our font bitmap. Each "on" pixel in the font data fills a scaled rectangle via the GOP's Blt() (Block Transfer) operation:
void DrawCharScaled(...) {
    for (UINTN row = 0; row < FONT_HEIGHT; row++) {
        UINT8 bits = Font9X16[(UINT8)ch][row];
        for (UINTN col = 0; col < FONT_WIDTH; col++) {
            if (bits & (0x80 >> col)) {
                // Draw scaled pixel rectangle
                gop->Blt(...);
            }
        }
    }
}
DrawStringScaled() iterates through a string, positioning each scaled character sequentially:
void DrawStringScaled(...)
{
    while (*str) {
        DrawCharScaled(gop, x, y, scale, color, *str);
        x += FONT_WIDTH * scale;
        str++;
    }
}
DrawInitialUI() creates a blue button, white text over the button, and a red pointer, all on a light gray background:
void DrawInitialUI(...) {
    EFI_GRAPHICS_OUTPUT_BLT_PIXEL lightGray = {0xC0, 0xC0, 0xC0, 0x00};
    EFI_GRAPHICS_OUTPUT_BLT_PIXEL blue = {0xFF, 0x00, 0x00, 0x00};
    [...] // other colors

    // Fill the entire screen with light gray.
    gop->Blt(gop, &lightGray, EfiBltVideoFill, 0, 0, 0, 0, screenW, screenH, 0);

    // Draw the centered blue button.
    gop->Blt(gop, &blue, EfiBltVideoFill, 0, 0, btnX, btnY, btnW, btnH, 0);

    // Write "Click here" at the center of that button
    [...]
    DrawStringScaled(gop, textX, textY, SCALE_FACTOR, white, u"Click here");

    // Pointer
    [...]
    gop->Blt(gop, &red, EfiBltVideoFill, 0, 0, pointerX, pointerY, ptrW, ptrH, 0);
}
DrawFinalUI() follows similar logic and is used to give feedback after the button is pressed.
It's important to note that we don't have access to the real mouse. The cursor is moved using the arrows on the keyboard, and the click is simulated by pressing the Enter key.
4.2. Interaction Workflow
The self-explanatory efi_main() function implements the core logic:
EFI_STATUS efi_main(EFI_HANDLE image, EFI_SYSTEM_TABLE *systab)
{
    [...]

    // Locate the Graphics Output Protocol for 2D drawing.
    [...]
    EFI_STATUS status = systab->BootServices->LocateProtocol(&gopGuid, NULL, (void**)&gop);
    [...]

    // Get screen resolution.
    [...]

    // Define the button in the center of the screen.
    [...]

    // We'll keep a pointer (red rectangle) that starts near top-left.
    [...]

    // The pointer is 18×32 in size.
    [...]

    // Draw the initial UI once.
    DrawInitialUI(gop, screenW, screenH, btnX, btnY, btnW, btnH, pointerX, pointerY);

    // We'll watch for keyboard events only (arrow keys to move, Enter to click).
    [...]
    while (!activated) {
        [...]
            // If user presses Enter, see if pointer is inside the button
            else if (key.UnicodeChar == CHAR_CARRIAGE_RETURN) {
                if (pointerX + pointerW > btnX && pointerX < (btnX + btnW) &&
                    pointerY + pointerH > btnY && pointerY < (btnY + btnH))
                {
                    // The pointer overlaps the button area => activated
                    activated = TRUE;
                    break;
                }
            }

            // Redraw the initial UI with the pointer in its new position
            DrawInitialUI(gop, screenW, screenH, btnX, btnY, btnW, btnH, pointerX, pointerY);
        }
    }

    // Once activated, show final screen:
    DrawFinalUI(gop, screenW, screenH);

    // Wait for Enter to exit
    [...]

    return EFI_SUCCESS;
}
This minimal GUI demonstrates how to combine UEFI's graphics and input services to create interactive applications without an operating system.
5. Font Conversion and C Header Creation
To use our bitmap font in the GUI application, we need to convert baeldung-font-9x16.bdf into the C header baeldung-font9x16.h.
5.1. How the Characters Are Encoded
First, let's take a look at our BDF file with FontForge:
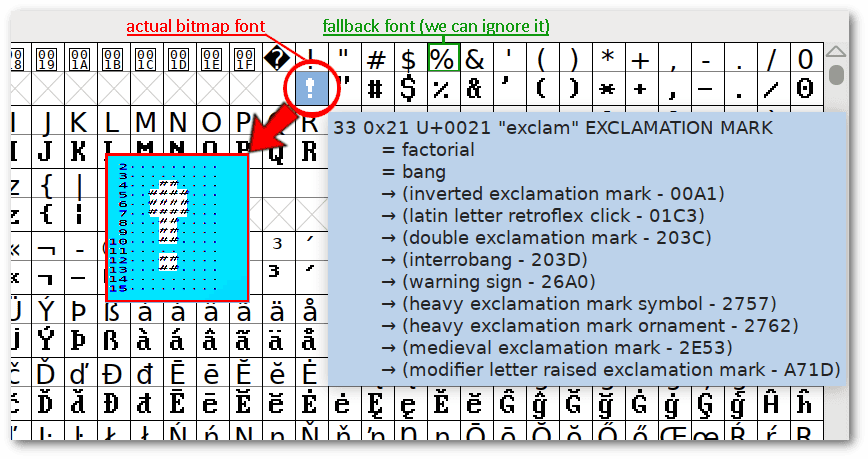 Next, let's see how the exclamation mark magnified in the screenshot is encoded:
$ sed -n '/^STARTCHAR exclam/,/^ENDCHAR/{p;/^ENDCHAR/q}' baeldung-font-9x16.bdf
STARTCHAR exclam  # Symbolic name of the glyph
ENCODING 33       # Decimal Unicode/ASCII code-point (decimal 33 = U+0021 "!")
SWIDTH 562 0      # Scalable advance-width: 562 / 1000 em on the x-axis, 0 on y
DWIDTH 9 0        # Device advance-width in pixels: move 9 px right, 0 px down after drawing.
BBX 4 10 2 0      # Bounding-box 4 px wide x 10 px high, offset +2 px from the left edge of the 9-pixel cell
                  # and 0 px vertically  (its bottom row sits exactly on the baseline)
BITMAP            # Ten rows of hexadecimal data
60                # Each row encodes 8 bits,
F0                # but only the first 4 are inside the bounding-box (the rest are right-hand padding)
[...]             # ... other rows
ENDCHAR
We can use this information inside the BDF to calculate which pixels draw the exclamation mark. For example, these are the lines 3, 4, and 5 of the 9x16 grid in which the character is placed:
Row
Source
Hex
8 bits
4 MSB
0 -> .
1 -> #
Final 9 px
+2 left
+3 right
padding
3
above BBX
-
-
-
-
.........
4
bitmap 0
60
0110 0000
0110
.##.
...##....
5
bitmap 1
F0
1111 0000
1111
..####...
This is the complete grid:
 0 .........
 1 .........
 2 .........
 3 .........
 4 ...##....
 5 ..####...
 6 ..####...
 7 ..####...
 8 ...##....
 9 ...##....
10 ...##....
11 .........
12 ...##....
13 ...##....
14 .........
15 .........
Our UEFI GUI program needs to know all the pixels of each character, but it can't read the BDF file directly.
5.2. Bash Script for Font Header Generation
The baeldung-generate-font-header.sh script automates the whole conversion pipeline:
- reads the BDF
- extracts only ASCII glyph bitmaps (0x20-0x7F) via awk
- pads non-ASCII slots with zeros
- emits a 256x16 UINT8 array in a C header
Let's simply run it:
$ ./baeldung-generate-font-header.sh
Extracting glyph bitmaps from BDF file...
Generating C header file...
Header file generated: baeldung-font9x16.h
The generated header is ready for use. For each character, it stores the pixels to be turned on. For example, let's look at the implementation of A, B, and C:
$ grep -E "// *'[ABC]'" baeldung-font9x16.h
[0x41] = { [...],0x10,0x38,0x6C,0xC6,0xC6,0xFE,0xC6,0xC6,0xC6,0xC6 }, // 'A'
[0x42] = { [...],0xFC,0x66,0x66,0x66,0x7C,0x66,0x66,0x66,0x66,0xFC }, // 'B'
[0x43] = { [...],0x3C,0x66,0xC2,0xC0,0xC0,0xC0,0xC0,0xC2,0x66,0x3C }, // 'C'
This matches the BDF content. The information is the same, but presented differently.
6. Deployment
If we've done all the previous steps correctly, a simple make in /gnu-efi will generate the .efi files:
$ make
[...]
  CC       baeldung.o
  LD       baeldung.so
  OBJCOPY  baeldung.efi
  CC       baeldung-gui.o
  LD       baeldung-gui.so
  OBJCOPY  baeldung-gui.efi
[...]
make[1]: Leaving directory '/home/francesco/temp/gnu-efi/x86_64/apps'
The .efi binaries are PE32+ executables:
$ cd x86_64/apps/
[...]/gnu-efi/x86_64/apps$ file baeldung.efi
baeldung.efi: PE32+ executable (EFI application) x86-64 (stripped to external PDB), for MS Windows, 6 sections
[...]/gnu-efi/x86_64/apps$ file baeldung-gui.efi
baeldung-gui.efi: PE32+ executable (EFI application) x86-64 (stripped to external PDB), for MS Windows, 6 sections
We're ready to test our UEFI applications.
6.1. Deploy on QEMU
We're going to boot UEFI in QEMU, assuming we installed the ovmf package as we saw in the first steps.
Let's make sure we're in the /gnu-efi directory before running these commands:
$ mkdir -p ESP/EFI/BOOT
$ cp ./x86_64/apps/baeldung.efi ESP/EFI/BOOT/BOOTX64.EFI
$ qemu-system-x86_64 \
  -bios /usr/share/ovmf/OVMF.fd \
  -drive file=fat:rw:ESP,format=raw,media=disk \
  -m 256
This way, we start a 64-bit x86 virtual machine using the OVMF UEFI firmware, expose the host's ESP directory - regardless of its native Linux file system - as a FAT-formatted read-write disk for the EFI system partition, and allocate 256 MB of RAM.
Our text-only program works as expected:
To test the GUI program, we can copy its .efi file and run QEMU again with the same parameters as before:
$ cp ./x86_64/apps/baeldung-gui.efi ESP/EFI/BOOT/BOOTX64.EFI
$ qemu-system-x86_64 [... same parameters ...]
Again, the behavior is as expected:
QEMU should be our primary test environment so that any bugs won't affect the host system.
6.2. Deploy on USB Stick for Real Hardware
The operation of our .efi binaries on a real machine is identical to what we've already seen with QEMU.
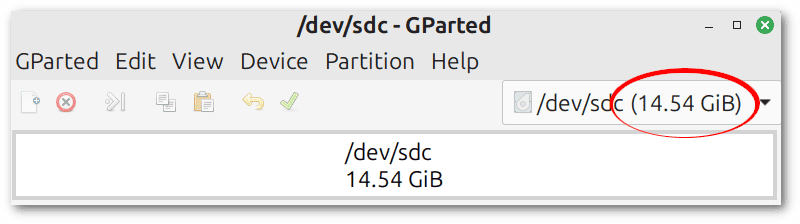
First, let's disable secure boot and check the device name of our USB stick. If in doubt, GParted can show it:
 Our prepare-usb.sh script does everything necessary to safely partition, format, and install an .efi file:
$ sudo ./prepare-usb.sh /dev/sdc ./x86_64/apps/baeldung-gui.efi
-> Checking for mounted partitions on /dev/sdc...
WARNING: This will permanently erase all data on /dev/sdc.
Are you sure you want to continue? [y/N] y
-> Preparing /dev/sdc...
mkfs.fat 4.2 (2021-01-31)
USB stick (/dev/sdc) is now UEFI-bootable!
The sequence of commands to boot from a USB stick depends on the firmware. Often, simply pressing a key such as ESC when the computer is turned on will access the boot manager.
7. Conclusion
In this article, we walked through the full lifecycle of creating UEFI text-only and GUI applications.
We explored key UEFI services, such as console input/output and Graphics Output Protocol, implemented helper routines for input parsing and scaled character rendering, and automated font conversion from BDF to a C header.
Then, we demonstrated how to compile and package our .efi binaries, test them in QEMU, and prepare a bootable USB stick for real hardware. As always, all of the code used in this article is available over on GitHub.