1. Introduction

One common task when working with cloud applications is writing code that communicates with external applications via the network.

For that, we can leverage the Ambassador Pattern to create a single piece of code that contains all the necessary networking components, thereby favoring reusability.

In this tutorial, we’ll delve into the Ambassador Pattern, exploring when it’s a suitable choice for our systems and how to implement it in Java.

2. What Is the Ambassador Pattern?

The Ambassador Pattern is a structural design pattern that serves as a network proxy between a client and a server. We can envision it as a library that encapsulates most of the networking activities involved when programmatically calling external services.

Its primary purpose is to abstract network routing, observability, retry, and circuit breaker mechanisms, as well as caching and security workflows.

Furthermore, when implemented in a separate container, it serves as a language-agnostic means of communication with other clients, as all work is done via network interfaces.

Therefore, we can encapsulate the network client logic into a separate library or container, called an Ambassador, and expose it as a dependency that we can integrate into our code or as an API that we can call via a network request.

3. Implementing the Ambassador Pattern in Java

In this section, we’ll create an Ambassador implementation that acts as a proxy for external HTTP calls, incorporating retry, timeout, and standard output mechanisms:

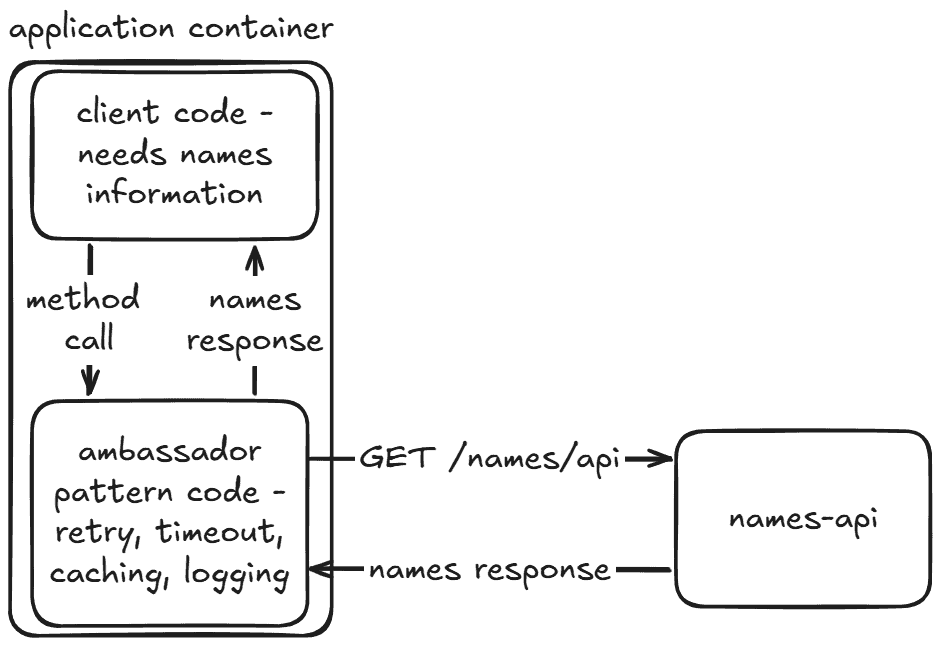
Interaction between the client-side Ambassador pattern, the client code, and the external API.

Noticeably, the Ambassador code lives in the same container as the client code. Thus, the client can call the Ambassador client through a simple method call to get the result from names-api.

3.1. Adding the Necessary Configurations

To illustrate the Ambassador implementation, we’ll first use the spring-web dependency to make our HTTP calls using the RestTemplate bean:

<dependency>
    <groupId>org.springframework</groupId>
    <artifactId>spring-web</artifactId>
    <version>6.2.7</version>
</dependency>

We’ll also need the spring-retry dependency to illustrate a possible retry logic in our Ambassador configuration:

<dependency>
    <groupId>org.springframework.retry</groupId>
    <artifactId>spring-retry</artifactId>
    <version>2.0.12</version>
</dependency>

Then, we’ll need the values for connect and read timeouts, and the API URL of our HTTP calls in the application.properties file:

http.client.connect-timeout-seconds=2000
http.client.read-timeout-seconds=3000
names-api-url=https://domain.com/names/api

Also, we’ll need a configured RestTemplate bean to use the pre-defined timeouts:

@Configuration
public class RestTemplateConfig {
    private final int connectTimeoutSeconds;
    private final int readTimeoutSeconds;
    private final RestTemplateBuilder restTemplateBuilder;
    
    // all-args constructor

    @Bean
    public RestTemplate restTemplate() {
        return restTemplateBuilder.setConnectTimeout(Duration.ofMillis(connectTimeoutSeconds))
          .setReadTimeout(Duration.ofMillis(readTimeoutSeconds))
          .build();
    }
}

Finally, we need to add the @EnableRetry and @EnableCaching annotations in our Spring Boot’s main class:

@EnableRetry
@EnableCaching
@SpringBootApplication
public class AmbassadorPatternApplication {
    public static void main(String[] args) {
        SpringApplication.run(AmbassadorPatternApplication.class, args);
    }
}

3.2. Implementing the Ambassador REST Client

With all set, we can create our HTTP Client that works as the Ambassador:

@Component
public class HttpAmbassadorNamesApiClient {

    private final RestTemplate restTemplate;
    private final Logger logger = LoggerFactory.getLogger(HttpAmbassadorNamesApiClient.class);
    public final String apiUrl;

    public HttpAmbassadorNamesApiClient(RestTemplate restTemplate, @Value("${names-api-url}") String apiUrl) {
        this.restTemplate = restTemplate;
        this.apiUrl = apiUrl;
    }

    @Cacheable(value = "httpResponses", key = "#root.target.apiUrl", unless = "#result == null")
    @Retryable(value = { HttpServerErrorException.class }, maxAttempts = 5, backoff = @Backoff(delay = 1000))
    public String getResponse() {
        try {
            String result = restTemplate.getForObject(apiUrl, String.class);
            logger.info("HTTP call completed successfully to url={}", apiUrl);
            return result;
        } catch (HttpClientErrorException e) {
            logger.error("HTTP Client Error error_code={} message={}", e.getStatusCode(), e.getMessage());
            throw e;
        }
    }

    @Recover
    public String recover(Exception e) {
        final String defaultResponse = "default";
        logger.error("Too many retry attempts. Falling back to default. error={} default={}", e.getMessage(), defaultResponse);
        return defaultResponse;
    }
}

The responsibility of the HttpAmbassadorNamesApiClient class is to have a fully configured client code to fetch names from an external /names/api. For that, we inject our pre-configured RestTemplate with connect and read timeouts already set in applications.properties. Additionally, we inject the apiUrl defined in the names-api-url.

Then, we define the method getResponse() to execute the REST call. That method has some critical nuances to illustrate the Ambassador pattern:

  • First, it defines a cache using the @Cacheable annotation to store the results in memory. For the sake of simplicity, we defined a cache without setting a time-to-live (TTL) value, and the key for stored values is the apiUrl. There might be some opportunity there.
  • Secondly, we define a retry strategy using @Retryable for the external REST call, suggesting that for HttpServerErrorExceptions, we retry at most five times every one second. Hence, we also define a recovery strategy that returns a default string and outputs the result when all retry attempts have been made.
  • Finally, we use the getForObject() method from RestTemplate to get the resource from the API defined in the route apiUrl. If successful, we use SLF4J to log a success message and return the result. Otherwise, if a HttpClientErrorException error happens, we log an error message and throw the error to the caller.

With that, we can inject HttpAmbassadorNamesApiClient in the client code, and call the getResponse() method to accomplish the REST calls.

4. Ambassador as a Sidecar Container

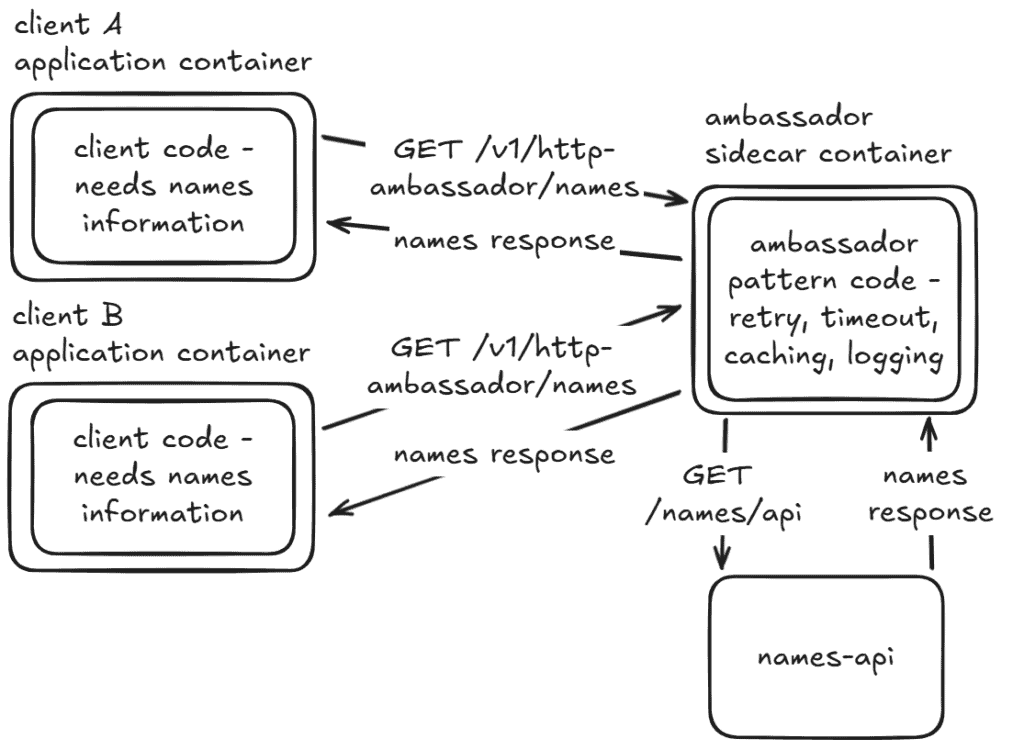
We can also implement an Ambassador in a separate container and make it available through an exposed REST API. Hence, we can create a language-agnostic logic to call an external API with all the configurations mentioned previously, such as retry, caching, and observability:

![Interaction between the sidecar Ambassador pattern, two clients`containers and the external API.](/wp-content/uploads/2025/06/sidecar-ambassador-pattern-1024x750.png)

As clients and the Ambassador are in different containers, we need to implement a network communication between them to get the names-api result.

Supposing, for instance, that we have a problem where two client services are written in different languages, both of which depend on a single server API. In that case, we’d need to write the same network client code twice in different languages, one for each client. Hence, with Ambassador in a different container, we can make both clients depend only on the Ambassador API to accomplish the requirement.

4.1. Exposing the Ambassador API

With that, we can expose an endpoint that will serve as the Ambassador for other client applications:

@RestController
@RequestMapping("/v1/http-ambassador/names")
public class HttpAmbassadorNamesController {
    private final HttpAmbassadorNamesApiClient httpAmbassadorNamesApiClient;

    public HttpAmbassadorController(HttpAmbassadorNamesApiClient httpAmbassadorNamesApiClient) {
        this.httpAmbassadorNamesApiClient = httpAmbassadorNamesApiClient;
    }

    @GetMapping
    public String get() {
        return httpAmbassadorNamesApiClient.getResponse();
    }
}

Here, we’ve defined a /v1/http-ambassador/names resource, allowing clients to access the external resource names/api through the Ambassador.

The primary purpose of having an HTTP client with all these configurations and an endpoint exposed is to condense that logic into a single place, instead of copying and pasting it to different applications. For instance, if two applications, one written in Python and another in Go, want to access the names API, they can call the Ambassador and take advantage of the timeouts, retries, caching, and logging strategies.

5. Advantages and Disadvantages

One significant advantage of using such a pattern is the reusability of code. In either approach, whether the Ambassador is used as a dependency or as a REST API, all the code is written once to be used by many clients, which favors reusability through a single, cohesive interface.

Additionally, the Ambassador favors maintainability since we have only one place to provide code maintenance, instead of having the same logic spread across different clients. For instance, changing the external resource URL or adding a new field in the response payload is easier to implement and test when done in just one place, which is the Ambassador.

One disadvantage of considering the Ambassador as a REST API approach is that it adds an extra layer of network, which naturally introduces latency. Thus, for latency-critical systems, where the end-user’s response time should be optimal, the ambassador sidecar isn’t indicated. Additionally, it adds a potential point of failure, since containers aren’t always reliable. Thus, the Ambassador can also negatively impact the system’s availability.

6. Conclusion

In this article, we learned how to implement a configured Ambassador application that serves as a network proxy for different client applications.

We explored retry, caching, timeout and added them in one place, aiming to improve our system’s maintainability with the Ambassador pattern. Additionally, we discussed situations where it may not be advisable to use it, due to increased latency and potential decreased availability.

As always, the source code is available over on GitHub.