1. 引言
本文将介绍如何通过YML文件和模式引用为REST接口生成Swagger UI文档。我们将遵循Swagger解析规则,把生成API所需的所有代码独立维护。
我们将从零开始讲解使用YML文件生成Swagger UI的实现细节。
2. 将Swagger逻辑独立到YML文件
先看将Swagger逻辑独立到YML文件(或JSON文件)的情况:
openapi: 3.0.1
info:
  title: User API
  version: "1.0"
  description: API for User Management
paths:
  /users/all:
    get:
      summary: Get all users
      description: Returns a list of users
      responses:
        "200":
          description: Successful response
这种做法的核心优势是关注点清晰分离,避免文档细节污染实际应用代码。更重要的是,这种方式通常能促进协作,让QA测试人员或产品经理等非开发人员直接参与API文档的更新。
另一个显著优点是可复用性——同一份文档文件常可在多个微服务或团队间共享或适配。
此外,独立维护文档支持专门的版本控制,通过独立跟踪变更来支持更正式的API治理流程。
但这种方法也有明显挑战。最突出的缺点是需要手动更新:如果API代码变更,必须同步更新独立的文档文件。
最后,调试实际API行为与文档规范之间的差异可能更困难,因为代码中的API方法与独立文件中的描述没有直接关联。
3. 项目初始化
开始设置Spring Boot项目。访问Spring Initializer并应用以下配置:
- Project: Maven
- Language: Java
- Spring Boot Version: 3.4.4 (或任何稳定版)
- Group: com.baeldung
- Artifact: swaggeryml
- Description: Demo project for Swagger using YML
- Packaging: JAR
- JDK: 17
还需添加*spring-doc*依赖:
<dependency>
    <groupId>org.springdoc</groupId>
    <artifactId>springdoc-openapi-starter-webmvc-ui</artifactId>
    <version>2.4.0</version>
</dependency>
同时添加*spring-boot-starter-web*依赖:
<dependency>
    <groupId>org.springframework.boot</groupId>
    <artifactId>spring-boot-starter-web</artifactId>
</dependency>
spring-boot-starter-web是核心依赖,它引入了Spring MVC和嵌入式Web服务器(默认Tomcat)。它为Spring Boot应用提供Web应用所需的基础设施,使其能处理特定路径(*/swagger-ui.html, /v3/api-docs*及自定义接口)的HTTP请求。
4. 配置application.properties
在application.properties中添加配置,确保YML文件被正确识别:
spring.application.name=demo
springdoc.api-docs.enabled=true
springdoc.api-docs.path=/v3/api-docs
springdoc.api-docs.resolve-schema-properties=true
springdoc.swagger-ui.url=/openapi.yml
springdoc.swagger-ui.path=/swagger-ui.html
首先,spring.application.name=demo设置应用名。文档相关配置中,springdoc.api-docs.enabled=true启用springdoc-openapi库,使其主动扫描控制器和*@Operation*注解,动态生成OpenAPI v3规范。
springdoc.api-docs.path=/v3/api-docs定义动态生成规范的接口路径。springdoc.swagger-ui.path=/swagger-ui.html设置访问Swagger UI的URL(如http://localhost:8080/swagger-ui.html)。
但对我们当前目标,springdoc.swagger-ui.url=/openapi.yml才是关键,它指示Swagger UI从*/openapi.yml*路径获取并显示定义。
最后,springdoc.api-docs.resolve-schema-properties=true确保springdoc-openapi不仅生成*$ref引用,还正确包含对应的组件定义(如components/schemas/Student*)。
5. 解析Swagger YML文件
现在分析位于resources/static/components/schemas文件夹的OpenAPI YML定义。
5.1 添加版本信息
添加文档遵循的OpenAPI规范版本:
openapi: 3.1.0
info:
  title: Student API
  description: Following documentation explain the API's supported by the [student server](http://localhost:8080).
  version: 1.1.9
OpenAPI YML文件以openapi关键字开头,指定使用的规范版本。info部分提供API文档的概览。
5.2 添加服务器信息
servers部分定义服务器环境信息:
servers:
  - url: http://localhost:8080/v1
    description: Prod server
    variables:
      region:
        default: us-west
        enum:
          - us-west
          - us-east
  - url: http://localhost:8080/test
    description: Test server
5.3 在YML中定义REST接口
定义REST接口:
paths:
  /students:
    get:
      tags:
        - Students
      summary: Returns all the students.
      description: Following path gives all the data related to students
      responses:
        "200":
          description: A JSON array of student objects
          content:
            application/json:
              schema:
                type: array
                items:
                    $ref: './components/schemas/Student.yml'
  /students/{id}:
    get:
      tags:
        - Students
      summary: Gets a student by ID.
      description: >
        Gives the details of specific student based on **ID**
      operationId: getStudentById
      parameters:
        - name: id
          in: path
          description: Student ID
          required: true
          schema:
            type: integer
            format: int64
      responses:
        "200":
          description: Successful operation
          content:
            application/json:
              schema:
                $ref: './components/schemas/Student.yml'
核心的paths部分包含应用暴露的所有API接口定义。例如*/students路径定义了GET操作。tags用于分组相关操作,summary*提供简短说明。
responses部分定义HTTP操作的所有可能响应(按状态码键入)。响应的description说明内容,content对象定义负载格式(如application/json)。
在content中,schema关键字描述响应体结构。如果是数组,items描述每个元素的schema。常见*$ref引用外部定义(如./components/schemas/Student.yml*)。
注意:YML文件中所有关键字区分大小写。
5.4 添加模式定义文件
最佳实践是使用引用定义模式,并在OpenAPI中组织数据对象结构。
以下模式定义应放在resources/static/components/schemas文件夹:
type: object
properties:
  id:
    type: integer
    format: int64
  name:
    type: string
  rollNo:
    type: string
5.5 输出效果
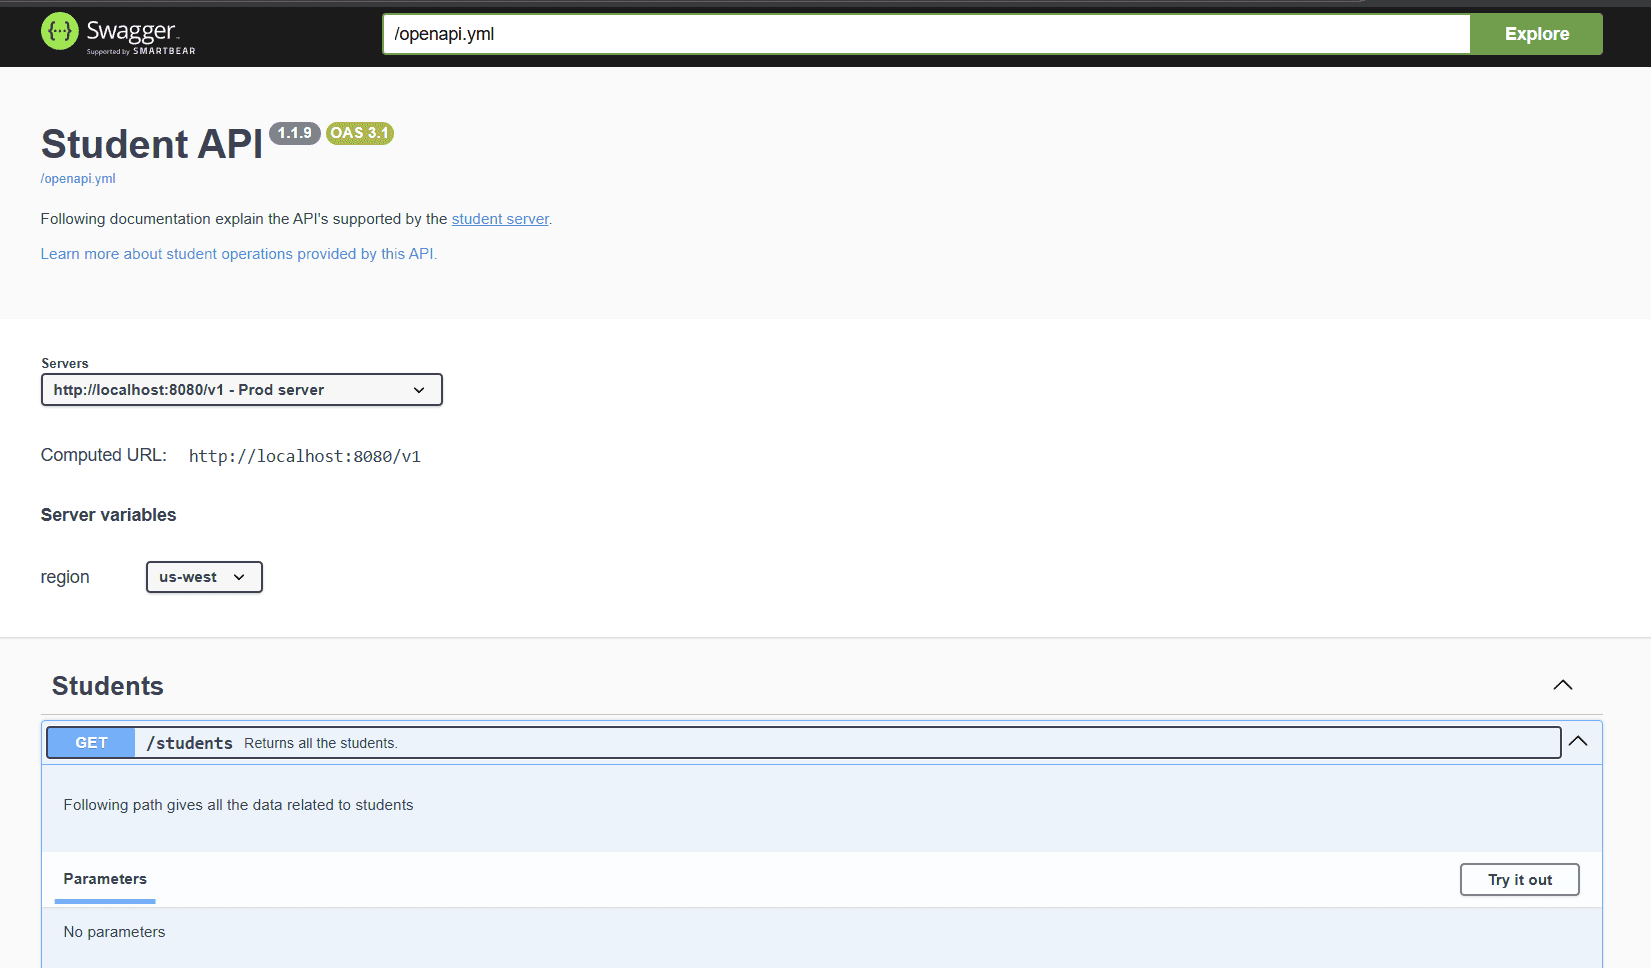
运行应用后,可看到文档展示"Student API"(版本1.1.9,基于OpenAPI 3.1规范)。清晰显示生产服务器URL(http://localhost:8080/v1)和具体接口(如获取所有学生数据的*/students* GET请求)。访问Swagger URL查看效果:
6. 结论
本文探讨了通过独立YML文件维护Swagger UI的利弊。选择哪种方式取决于项目具体场景:
✅ 小型项目/快速原型:注解方式速度快、同步紧密,维护简单
✅ 大型系统/微服务:YML文件分离提供更好的结构、复用性和代码整洁性
⚠️ 协作需求强:YML文件便于非开发人员参与文档维护
❌ 手动同步风险:代码变更需同步更新YML文件
最终方案需在开发效率与文档治理间权衡。本文代码可在GitHub获取。