1. 引言
本文将探讨如何使用PKCE(Proof Key for Code Exchange)机制为OAuth 2.0公共客户端(如单页应用SPA)提供安全认证。我们将深入分析PKCE如何解决授权码拦截攻击,并通过Spring Security实现完整流程。
2. 背景知识
单页应用(SPA)或移动应用这类OAuth 2.0公共客户端在使用授权码模式时,极易遭受授权码拦截攻击。当客户端与服务器通信经过不安全网络时,恶意攻击者可能截获从授权接口返回的授权码。
一旦攻击者获取授权码,就能用它换取访问令牌。此后攻击者可像合法用户一样访问受保护资源,造成严重安全风险。例如在金融应用中,攻击者可能获取敏感财务数据。
2.1. OAuth授权码拦截攻击
下图展示了攻击者如何滥用授权码获取访问令牌的流程:
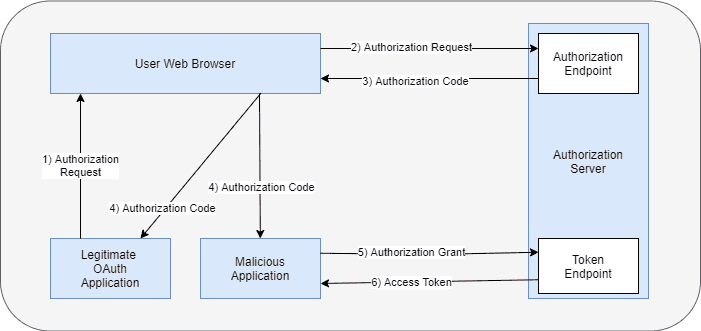
- 合法OAuth应用通过浏览器发起授权请求
- 浏览器将请求发送至授权服务器
- 授权服务器向浏览器返回授权码
- 若通信发生在不安全通道,攻击者此时可能截获授权码
- 攻击者用截获的授权码向授权服务器换取访问令牌
- 由于授权码有效,授权服务器向攻击者颁发令牌。攻击者可冒充合法用户访问受保护资源
PKCE作为OAuth框架的扩展,正是为缓解此类攻击而设计。
3. PKCE与OAuth结合
PKCE扩展在OAuth授权码流程中增加了以下关键步骤:
- 客户端在初始授权请求中额外携带
code_challenge和code_challenge_method参数 - 客户端在后续用授权码换取令牌时,必须提供
code_verifier参数
具体实现流程:
- 客户端生成一个加密随机值作为
code_verifier(每个授权请求唯一) - 根据PKCE规范,
code_verifier长度需在43-128字节之间 code_verifier仅允许包含字母数字和特定符号- 使用支持的
code_challenge_method(如plain或S256)将code_verifier转换为code_challengeplain:直接使用原始值(不推荐)S256:对code_verifier进行SHA-256哈希后Base64编码(推荐)
3.1. 防御授权码拦截攻击
下图展示PKCE如何阻止令牌窃取:
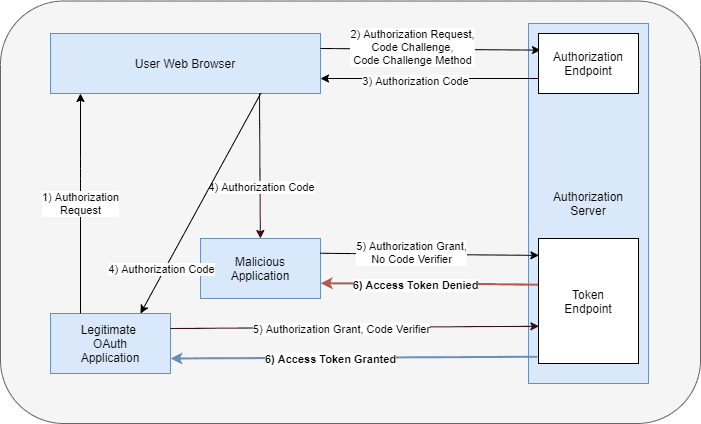
- 合法应用发起授权请求,额外携带
code_challenge和code_challenge_method - 授权服务器存储这些参数并返回授权码
- 攻击者可能截获授权码
- 攻击者尝试用授权码换取令牌,但**缺少
code_verifier**,请求被拒绝 - 合法应用**提供正确的
code_verifier**换取令牌 - 授权服务器验证:
- 用存储的
code_challenge_method将code_verifier转换为code_challenge - 与之前存储的
code_challenge比对 - 验证通过后颁发令牌
- 用存储的
4. Spring Security中的PKCE实现
Spring Security 6.3版本起同时支持Servlet和Reactive应用的PKCE。但默认未启用(因部分身份提供商尚未支持)。当客户端运行在不可信环境(如浏览器)且未配置client_secret时,PKCE会自动启用。
4.1. Maven配置
通过添加Spring授权服务器依赖即可支持PKCE:
<dependency>
    <groupId>org.springframework.boot</groupId>
    <artifactId>spring-boot-starter-oauth2-authorization-server</artifactId>
    <version>3.3.0</version>
</dependency>
4.2. 注册公共客户端
在application.yml中配置SPA客户端:
spring:
  security:
    oauth2:
      authorizationserver:
        client:
          public-client:
            registration:
              client-id: "public-client"
              client-authentication-methods:
                - "none"
              authorization-grant-types:
                - "authorization_code"
              redirect-uris:
                - "http://127.0.0.1:3000/callback"
              scopes:
                - "openid"
                - "profile"
                - "email"
            require-authorization-consent: true
            require-proof-key: true
关键配置说明:
client-authentication-methods: none:标识为公共客户端require-authorization-consent: true:强制用户二次确认权限范围require-proof-key: true:防止PKCE降级攻击,确保必须使用PKCE流程
4.3. Spring Security配置
配置授权服务器的安全过滤器链:
@Bean
@Order(1)
SecurityFilterChain authorizationServerSecurityFilterChain(HttpSecurity http) throws Exception {
    OAuth2AuthorizationServerConfiguration.applyDefaultSecurity(http);
    http.getConfigurer(OAuth2AuthorizationServerConfigurer.class)
      .oidc(Customizer.withDefaults());
    http.exceptionHandling((exceptions) -> exceptions.defaultAuthenticationEntryPointFor(new LoginUrlAuthenticationEntryPoint("/login"), new MediaTypeRequestMatcher(MediaType.TEXT_HTML)))
      .oauth2ResourceServer((oauth2) -> oauth2.jwt(Customizer.withDefaults()));
    return http.cors(Customizer.withDefaults())
      .build();
}
配置默认安全过滤器链(处理登录页等请求):
@Bean
@Order(2)
SecurityFilterChain defaultSecurityFilterChain(HttpSecurity http) throws Exception {
    http.authorizeHttpRequests((authorize) -> authorize.anyRequest()
      .authenticated())
      .formLogin(Customizer.withDefaults());
    return http.cors(Customizer.withDefaults())
      .build();
}
由于SPA(运行在http://127.0.0.1:3000)与授权服务器(端口9000)跨域,需配置CORS:
@Bean
CorsConfigurationSource corsConfigurationSource() {
    UrlBasedCorsConfigurationSource source = new UrlBasedCorsConfigurationSource();
    CorsConfiguration config = new CorsConfiguration();
    config.addAllowedHeader("*");
    config.addAllowedMethod("*");
    config.addAllowedOrigin("http://127.0.0.1:3000"); // 注意:不能用localhost
    config.setAllowCredentials(true);
    source.registerCorsConfiguration("/**", config);
    return source;
}
创建测试用户:
@Bean
UserDetailsService userDetailsService() {
    PasswordEncoder passwordEncoder = PasswordEncoderFactories.createDelegatingPasswordEncoder();
    UserDetails userDetails = User.builder()
      .username("john")
      .password("password")
      .passwordEncoder(passwordEncoder::encode)
      .roles("USER")
      .build();

    return new InMemoryUserDetailsManager(userDetails);
}
4.4. 公共客户端实现
使用React作为SPA示例,依赖oidc-client-ts库。配置文件pkceAuthConfig.js:
const pkceAuthConfig = {
  authority: 'http://127.0.0.1:9000/',
  client_id: 'public-client',
  redirect_uri: 'http://127.0.0.1:3000/callback',
  response_type: 'code',
  scope: 'openid profile email',
  post_logout_redirect_uri: 'http://127.0.0.1:3000/',
  userinfo_endpoint: 'http://127.0.0.1:9000/userinfo',
  response_mode: 'query',
  code_challenge_method: 'S256', // 关键:启用S256挑战
};

export default pkceAuthConfig;
主应用组件App.js:
import React, { useState, useEffect } from 'react';
import { BrowserRouter, Routes, Route } from 'react-router-dom';
import Login from './components/LoginHandler';
import CallbackHandler from './components/CallbackHandler';
import pkceAuthConfig from './pkceAuthConfig';
import { UserManager, WebStorageStateStore } from 'oidc-client-ts';

function App() {
    const [authenticated, setAuthenticated] = useState(null);
    const [userInfo, setUserInfo] = useState(null);

    const userManager = new UserManager({
        userStore: new WebStorageStateStore({ store: window.localStorage }),
        ...pkceAuthConfig,
    });

    function doAuthorize() {
        userManager.signinRedirect({state: '6c2a55953db34a86b876e9e40ac2a202',});
    }

    useEffect(() => {
        userManager.getUser().then((user) => {
            if (user) {
                setAuthenticated(true);
            }
            else {
                setAuthenticated(false);
            }
      });
    }, [userManager]);

    return (
      <BrowserRouter>
          <Routes>
              <Route path="/" element={<Login authentication={authenticated} handleLoginRequest={doAuthorize}/>}/>
              <Route path="/callback"
                  element={<CallbackHandler
                      authenticated={authenticated}
                      setAuth={setAuthenticated}
                      userManager={userManager}
                      userInfo={userInfo}
                      setUserInfo={setUserInfo}/>}/>
          </Routes>
      </BrowserRouter>
    );
}

export default App;
5. 测试验证
使用React应用测试PKCE流程。执行npm install安装依赖后,通过npm start启动应用。
5.1. 获取授权码
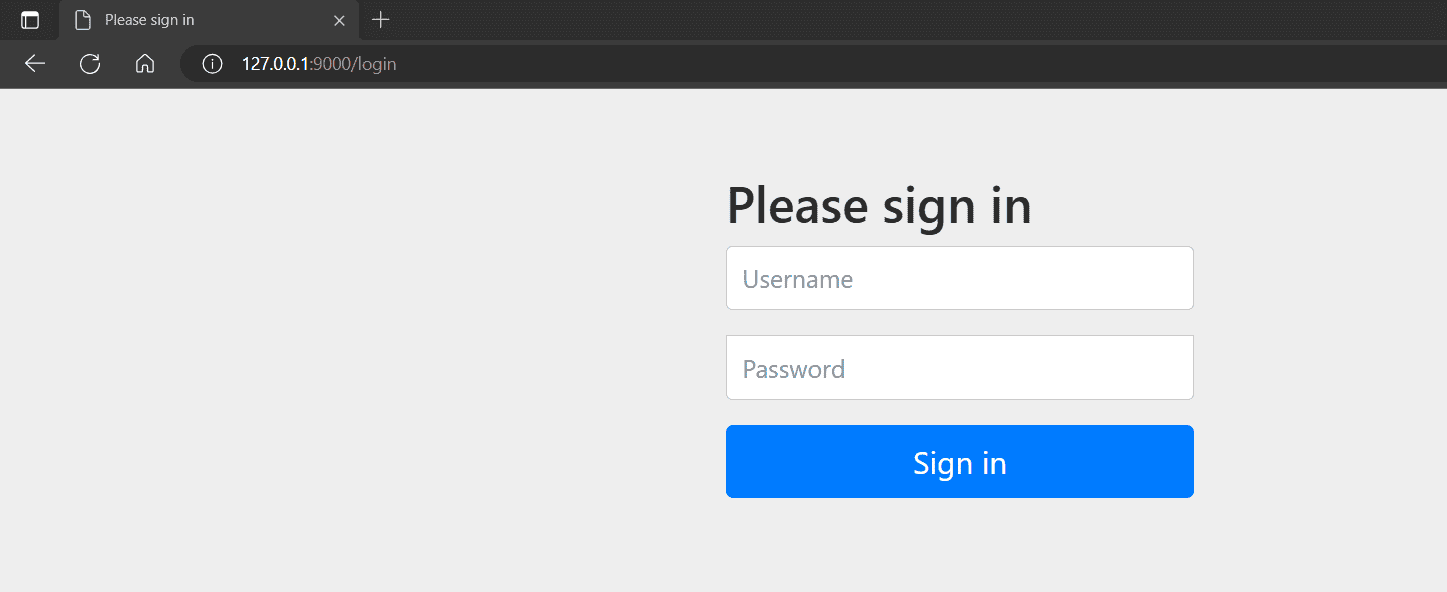
访问http://127.0.0.1:3000显示登录页:
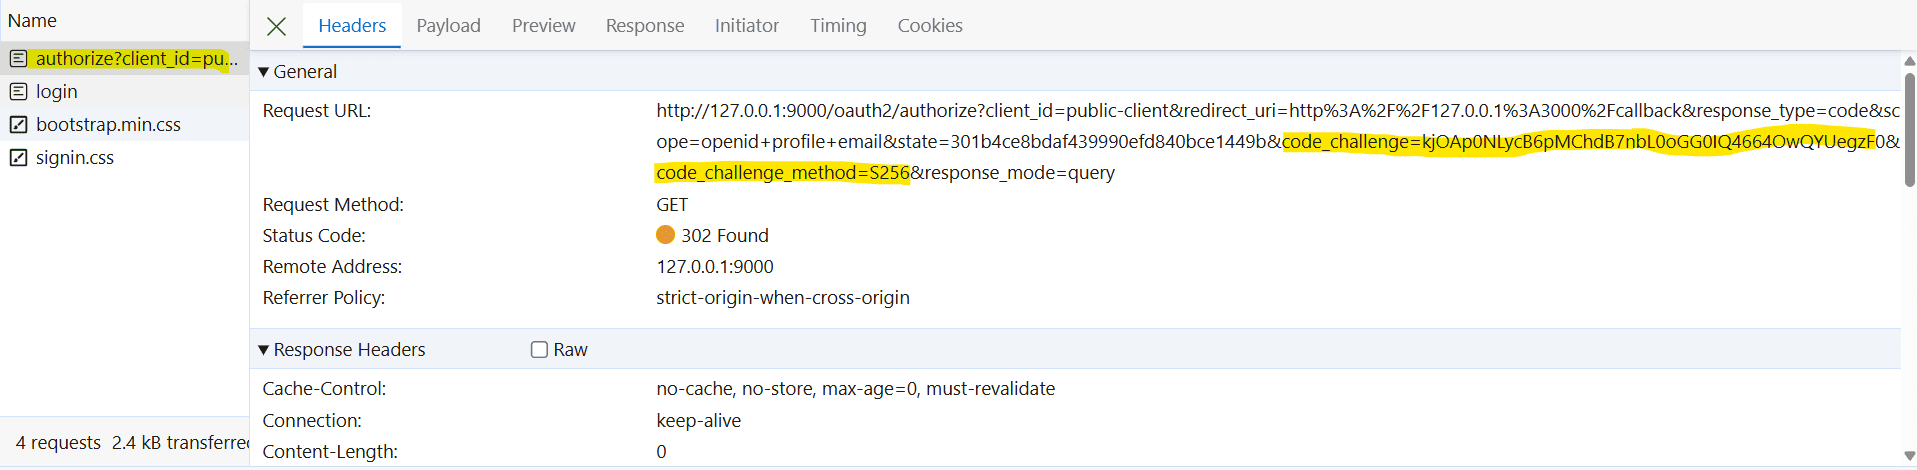
点击登录后,SPA向授权服务器发起请求(携带PKCE参数):
http://127.0.0.1:9000/oauth2/authorize?
client_id=public-client&
redirect_uri=http%3A%2F%2F127.0.0.1%3A3000%2Fcallback&
response_type=code&
scope=openid+profile+email&
state=301b4ce8bdaf439990efd840bce1449b&
code_challenge=kjOAp0NLycB6pMChdB7nbL0oGG0IQ4664OwQYUegzF0&  // 关键参数
code_challenge_method=S256&  // 关键参数
response_mode=query
授权服务器重定向到Spring Security登录页:
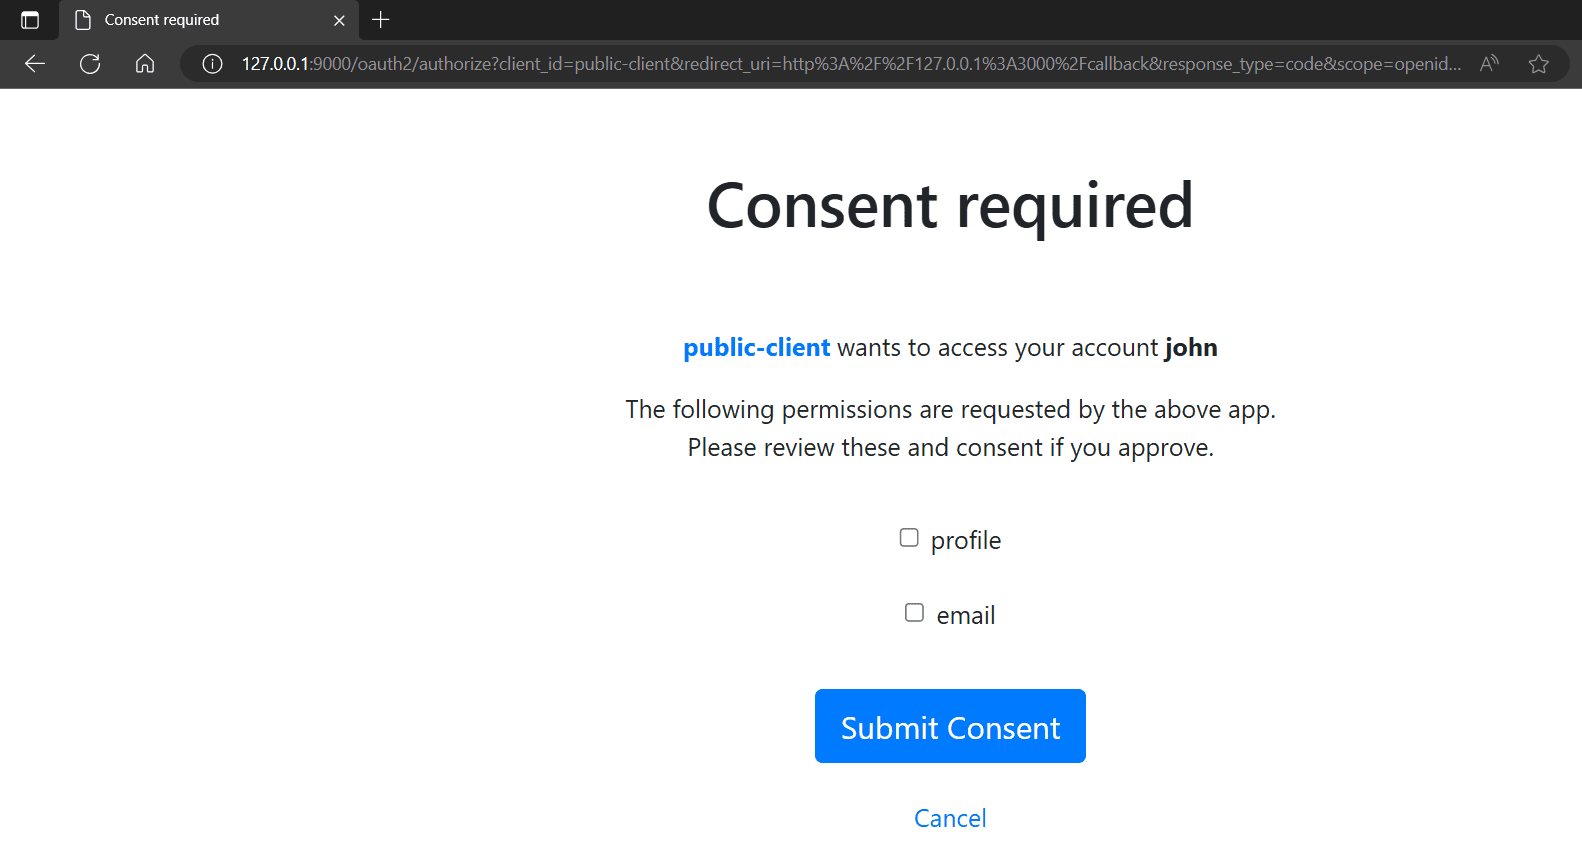
登录后显示权限确认页(因配置了require-authorization-consent: true):
5.2. 用授权码换取令牌
确认权限后,授权服务器返回授权码。SPA随即发起令牌请求(**携带授权码和code_verifier**):

授权服务器响应访问令牌:

最后SPA用令牌访问/userinfo接口获取用户信息:

6. 总结
本文完整演示了在Spring授权服务器中为单页应用实现PKCE认证的流程。关键点包括:
✅ PKCE有效防御授权码拦截攻击
✅ Spring Security通过require-proof-key强制启用PKCE
✅ 客户端需生成code_verifier并转换为code_challenge
✅ 令牌交换时必须提供原始code_verifier进行验证
完整代码可在GitHub仓库获取。实际开发中请务必:
- 始终使用
S256挑战方法 - 确保HTTPS传输
- 对公共客户端启用PKCE强制验证