2. 背景
PKCE(Proof Key for Code Exchange)是OAuth协议的扩展,最初针对公共客户端(如SPA应用或移动App)设计。它作为授权码流程的一部分,能有效缓解恶意第三方的攻击。
这类攻击的核心在于:当认证服务器确认用户身份后,通过HTTP重定向发送授权码时,该授权码可能被泄露或拦截。攻击者一旦获取授权码,就能用它换取有效的访问令牌。
有了访问令牌,攻击者就能像合法用户一样访问受保护资源。例如,若令牌关联银行账户,攻击者就能获取账单、投资组合等敏感信息。
3. PKCE对OAuth的改进
PKCE机制在标准授权码流程中增加了几个关键调整:
- 客户端在初始授权请求中发送两个额外参数:
code_challenge和code_challenge_method - 在最后一步(用授权码换取访问令牌时),新增一个参数:
code_verifier
启用PKCE的客户端需执行以下步骤:
首先,生成随机字符串作为 code_verifier 参数。根据 RFC 7636,字符串长度需在43到128字节之间。关键点在于使用安全的随机生成器(如JVM的 SecureRandom)。
除长度外,字符范围也有限制:仅支持ASCII字母数字和少量符号。
**其次,客户端用支持的方法将 code_verifier 转换为 code_challenge**。目前规范仅支持两种转换方法:
-
plain:无转换,code_challenge与code_verifier相同 -
S256:使用SHA-256哈希后进行BASE64编码
客户端随后构建OAuth授权URL,包含常规参数(client_id、scope、state 等)并添加 code_challenge 和 code_challenge_method。
3.1. 授权码挑战验证
在OAuth授权码流程的最后一步,客户端发送原始 code_verifier 值。服务器根据挑战方法进行验证:
-
plain方法:code_verifier必须与挑战值完全相同 -
S256方法:服务器计算提供值的SHA-256哈希并BASE64编码,再与原始挑战值比对
PKCE为何能有效防御授权码攻击? 攻击通常针对认证服务器的重定向(包含授权码)。但启用PKCE后,仅凭授权码无法完成流程(至少对 S256 方法如此)。令牌交换必须同时提供授权码和验证码,而验证码绝不会出现在重定向中。
注意:plain 方法中验证码和挑战码相同,实际应用中应避免使用。
3.2. 机密客户端的PKCE
OAuth 2.0中PKCE是可选的,主要用于移动和Web应用。但即将发布的OAuth 2.1版本要求PKCE不仅对公共客户端,也对机密客户端强制使用。
机密客户端通常指运行在云或本地服务器的托管应用。这类客户端也使用授权码流程,但令牌交换发生在后端与认证服务器之间,用户代理(Web或移动端)无法“看到”访问令牌。
除此之外,步骤与公共客户端完全相同。
4. Spring Security的PKCE支持
从Spring Security 5.7开始,PKCE已完全支持Servlet和Reactive应用。但该特性默认未启用(因部分认证服务器尚未支持)。Spring Boot应用需使用2.7+版本,依赖标准依赖管理确保正确版本。
PKCE支持位于 spring-security-oauth2-client 模块。Spring Boot应用可通过以下starter引入:
<dependency>
    <groupId>org.springframework.boot</groupId>
    <artifactId>spring-boot-starter-webflux</artifactId>
</dependency>
<dependency>
    <groupId>org.springframework.boot</groupId>
    <artifactId>spring-boot-starter-oauth2-client</artifactId>
</dependency>
最新版本可在Maven Central下载。
添加依赖后,需自定义OAuth 2.0登录流程以支持PKCE。Reactive应用需添加 SecurityWebFilterChain Bean:
@Bean
public SecurityWebFilterChain pkceFilterChain(ServerHttpSecurity http,
  ServerOAuth2AuthorizationRequestResolver resolver) {
    http.authorizeExchange(r -> r.anyExchange().authenticated());
    http.oauth2Login(auth -> auth.authorizationRequestResolver(resolver));
    return http.build();
}
**关键步骤是在登录配置中设置自定义 ServerOAuth2AuthorizationRequestResolver**。Spring Security通过该接口构建OAuth授权请求。
无需自行实现,可直接使用 DefaultServerOAuth2AuthorizationRequestResolver 进行定制:
@Bean
public ServerOAuth2AuthorizationRequestResolver pkceResolver(ReactiveClientRegistrationRepository repo) {
    var resolver = new DefaultServerOAuth2AuthorizationRequestResolver(repo);
    resolver.setAuthorizationRequestCustomizer(OAuth2AuthorizationRequestCustomizers.withPkce());
    return resolver;
}
这里传入 ReactiveClientRegistrationRepository 实例,并通过 OAuth2AuthorizationRequestCustomizers.withPkce() 添加PKCE参数。
5. 测试
测试需支持PKCE的认证服务器。本教程使用Spring Authorization Server(Spring家族新成员,可快速构建OAuth 2.1/OIDC兼容服务器)。
5.1. 认证服务器设置
测试环境中,认证服务器作为独立进程运行。项目是标准Spring Boot Web应用,添加以下依赖:
<dependency>
    <groupId>org.springframework.boot</groupId>
    <artifactId>spring-boot-starter-web</artifactId>
</dependency>
<dependency>
    <groupId>org.springframework.security</groupId>
    <artifactId>spring-security-oauth2-authorization-server</artifactId>
</dependency>
最新版本可在Maven Central下载。
认证服务器需配置 RegisteredClientRepository 和 UserDetailsService。测试中可使用内存实现:
@Bean
public RegisteredClientRepository registeredClientRepository() {
    var pkceClient = RegisteredClient
      .withId(UUID.randomUUID().toString())
      .clientId("pkce-client")
      .clientSecret("{noop}obscura")
      .clientAuthenticationMethod(ClientAuthenticationMethod.CLIENT_SECRET_BASIC)
      .authorizationGrantType(AuthorizationGrantType.AUTHORIZATION_CODE)
      .authorizationGrantType(AuthorizationGrantType.REFRESH_TOKEN)
      .authorizationGrantType(AuthorizationGrantType.CLIENT_CREDENTIALS)
      .scope(OidcScopes.OPENID)
      .scope(OidcScopes.EMAIL)
      .scope(OidcScopes.PROFILE)
      .clientSettings(ClientSettings.builder()
        .requireAuthorizationConsent(false)
        .requireProofKey(true)  // 强制PKCE
        .build())
      .redirectUri("http://127.0.0.1:8080/login/oauth2/code/pkce")
      .build();

    return new InMemoryRegisteredClientRepository(pkceClient);
}
关键点是通过 clientSettings() 强制特定客户端使用PKCE,设置 requireProofKey(true)。
测试中客户端与认证服务器同机运行,故使用 127.0.0.1 作为重定向URL主机名(注意:此处不允许使用"localhost")。
最后在 application.properties 中修改端口:
server.port=8085
5.2. 运行实时测试
启动两个项目(IDE或命令行 mvn spring-boot:run),访问 http://127.0.0.1:8080。将看到Spring Security默认登录页:
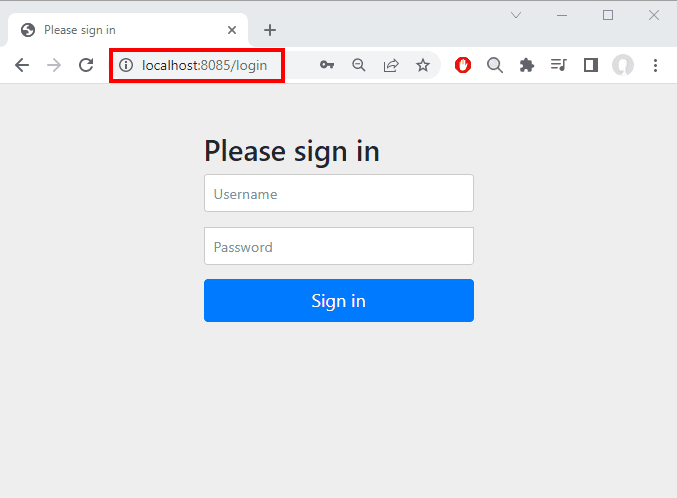
注意地址栏URL为 http://localhost:8085,说明登录页通过重定向来自认证服务器。打开Chrome DevTools查看请求:
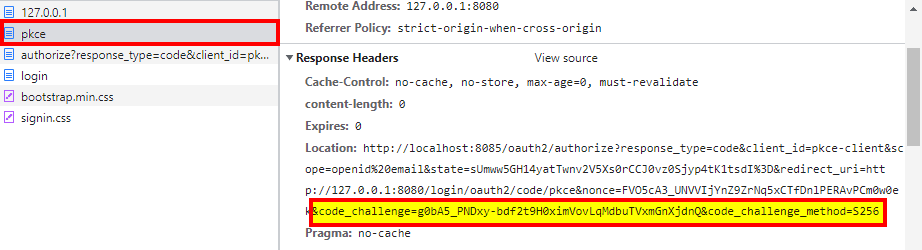
在响应头中可见PKCE参数:
Location: http://localhost:8085/oauth2/authorize?
  response_type=code&
  client_id=pkce-client&
  scope=openid email&
  state=sUmww5GH14yatTwnv2V5Xs0rCCJ0vz0Sjyp4tK1tsdI=&
  redirect_uri=http://127.0.0.1:8080/login/oauth2/code/pkce&
  nonce=FVO5cA3_UNVVIjYnZ9ZrNq5xCTfDnlPERAvPCm0w0ek&
  code_challenge=g0bA5_PNDxy-bdf2t9H0ximVovLqMdbuTVxmGnXjdnQ&
  code_challenge_method=S256
使用凭据 user/password 完成登录。后续请求中不会出现验证码或访问令牌——这正是我们期望的结果。
6. 结论
本教程展示了如何在Spring Security中通过少量代码启用OAuth的PKCE扩展,并使用Spring Authorization Server创建定制测试服务器。
完整代码见GitHub仓库。